Hoover 72-59139 User Guide - Page 5
Storing hose & tools
 |
View all Hoover 72-59139 manuals
Add to My Manuals
Save this manual to your list of manuals |
Page 5 highlights
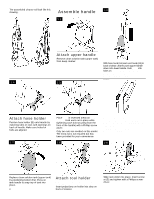
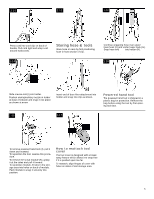
1-10 1 - 1 1 A2 1 - 1 2 F Press cord into cord clip on back of handle. Pull cord tight and wrap cord around hooks (A2). 1 - 1 3 I Storing hose & tools Store hose on rack by first positioning hose in front section of clip. 1 - 1 4 GH Continue wrapping hose over upper hose hook (F) and under lower hook (G). Snap hose end fully into holder (H). Ensure that the hose end is pushed down completely into holder (H). 1 - 1 5 Slide crevice tool (I) into holder. Position stair/upholstery nozzle in holder at base of cleaner and snap it into place as shown at arrow. Insert end of bare floor attachment into holder and snap into clip as shown. Powered hand tool The powered hand tool is shipped in a plastic bag for protection. Remove the bag before using the tool by first opening tool door. 1 - 1 6 1 - 1 7 K J To remove powered hand tool (J), pull it down and outward. To reposition the tool, reverse this procedure. To remove the scrub module (K), grasp it at the sides and pull it forward. To reposition module, fit tabs in the storage area into holes on back of module. Push module to snap it securely into position. How to reattach tool cover The tool cover is designed with a breakaway feature which allows it to snap free if it is pushed open too far. To reattach, align hinges of cover with holes on sides of tool storage area. 5
-
 1
1 -
 2
2 -
 3
3 -
 4
4 -
 5
5 -
 6
6 -
 7
7 -
 8
8 -
 9
9 -
 10
10 -
 11
11 -
12
-
13
-
14
-
15
-
16
 |
 |
