Hoover FH51102PC Product Manual - Page 21
Replace Dirty Water Tank back
 |
View all Hoover FH51102PC manuals
Add to My Manuals
Save this manual to your list of manuals |
Page 21 highlights
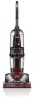
Note: The filter screen is not removable. Attempting to remove the filter screen from the tank may damage it 3 To clean Dirty Water Tank, place it under faucet and dispense high pressure clean water to backflush any loose debris. 4 Be sure to clean the filter screen located in the duct of the recovery tank base. 5 Allow to air dry completely. Pull up on latch, then back down to lock. Latch will snap when locked. Replace Dirty Water Tank back onto unit until it snaps. 18
-
 1
1 -
2
-
3
-
4
-
5
-
6
-
7
-
8
-
9
-
10
-
11
-
12
-
13
-
14
-
15
-
 16
16 -
 17
17 -
 18
18 -
 19
19 -
 20
20 -
 21
21 -
 22
22 -
 23
23 -
 24
24 -
 25
25 -
 26
26 -
27
-
28
-
29
-
30
-
31
-
32
-
33
-
34
-
35
-
36
-
37
-
38
-
39
-
40
-
41
-
42
-
43
-
44
-
45
-
46
-
47
-
48
-
49
-
50
-
51
-
52
-
53
-
54
-
55
-
56
-
57
-
58
-
59
-
60
-
61
-
62
-
63
-
64
 |
 |

18
3
To clean Dirty Water Tank,
place it under faucet and
dispense high pressure
clean water to backflush
any loose debris.
4
5
Be sure to clean the
filter screen located in
the duct of the recovery
tank base.
Allow to air dry completely. Pull
up on latch, then back down to
lock. Latch will snap when locked.
Replace Dirty Water Tank back
onto unit until it snaps.
Note: The filter screen
is not removable.
Attempting to remove
the filter screen from the
tank may damage it