Hoover S2105 Manual - Page 3
How to assemble, Charging, How to use, Maintenance - battery
 |
UPC - 073502028018
View all Hoover S2105 manuals
Add to My Manuals
Save this manual to your list of manuals |
Page 3 highlights
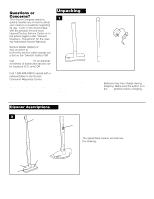
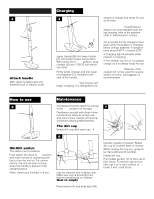
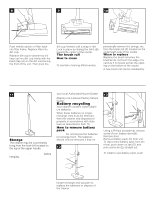
NORTH CANTON FOR SERVICE. 3 B A C How to assemble Attach handle With upper handle button (A) towards back of cleaner, push Charging 4 C A B upper handle (B) into lower handle (C) until button snaps into position. With switch (A) in OFF position, plug charger (B) into 110/120 volt electrical outlet. Firmly press charger end into cleaner receptacle (C), located on the side of the handle. Press firmly on cleaner to ensure that end of cord is fully connected. Your cleaner will begin charging. It is designed to be stored on charge and ready for use at all times. Charge batteries for 16 hours before initial use. If performance drops to an unacceptable level during cleaning, refer to the problem chart in "Maintenance" section. NOTE: • It is normal for the charger to feel warm when the battery is charging. Never charge batteries in temperatures above100o F or below 32oF. • Charging light illuminates when cleaner is charging. • The cleaner can be on a constant charge so it is always ready for use. Make sure it is in OFF position before charging. However, if the cleaner will not be used for several weeks at a time, unplugging it is recommended. Do not use an outlet which is con- How to use 5 A trolled with a wall switch for charging your cleaner. ON-OFF switch The switch has 2 positions. Push switch (A) down to ON position and lower handle to operating position to turn the unit on. For convenience, the unit will stop running when the handle is placed in the upright position. When cleaning is finished, it is rec- Maintenance ommended that the switch be turned to the OFF position for storage. Familiarize yourself with these home maintenance tasks as proper use and care of your cleaner will ensure continued cleaning effectiveness. The dirt cup Empty dirt cup after each use. It 6 BA C may be cleaned with a damp cloth. Make sure cup is thoroughly dry before repositioning on cleaner. How to empty Turn switch to OFF position. Press button (A) and slide latch (B) 7 B C A towards outside of cleaner. Rotate dirt cup (C) toward back of cleaner. While holding dirt cup (A), grasp filter frame (B) and lift out filter. Empty dirt cup. Pull middle section (C) of filter out of filter frame. To remove debris from filter, tap it on a hard surface or brush it with a soft brush. 3
-
 1
1 -
 2
2 -
 3
3 -
 4
4 -
 5
5 -
 6
6
 |
 |
