Hoover SmartWash PET Complete Automatic Bundle Product Manual English
Hoover SmartWash PET Complete Automatic Bundle Manual
 |
View all Hoover SmartWash PET Complete Automatic Bundle manuals
Add to My Manuals
Save this manual to your list of manuals |
Hoover SmartWash PET Complete Automatic Bundle manual content summary:
- Hoover SmartWash PET Complete Automatic Bundle | Product Manual English - Page 1
USER MANUAL AUTOMATIC CARPET CLEANER IMPORTANT: Read all instructions carefully before assembly and use. This product is intended for Household use only. If used Commercially warranty is VOID. © 2020 Techtronic Floor Care Technology Limited. - Hoover SmartWash PET Complete Automatic Bundle | Product Manual English - Page 2
Welcome to HOOVER® ownership. Make it official. Register your carpet cleaner by: Visit Hoover.com or Hoover.ca Calling 1-800-944-9200 IT'S GUARANTEED. Get cleaning confidence for up to 5 years with the HOOVER® limited warranty. See warranty, page 23, for complete details. 2 - Hoover SmartWash PET Complete Automatic Bundle | Product Manual English - Page 3
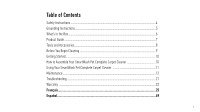
Grounding Instructions...5 What's in the Box...6 Product Guide...7 Tools and Accessories...8 Before You Begin Cleaning...9 Getting Started...10 How to Assemble Your SmartWash Pet Complete Carpet Cleaner 10 Using Your SmartWash Pet Complete Carpet Cleaner 11 Maintenance...13 Troubleshooting...21 - Hoover SmartWash PET Complete Automatic Bundle | Product Manual English - Page 4
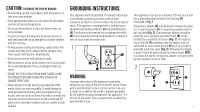
left outdoors, or dropped into water, call customer service at 1-800-944-9200 prior to continuing use the Cleaning Fluid section (page 11) of this manual. • Do not put any object into openings. Do to a properly grounded outlet only. See Grounding Instructions. • Do not pick up anything that is - Hoover SmartWash PET Complete Automatic Bundle | Product Manual English - Page 5
absorbent material (such as a towel) to soak up drips. GROUNDING INSTRUCTIONS: This appliance must be grounded. If it should malfunction or breakdown, result in the risk of electric shock. Check with a qualified electrician or service person if you are in doubt as to whether the outlet is properly - Hoover SmartWash PET Complete Automatic Bundle | Product Manual English - Page 6
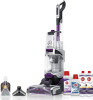
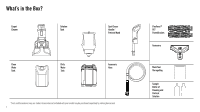
What's in the Box? Carpet Cleaner Solution Tank Clean Dirty Water Water Tank Tank Spot Chaser Handle / Pretreat Wand Accessory Hose *Tools and Accessories vary per model. Accessories not included with your model may be purchased separately by visiting Hoover.com 6 FlexForce™ PET - Hoover SmartWash PET Complete Automatic Bundle | Product Manual English - Page 7
Getting to Know Your HOOVER® SmartWash Pet Complete 1. Triggerless Handle Design & Removable Spot Chaser Pretreat Wand 1 2. Clean Water Tank 3. Filter 4. Dirty Water/Recovery Tank 5. Hose Connection 6. Removable Recovery Nozzle 2 7. Automatic Wash/ Dry LED Display 3 8. Removable FlexForce™ - Hoover SmartWash PET Complete Automatic Bundle | Product Manual English - Page 8
Tools & Accessories: Antimicrobial PET Tool1: Antimicrobial tool that helps prevent bacteria growth and odors. The rubber nubs are for unpleasant stain removal and hygienic clean-ups. CAUTION Not to be used for grooming a pet. Stair Tool1 Crevice Tool1 Upholstery Tool1 1Tools and Accessories - Hoover SmartWash PET Complete Automatic Bundle | Product Manual English - Page 9
from staining carpet. Pin up furniture skirts and draperies. For best results, pretreat stains with a HOOVER® spot treatment (See HOOVER® Cleaning Solutions Guide) to help loosen and remove even the most stubborn stains. Available at additional cost if not included with your model. NOTE: To prevent - Hoover SmartWash PET Complete Automatic Bundle | Product Manual English - Page 10
Getting Started With Your SmartWash Carpet Cleaner: ASSEMBLY 1 Slide the handle into the base until you hear a "click". FILL THE CLEAN WATER TANK 1 Lift up to remove the Clean Water Tank. Fully assemble before operating. FILL THE SOLUTION TANK 1 Remove the Solution Tank from the back of the - Hoover SmartWash PET Complete Automatic Bundle | Product Manual English - Page 11
Using Your SmartWash Pet Complete Carpet Cleaner CAUTION Not to be used for grooming a pet. 1 Unwrap the power cord and plug cleaner in an electrical outlet. 3 Step on the On/Off Pedal to turn ON. 2 Step on the Handle Release Pedal to recline the cleaner to cleaning position. 11 - Hoover SmartWash PET Complete Automatic Bundle | Product Manual English - Page 12
from your carpets. To rinse with clean water only, remove the Solution Tank and then repeat steps 4 through 6. 12 CLEANING FLUID SEE THE HOOVER'S SOLUTIONS GUIDE insert or visit Hoover.com/cleaning-solutions. - Hoover SmartWash PET Complete Automatic Bundle | Product Manual English - Page 13
parts. If appliance is not working as it should, has been dropped, damaged, left outdoors, or dropped into water, call customer service at 1-800-944-9200 prior to continuing use. 1 Turn the cleaner off and unplug from electrical outlet. 3 Place on a flat surface and unlatch Dirty Water - Hoover SmartWash PET Complete Automatic Bundle | Product Manual English - Page 14
Notices IMPORTANT: Regarding the Dirty Water Tank: For full suction it is important that the Dirty Water Tank Lid is securely in place. If misplaced, poor or no suction will result. IMPORTANT: For full suction, it is important that the Dirty Water Tank is properly secured before cleaning. Continue - Hoover SmartWash PET Complete Automatic Bundle | Product Manual English - Page 15
. CAUTION, pull Nozzle carefully outwards and not upwards. ! WARNING ! Risk of personal injury - Brush roll may suddenly restart - unplug before cleaning or servicing. 3 Rinse debris from Nozzle. 4 Position Nozzle onto foot, making sure to align the tabs at the top of the Nozzle with the notches - Hoover SmartWash PET Complete Automatic Bundle | Product Manual English - Page 16
of personal injury - Brush roll may suddenly restart - unplug before cleaning or servicing. 3 Grab Side A and pull up to remove. Repeat on the A handle in upright position, follow "Nozzle: How to Remove and Clean" instructions (page 15). STORAGE Before storing: Empty Clean Water Tank and let air - Hoover SmartWash PET Complete Automatic Bundle | Product Manual English - Page 17
Tools and Accessories HOW TO ATTACH HOSE 1 Open Hose Connection Port. Insert hose end by inserting FIRMLY into Hose Solution Port. ! CAUTION ! Always turn off this product before connecting or disconnecting hose. HOW TO REMOVE HOSE 1 Press trigger on tool to ensure all fluid has discharged from the - Hoover SmartWash PET Complete Automatic Bundle | Product Manual English - Page 18
Tools and Accessories How to Attach Tools 1 To ensure maximum performance and to protect your carpet, be sure to place the handle in the upright position while using the hose. Placing the handle in the upright position shuts off the FlexForce™ PET PowerBrushes. 2 Connect tool to hose by sliding it - Hoover SmartWash PET Complete Automatic Bundle | Product Manual English - Page 19
the machine, press both latches and pull down to release Pretreat Bottle. 2 Unscrew cap and fill with a HOOVER® spot treatment. (See page 9 instructions). 3 Reinstall Pretreat Bottle by pressing the bottle up into the Spot Chaser handle grip. 4 Press and release the "Wand Release" button next to - Hoover SmartWash PET Complete Automatic Bundle | Product Manual English - Page 20
page 9. Pre-spray the area by holding the tool about one inch above the carpet 9 and push it forward while pressing 2 Attach hose as instructed (page 18). the trigger. 3 Place handle in upright position. FlexForce™ PET PowerBrushes will not rotate while handle is in the upright position. 10 - Hoover SmartWash PET Complete Automatic Bundle | Product Manual English - Page 21
as it should, has been dropped, damaged, left outdoors, or dropped into water, call Customer Service at 1-800-844-9200 prior to continuing use. USE TROUBLESHOOTING GUIDE AS A FIRST STEP TO RESOLVE ANY PROBLEMS YOU MAY BE EXPERIENCING. QUESTIONS OR CONCERNS? Contact Us: 1-800-944-9200 If you have - Hoover SmartWash PET Complete Automatic Bundle | Product Manual English - Page 22
Troubleshooting: PROBLEM 2. Aim downward & squeeze trigger. 1. Pump is defective 1. Call for service: 1-800-944-9200. 2. Not connected properly 2. Check connection. 1. Solution Tank empty 2. Refill container according to cleaning instructions. 1. Cleaner is not moving in forward direction 1. - Hoover SmartWash PET Complete Automatic Bundle | Product Manual English - Page 23
product is not as warranted, contact TTI Floor Care North America Customer Service at 1-800-406-2005. Please have available the proof of purchase and maintained in normal household use and in accordance with the Owner's Guide, this product is warranted against original defects in material and - Hoover SmartWash PET Complete Automatic Bundle | Product Manual English - Page 24
NOTES: 24 - Hoover SmartWash PET Complete Automatic Bundle | Product Manual English - Page 25
GUIDE D'UTILISATION SHAMPOUINEUSE COMPÈTE POUR DÉGÂTS D'ANIMAUX SHAMPOUINEUSE AUTOMATIQUE IMPORTANT : Veuillez lire attentivement toutes les instructions avant d'assembler et d'utiliser cet appareil. Ce produit est destiné à un usage domestique seulement. La garantie est nulle si l'appareil est - Hoover SmartWash PET Complete Automatic Bundle | Product Manual English - Page 26
Bienvenue chez HOOVERMD. Devenez officiellement propriétaire. Enregistrez votre nettoyeur de tapis chez : Visitez le site Hoover.com ou Hoover.ca Appelez au 1 800 944-9200 C'EST GARANTI. Nettoyez en toute confiance pendant jusqu'à 5 ans grâce à la garantie limitée de HOOVERMD. Consultez la - Hoover SmartWash PET Complete Automatic Bundle | Product Manual English - Page 27
Table des matières Consignes de sécurité...27 Instructions de mise à la terre...29 Contenu de la boîte...30 Outils et accessoires...32 Avant de commencer le nettoyage 33 Premiers pas...34 Assemblage - Hoover SmartWash PET Complete Automatic Bundle | Product Manual English - Page 28
à l'extérieur ou a pris l'eau, communiquez avec le service à la clientèle au 1-800-944-9200 avant de continuer (à la page 35) du présent guide. • Ne pas permettre que l'appareil soit lectrique correctement mise à la terre. Consulter la section « Instructions de mise à la terre ». • Ne pas utiliser - Hoover SmartWash PET Complete Automatic Bundle | Product Manual English - Page 29
, mais le déplacer sur une surface dure et (b) le placer sur un matériau absorbant (une serviette, par exemple) permettant d'éponger les déversements. INSTRUCTIONS DE MISE À LA TERRE : Cet appareil doit être mis à la terre. S'il devait mal fonctionner ou être endommagé, la mise à la terre fournira - Hoover SmartWash PET Complete Automatic Bundle | Product Manual English - Page 30
Contenu de la boîte Shampouineuse Réservoir à solution Poignée / tube de prétraitement Spot Chaser Brosses motorisées FlexForceMC pour dégâts d'animaux Accessoire Réservoir d'eau propre Réservoir d'eau sale Accessoire Sac de rangement pour outils Solution de taille d'essai *Les outils et - Hoover SmartWash PET Complete Automatic Bundle | Product Manual English - Page 31
Apprivoiser votre SmartWash de HOOVERMD 1. Poignée de conception sans gâchette et tube de prétraitement amovible Spot 1 Chaser 2. Réservoir d'eau propre 3. Filtre 4. Réservoir de récupération d'eau sale 5. Raccord du tuyau 2 6. Buse de récupération amovible 7. Écran LED lavage/séchage - Hoover SmartWash PET Complete Automatic Bundle | Product Manual English - Page 32
Outils et accessoires : Accessoire antimicrobien pour dégâts d'animaux 1: Accessoire antimicrobien qui aide à prévenir la prolifération des bactéries et les odeurs. Les pointes en caoutchouc servent à éliminer les taches désagréables et conviennent au nettoyage hygiénique. MISE EN GARDE N'utilisez - Hoover SmartWash PET Complete Automatic Bundle | Product Manual English - Page 33
pinglez-les en place. Pour obtenir de meilleurs résultats, prétraitez les taches à l'aide d'un traitement spécifique HOOVERMD (voir le guide relatif aux solutions de nettoyage HOOVERMD) pour faciliter l'élimination des taches les plus tenaces. Produit offert moyennant des frais supplémentaires s'il - Hoover SmartWash PET Complete Automatic Bundle | Product Manual English - Page 34
Premiers pas avec votre nettoyeur de tapis SmartWash : Assemblage 1 Insérez la poignée dans la base jusqu'à entendre un cliquetis. Remplissez le réservoir d'eau propre 1 Soulevez et retirez le réservoir d'eau propre. Assemblez entièrement l'appareil avant de l'utiliser. Fill the Solution Tank 1 - Hoover SmartWash PET Complete Automatic Bundle | Product Manual English - Page 35
Utilisation de votre shampouineuse complète SmartWash pour dégâts d'animaux MISE EN GARDE N'utilisez pas l'aspirateur pour toiletter un animal. 1 Déroulez le cordon d'alimentation et branchez l'appareil dans une prise électrique. 3 Appuyez sur la pédale marche/arrêt avec un pied pour mettre l' - Hoover SmartWash PET Complete Automatic Bundle | Product Manual English - Page 36
nettoyante se trouvant dans votre tapis. Pour rincer à l'eau propre seulement, retirez le réservoir de solution, puis répétez les étapes 4 à 6. PRODUITS NETTOYANTS CONSULTEZ L'ENCART DU GUIDE DES SOLUTIONS HOOVER ou rendez-vous sur le site Web Hoover.com/cleaning-solutions. 36 - Hoover SmartWash PET Complete Automatic Bundle | Product Manual English - Page 37
. Si l'appareil ne fonctionne pas comme il le devrait, est tombé, est endommagé, a été laissé à l'extérieur ou a pris l'eau, communiquez avec le service à la clientèle au 1 800 844-9200 avant de continuer à l'utiliser. 1 Éteignez l'appareil et débranchez-le de la prise de courant. 3 Déposez - Hoover SmartWash PET Complete Automatic Bundle | Product Manual English - Page 38
Remarques IMPORTANT : À propos du réservoir d'eau sale : Pour que l'appareil offre une succion complète, il est important que le couvercle du réservoir d'eau sale soit bien en place. Si celui-ci est mal placé, la succion sera faible, voire nulle. IMPORTANT : Pour que l'appareil offre une succion - Hoover SmartWash PET Complete Automatic Bundle | Product Manual English - Page 39
Entretien Retrait et nettoyage de la buse 1 Pour empêcher les éventuelles fuites, retirez et videz le réservoir d'eau propre, le réservoir d'eau sale et le réservoir de solution. 2 Placez la poignée en position verticale, tirez vers le haut le dégagement de la buse, puis poussez la buse vers l'avant - Hoover SmartWash PET Complete Automatic Bundle | Product Manual English - Page 40
tirez-la vers le haut A pour la retirer. Répétez l'opération sur l'autre brosse. 2 Placez la poignée en position verticale et suivez les instructions de la section « Buse : Retrait et nettoyage » (page 39). 4 Les brosses peuvent être nettoyées à l'eau courante. HOW TO REPLACE 1 Selon un angle - Hoover SmartWash PET Complete Automatic Bundle | Product Manual English - Page 41
Outils et accessoires COMMENT FIXER LE TUYAU 1 Ouvrez la prise de connexion du tuyau. Insérez fermement le bout du tuyau dans l'orifice de solution du tuyau. ! MISE EN GARDE ! Éteignez toujours ce produit avant de brancher ou de débrancher le tuyau. COMMENT RETIRER LE TUYAU 1 Appuyez sur la gâ - Hoover SmartWash PET Complete Automatic Bundle | Product Manual English - Page 42
Outils et accessoires Comment fixer les outils 1 Pour profiter d'un rendement maximal et protéger votre tapis, prenez soin de placer la poignée en position verticale lorsque vous utilisez le tuyau. Positionner la poignée à la verticale arrête les brosses motorisées FlexForceMCpour dégâts d'animaux. - Hoover SmartWash PET Complete Automatic Bundle | Product Manual English - Page 43
gager la bouteille de prétraitement. 2 Dévissez le bouchon et remplissez la bouteille avec un produit de traitement de taches HOOVERMD. (Consultez les instructions à la page 33). 3 Réinstallez le réservoir en pressant la bouteille vers le haut dans la poignée Spot Chaser. 4 Appuyez sur le bouton de - Hoover SmartWash PET Complete Automatic Bundle | Product Manual English - Page 44
le tapis. Relâchez la 11 gâchette à la fin du passage. 5 Remplissez le réservoir de solution avec une solution HOOVERMD conformément aux instructions à la page 33. 6 Installez l'accessoire à l'extrémité du tuyau. 7 Séchez-vous les mains puis branchez le nettoyeur dans une prise de courant mise - Hoover SmartWash PET Complete Automatic Bundle | Product Manual English - Page 45
le devrait, est tombé, est endommagé, a été laissé à l'extérieur ou a pris l'eau, communiquez avec le service à la clientèle au 1 800 844-9200 avant de continuer à l'utiliser. UTILISEZ D'ABORD LE GUIDE DE DÉPANNAGE POUR RÉSOUDRE LES PROBLÈMES. DES QUESTIONS OU DES PRÉOCCUPATIONS? Communiquez avec - Hoover SmartWash PET Complete Automatic Bundle | Product Manual English - Page 46
2. Visez vers le bas et serrez la détente. 1. Communiquez avec le service technique au +1 800 944-9200 2. Vérifiez le branchement. 1. Assurez-vous verrouillé en place. 2. Remplissez le contenant conformément aux instructions de nettoyage. 1. Il faut faire avancer l'appareil pour bien distribuer - Hoover SmartWash PET Complete Automatic Bundle | Product Manual English - Page 47
conditions normales d'utilisation et d'entretien domestiques, comme le stipule le Guide d'utilisation, contre les défauts de matériaux et de fabrication de l'entretien de ce produit autre que par le garant ou un fournisseur de service autorisé par le garant (le cas échéant) ou en raison d'autres - Hoover SmartWash PET Complete Automatic Bundle | Product Manual English - Page 48
NOTES: 48 - Hoover SmartWash PET Complete Automatic Bundle | Product Manual English - Page 49
DEL USUARIO LAVA-ASPIRADORA COMPLETA, REMOVEDORA DE PELO DE MASCOTAS LIMPIADORA DE ALFOMBRADOS AUTOMÁTICA IMPORTANTE: Lea este manual con atención antes de ensamblar y usar este aparato. El único uso previsto para este producto es el uso doméstico. Si se utiliza para uso - Hoover SmartWash PET Complete Automatic Bundle | Product Manual English - Page 50
Bienvenido a la propiedad de HOOVER®. Hágalo oficial. Registre su limpiadora de alfombras: Visitando Hoover.com o Hoover.ca Llamando al 1-800-944-9200 TIENE GARANTÍA. Obtenga confianza al limpiar con la garantía limitada de hasta 5 años de HOOVER®. Consulte la garantía en la página 71 para - Hoover SmartWash PET Complete Automatic Bundle | Product Manual English - Page 51
Índice Instrucciones de seguridad...52 Instrucciones de puesta a tierra 53 ¿Qué hay en la caja?...54 Guía del producto...55 Herramientas y accesorios...56 Antes de comenzar la limpieza...57 Pasos iniciales...58 Cómo armar la Limpiadora de alfombras SmartWash Pet Complete 58 Uso de la Limpiadora de - Hoover SmartWash PET Complete Automatic Bundle | Product Manual English - Page 52
aparato. Consulte la sección Fluidos de limpieza (en la página 59) de este manual. • Evite que se lo utilice como un juguete. Los niños de 12 añ . • Utilice la unidad únicamente según el uso descrito en este manual. Utilice solamente los accesorios y productos recomendados por el fabricante. • No - Hoover SmartWash PET Complete Automatic Bundle | Product Manual English - Page 53
PRECAUCIÓN: PARA DISMINUIR EL RIESGO DE DAÑOS: • Evite aspirar objetos duros y filosos con este producto, ya que pueden dañarlo. • Almacénelo adecuadamente en interiores, en un lugar seco. No exponga la máquina a temperaturas bajo cero. • No utilice objetos filosos para limpiar la manguera, ya que - Hoover SmartWash PET Complete Automatic Bundle | Product Manual English - Page 54
¿Qué hay en la caja? Limpiadora de alfombras Tanque de solución Tanque de agua limpia Tanque de agua sucio Mango Spot Chaser/Tubo de tratamiento previo Manguera accesoria *Las herramientas y los accesorios varían según el modelo. Puede comprar por separado, los accesorios que no vienen - Hoover SmartWash PET Complete Automatic Bundle | Product Manual English - Page 55
Conozca su HOOVER® SmartWash 1. Diseño de mango sin gatillo y tubo de tratamiento previo Spot Chaser 1 desmontable 2. Tanque de agua limpia 3. Filtro 4. Tanque de recuperación de agua sucia 5. Conector de la manguera 2 6. Boquilla de recuperación extraíble 7. Pantalla LED de lavado/secado - Hoover SmartWash PET Complete Automatic Bundle | Product Manual English - Page 56
Herramientas y accesorios: PRECAUCIÓN La aspiradora no debe utilizarse para limpiar mascotas. Herramienta antimicrobiana PET 1: Herramienta antimicrobiana que ayuda a prevenir el crecimiento de las bacterias y los olores. Las puntas de goma sirven para la eliminación de manchas desagradables y - Hoover SmartWash PET Complete Automatic Bundle | Product Manual English - Page 57
Antes de comenzar la limpieza: Tratamiento previo: Antes de su uso, aspire la alfombra y la tapicería a fondo con una aspiradora HOOVER®. No use la limpiadora de alfombras como aspiradora en seco. Utilice su limpiadora de alfombras Hoover® solo si la tela del tapizado está marcada con una "H" (para - Hoover SmartWash PET Complete Automatic Bundle | Product Manual English - Page 58
Pasos iniciales de su limpiadora de alfombras portátil SmartWash: Arme la unidad por completo antes de ponerla en funcionamiento. ENSAMBLAJE 1 Inserte el mango en la base hasta escuchar un "clic". LLENADO DEL TANQUE DE AGUA 1 Levante para quitar el tanque de agua limpia. LLENADO DEL TANQUE DE - Hoover SmartWash PET Complete Automatic Bundle | Product Manual English - Page 59
Uso de la Limpiadora de alfombras SmartWash Pet Complete PRECAUCIÓN La aspiradora no debe utilizarse para limpiar mascotas. 1 Desenrolle el cable de alimentación y enchufe la limpiadora en un tomacorriente. 3 Pise el pedal de encendido/apagado para encenderla. 2 Pise el pedal para soltar el mango - Hoover SmartWash PET Complete Automatic Bundle | Product Manual English - Page 60
Uso de la Limpiadora de alfombras SmartWash Pet Complete 4 Avance lentamente. La limpiadora dispensará automáticamente la cantidad óptima de agua y solución de limpieza. 6 Cuando termine de limpiar pero necesite seguir secando, presione el BOTÓN SOLO SECAR. El modo Solo Secar extraerá el resto del - Hoover SmartWash PET Complete Automatic Bundle | Product Manual English - Page 61
Mantenimiento Vaciado Este producto no contiene piezas que el usuario pueda reparar. Si el aparato no funciona como debe; si se ha caído, ha sido dañado, dejado a la intemperie o sumergido en agua, llame al servicio de atención al cliente al 1-800-844-9200 antes de seguir usándolo. 1 Apague la - Hoover SmartWash PET Complete Automatic Bundle | Product Manual English - Page 62
Aviso IMPORTANTE: Con respecto al tanque de agua sucia: Por que la aspiración sea buena, es importante que la tapa del depósito de agua sucia esté bien ajustada. Si estuviese mal colocada, la aspiración será mala o no se activará. IMPORTANTE: Para que la aspiración sea buena, es importante que el - Hoover SmartWash PET Complete Automatic Bundle | Product Manual English - Page 63
Mantenimiento Extracción y limpieza de la boquilla ! ADVERTENCIA ! Riesgo de lesiones físicas, el cepillo giratorio puede reiniciarse repentinamente, desenchufe la unidad antes de limpiar o hacer un mantenimiento. ! IMPORTANTE ! La boquilla debe estar en la posición adecuada para que la limpiadora - Hoover SmartWash PET Complete Automatic Bundle | Product Manual English - Page 64
Mantenimiento Cambio y limpieza de cepillos EXTRACCIÓN 1 Para evitar posibles goteos, retire el tanque de agua limpia, el tanque de agua sucia y el tanque de solución. 2 Con el mango en posición vertical, siga las instrucciones de "Boquilla: Extracción y limpieza" (página 63). ! ADVERTENCIA ! - Hoover SmartWash PET Complete Automatic Bundle | Product Manual English - Page 65
Herramientas y accesorios CONEXÓN DE LA MANGUERA 1 Abra el puerto de conexión de la manguera. Inserte el extremo de la manguera firmemente en el puerto de solución de manguera. ! PRECAUCIÓN ! Apague siempre este producto antes de conectar o desconectar la manguera. EXTRACCIÓN DE LA MANGUERA 1 - Hoover SmartWash PET Complete Automatic Bundle | Product Manual English - Page 66
Herramientas y accesorios Conexión de las herramientas 1 Para garantizar el máximo rendimiento y para proteger su alfombra, asegúrese de colocar el mango en posición vertical durante el uso de la manguera. La colocación del mango en posición vertical desactiva los cepillos giratorios FlexForce™ PET. - Hoover SmartWash PET Complete Automatic Bundle | Product Manual English - Page 67
Herramientas y accesorios Cómo usar el tubo de tratamiento previo 1 Con el tubo instalado en la máquina, presione ambos pestillos y tire hacia abajo para liberar la botella de tratamiento previo. FPO 4 Presione y suelte el botón "Liberación del tubo" junto al tubo Spot Chaser. Luego, tire del - Hoover SmartWash PET Complete Automatic Bundle | Product Manual English - Page 68
Herramientas y accesorios PRECAUCIÓN Extreme las precauciones cuando limpie en escaleras. Para evitar lesiones o daños físicos, y a fin de evitar que la limpiadora se caiga, colóquela siempre al pie de las escaleras o sobre el suelo. No coloque la aspiradora sobre las escaleras ni sobre un mueble, - Hoover SmartWash PET Complete Automatic Bundle | Product Manual English - Page 69
¿Necesita ayuda? Si necesita más ayuda: Si su producto necesita mantenimiento durante el período de garantía, llame al Servicio al cliente al teléfono 1-800-944-9200 de lunes a viernes de 7 a. m. a 6 p. m. (hora estándar del este). Siempre identifique su limpiador de alfombras con el número completo - Hoover SmartWash PET Complete Automatic Bundle | Product Manual English - Page 70
PROBLEMA La aspiradora no funciona. Poca aspiración CAUSA POSIBLE 1. No está firmemente enchufada. 2. No hay voltaje en el tomacorriente. 3. Fusible quemado o disyuntor activado. 4. Se quemó el fusible de la limpiadora. 5. Pedal de encendido/apagado sin presionar. 1. El Depósito de Agua Sucia está - Hoover SmartWash PET Complete Automatic Bundle | Product Manual English - Page 71
GARANTÍA GARANTÍA LIMITADA PARA PRODUCTOS DE HOOVER® GARANTÍA LIMITADA DE CINCO AÑOS (USO DOMÉSTICO) Si este producto no cumple con la garantía, comuníquese con el Servicio de atención al cliente de TTI Floor Care North America al 1-800-406-2005. Tenga a mano el comprobante de compra y el número de - Hoover SmartWash PET Complete Automatic Bundle | Product Manual English - Page 72
Hoover.com youtube.com/hoover facebook.com/hoover twitter.com/hooverusa instagram.com/hoover 72
-
 1
1 -
 2
2 -
 3
3 -
 4
4 -
 5
5 -
 6
6 -
 7
7 -
8
-
9
-
10
-
11
-
12
-
13
-
14
-
15
-
16
-
17
-
18
-
19
-
20
-
21
-
22
-
23
-
24
-
25
-
26
-
27
-
28
-
29
-
30
-
31
-
32
-
33
-
34
-
35
-
36
-
37
-
38
-
39
-
40
-
41
-
42
-
43
-
44
-
45
-
46
-
47
-
48
-
49
-
50
-
51
-
52
-
53
-
54
-
55
-
56
-
57
-
58
-
59
-
60
-
61
-
62
-
63
-
64
-
65
-
66
-
67
-
68
-
69
-
70
-
71
-
72
 |
 |

IMPORTANT: Read all instructions carefully before assembly and use.
This product is intended for Household use only. If used Commercially warranty is VOID.
© 2020 Techtronic Floor Care Technology Limited. All Rights Reserved. Distributed by, Royal Appliance Mfg. Co.
Charlotte, NC 28262. All Rights Reserved. 961152141-R2
USER MANUAL
AUTOMATIC CARPET CLEANER