Hoover U5265-900 Manual
Hoover U5265-900 - Empower Bagless Upright Vacuum Cleaner Manual
 |
View all Hoover U5265-900 manuals
Add to My Manuals
Save this manual to your list of manuals |
Hoover U5265-900 manual content summary:
- Hoover U5265-900 | Manual - Page 1
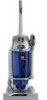
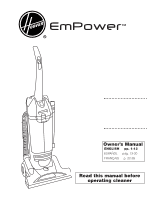
Upright Vacuum Cleaner Thank you for your purchase! Owner's Manual ENGLISH § pp. 1-12 ESPAÑOL § pág. 13-20 FRANÇAIS § p. 22-28 Read this manual before operating cleaner www.hoover.com - Hoover U5265-900 | Manual - Page 2
, or dropped into water, take it to a Hoover Factory Service Center or Authorized Hoover Warranty Service Dealer (Depot). • Use vacuum cleaner only for its intended use as described in the instructions. Use only attachments recommended by The Hoover Company; others may cause hazards. Save these - Hoover U5265-900 | Manual - Page 3
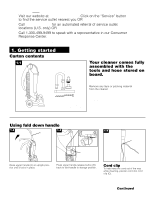
If you need any assistance: Visit our website at www.hoover.com. Click on the "Service" button to find the service outlet nearest you OR Call 1-800-944-9200 for an automated referral of service outlet locations (U.S. only) OR Call 1-330-499-9499 to speak with a representative in our Consumer - Hoover U5265-900 | Manual - Page 4
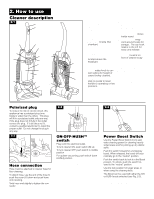
to tighten the connector. 4 2-3 B ON-OFF-HUSH™ switch Plug cord into electrical outlet. To turn cleaner ON, push switch (B) up. To turn cleaner OFF, push switch to middle position. For quieter vacuuming, push switch down (HUSH) position. Put Power Boost Switch in neutral when using ON or HUSH - Hoover U5265-900 | Manual - Page 5
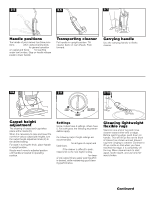
handle release pedal to lower handle. Transporting cleaner Put handle in upright position. Tilt cleaner back on rear wheels. Push forward. place handle in upright position. Nozzle won't move to adjusted position until handle is lowered to operating position. Settings Some models have 3 settings - Hoover U5265-900 | Manual - Page 6
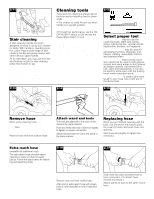
using your cleaner on stairs. With handle in operating position, place fingers under edge of stair cleaning handle and guide cleaner with to lock. CAUTION: Agitator continues to rotate while cleaner handle is in upright position. Avoid tipping cleaner or setting it on furniture, fringed area rugs or - Hoover U5265-900 | Manual - Page 7
yourself with these home maintenance tasks as proper use and care of your cleaner will ensure continued cleaning effectiveness. Dirt cup 3-1 A E D B C The dirt cup assembly consists of the following parts: Lid (A) Dirt cup (B) Pre-filter (C) HEPA cartridge filter (D) Dirt inlet opening (E) While the - Hoover U5265-900 | Manual - Page 8
in cold water with a mild detergent. Let filter air dry then reposition. Replace lens and screws. Should you want to replace this filter, ask for HOOVER part no. 38765024 (filter package part no. 40110004). Do not operate cleaner without any of the filters in place. 8 - Hoover U5265-900 | Manual - Page 9
operation, use only genuine HOOVER belts with your cleaner. When purchasing a new belt, ask for HOOVER part No. 38528040 (belt package part no. 40201190). 3-16 How to replace Disconnect cleaner from electrical outlet. With the handle in the upright position, tilt cleaner back until it rests on - Hoover U5265-900 | Manual - Page 10
not touch card. What to buy When purchasing a new agitator, ask for HOOVER part no. 48414130. 3-27 How to replace Disconnect cleaner from electrical outlet. Remove hood and agitator cover as described in the "Belt replacement" section. Discard old agitator. Continue following the directions in the - Hoover U5265-900 | Manual - Page 11
steps, your cleaner may need servicing (see"Service" section). Service To obtain approved HOOVER service and genuine HOOVER parts, locate the nearest Hoover Factory Service Center or Authorized Hoover Warranty Service Dealer (Depot) by: • checking the Yellow Pages under "Vacuum Cleaners - Household - Hoover U5265-900 | Manual - Page 12
OFF and unplug. 7. Remove hose end from cleaner. 8. Press hose inlet door open and clear any blockages. 12 Full One Year Warranty (Domestic Use) Your HOOVER® appliance is warranted in normal household use, in accordance with the Owner's Manual against original defects in material and workmanship
-
 1
1 -
 2
2 -
 3
3 -
 4
4 -
 5
5 -
 6
6 -
 7
7 -
8
-
9
-
10
-
11
-
12
 |
 |
Thank you
for your
purchase!
www.hoover.com
ENGLISH
pp. 1-12
ESPAÑOL
pág. 13-20
FRANÇAIS
p. 22-28
Owner’s Manual
Read this manual before
operating cleaner
Upright Vacuum Cleaner