Hoover U5509 Manual
Hoover U5509 Manual
 |
View all Hoover U5509 manuals
Add to My Manuals
Save this manual to your list of manuals |
Hoover U5509 manual content summary:
- Hoover U5509 | Manual - Page 1
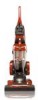
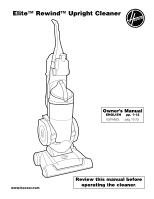
Elite™ Rewind™ Upright Cleaner ® Owner's Manual ENGLISH § pp. 1-12 ESPAÑOL § pág 13-20 www.hoover.com Review this manual before operating the cleaner. - Hoover U5509 | Manual - Page 2
, or dropped into water, take it to a Hoover Sales and Service Center or Authorized Hoover Warranty Service Dealer (Depot). • Use vacuum cleaner only for its intended use as described in the instructions. Use only attachments recommended by Hoover; others may cause hazards. WARNING: This product - Hoover U5509 | Manual - Page 3
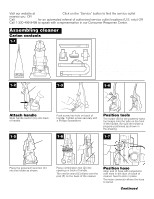
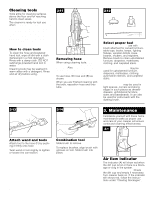
.hoover.com. Click on the "Service" button to find the service outlet nearest you OR Call 1-800-944-9200 for an automated referral of authorized service outlet B. Cleaner body C. Cleaning tools D. Hose Remove all parts from carton and A B D identify each item shown. Make sure all parts are - Hoover U5509 | Manual - Page 4
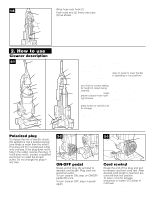
cup assembly 7. Long lasting HEPA filter 8. Headlight 9. Nozzle control knob: turn knob to correct setting for height of carpet being cleaned. 10. Furniture nozzle: helps prevent cleaner from marking furniture. 11. Cord reel 12. Cord rewind button: press button to rewind cord for storage. Hold plug - Hoover U5509 | Manual - Page 5
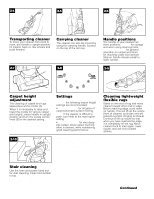
position. Settings For maximum cleaning performance, the following carpet height settings are recommended: • Lowest setting: for all types of carpet and hard surface flooring. Note: If the cleaner is difficult to push, turn knob to the next higher setting. • Higher settings: for very deep pile - Hoover U5509 | Manual - Page 6
indicator The indicator (A) will show red when the dirt cup is full or there is a blockage or clog in the system. Turn cleaner OFF and unplug. Check the dirt cup and empty if necessary. Turn cleaner back on. If the indicator still shows red, follow the instructions under "Clearing blockages". 6 - Hoover U5509 | Manual - Page 7
and cause loss of suction. When using the cleaner for this type of dust, empty the cup and clean the filters often. 3-5 How to empty Disconnect cleaner from electrical outlet. Do not use the cleaner without dirt cup or filters in place. Press dirt cup release button (B) and pivot cup out. Cleaning - Hoover U5509 | Manual - Page 8
broken. What to buy To assure effective operation, use only genuine HOOVER belts with your cleaner. When purchasing a new belt, ask for HOOVER part No. 38528040 (belt package part No. 40201190). Removing lens Disconnect cleaner from electrical outlet. Press handle release pedal and place handle in - Hoover U5509 | Manual - Page 9
outlet. 3-22 What to buy When purchasing a new agitator, ask for HOOVER part No. 48414113. How to replace Disconnect cleaner from electrical outlet. Remove bottom plate, belt and agitator following directions in "The belt" section beginning with Fig. 3-16. Discard old agitator. Continue following - Hoover U5509 | Manual - Page 10
is designed to last a long time and is not normally replaced. However, if the belt is cracked, gouged or broken, it should be replaced. 3-27 Replace belt When replacing belt, ask for HOOVER part No. 38528037. 1. Remove tool from hose. Remove bottom plate and brush roll as described in Figs. 3-23 - Hoover U5509 | Manual - Page 11
To obtain approved HOOVER service and genuine HOOVER parts, locate the nearest Hoover Sales and Service Center or Authorized Hoover Warranty Service Dealer (Depot) by: • checking the Yellow Pages under "Vacuum Cleaners Household" OR • checking the list of Sales and Service Centers provided with - Hoover U5509 | Manual - Page 12
airflow path 2. Plug cleaner in and turn ON. belt, turbine, brush roll, and bottom plate. Full One Year Warranty (Domestic Use) Your HOOVER® appliance is warranted in normal household use, in accordance with the Owner's Manual cost of parts only. Hoover Sales and Service Center for warranty service - Hoover U5509 | Manual - Page 13
HOOVER® Elite™ Rewind™ Anote los números COMPLETOS de modelo y serie a continuación. Modelo Número de serie Consejo: Adjunte su recibo de compra a este Manual del propietario. Manual los dedos de las manos y pies y todas las partes del cuerpo alejados de las aberturas, del agitador rotatorio - Hoover U5509 | Manual - Page 14
las figuras provistas en el manual de inglés. Si necesita asistencia: Visite www.hoover.com. Haga clic en el botón "Service" para encontrar el centro de las proyeccións encima de las ranuras en el tubo de polvo en la parte posterior de la aspiradora. Gírelo para trabarlo en su lugar. El conector de - Hoover U5509 | Manual - Page 15
alfombra y pase la aspiradora hacia el otro extremo o borde. Antes de llegar al borde, empuje el mango hacia abajo. Esto levantará la boquilla (parte delantera de la aspiradora) como se muestra y evitará que la alfombra se adhiera a la aspiradora. Continúe levantando la boquilla de modo que cuando - Hoover U5509 | Manual - Page 16
la puerta del depósito para polvo para cerrarla. 3-5 Coloque primero la parte inferior del depósito para polvo. Gire el depósito para insertarlo en de 13 voltios de base en cuña, tipo T-3114, pieza No. 27313107 de Hoover. 3-14 Para sacar la lente Desconecte la aspiradora de la toma de corriente el - Hoover U5509 | Manual - Page 17
No. 38528040 de HOOVER (paquete de correa con número de pieza 40201190). 3-16 Cómo reemplazarla Desconecte la aspiradora de la toma de corriente eléctrica. Separación de la placa inferior Coloque el mango en la posición baja y voltee la aspiradora de manera que la parte inferior esté hacia arriba - Hoover U5509 | Manual - Page 18
el accesorio de la manguera. La correa se puede ver a través de la parte superior de la boquilla o sacando la placa inferior (figura 3-23). 18 Reemplace la y servicio de Hoover provista con esta aspiradora O - • consultando la sección "Service" (Servicio) de Hoover en Internet, www.hoover.com O - - Hoover U5509 | Manual - Page 19
turbina, el rodillo de escobillas y la placa inferior. Garantía de un año completo (Uso doméstico) Su aparato HOOVER® está garantizado para uso doméstico normal, según el Manual del propietario, contra defectos originales del material y fabricación por el período de un año completo a partir de la - Hoover U5509 | Manual - Page 20
20 - Hoover U5509 | Manual - Page 21
TOTAL Detach this section and mail to: THE HOOVER COMPANY ® 101 East Maple St. North Canton, OH 44720 Attn: Sales & Service Center Part No. Cost No. of Per Pack Packs Total 59157055 59157014 27313107 40201190 59157029 59157093 59157086 $12.00 $ 9.99 $ 2.49 $ 3.99 $18.99 $ 4.99 $ 4.99 TOTAL - Hoover U5509 | Manual - Page 22
¢ 22 Desprenda esta sección y envíela por correo a: THE HOOVER COMPANY 101 East Maple St. North Canton, OH 44720 Número de pieza Costo/ No. en por Paqte. Paqte. Total 59157055 $12.00 59157014 27313107 40201190 $ 9.99 $ 2.49 $ 3.99 59157029 $18.99 59157093 $ 4.99 59157086 $ 4.99 - Hoover U5509 | Manual - Page 23
23 - Hoover U5509 | Manual - Page 24
1-06 U5507-/09-900 HOOVER y ®son marcas registradas HOOVER and ® are registered trademarks Printed in China 59157088
-
 1
1 -
 2
2 -
 3
3 -
 4
4 -
 5
5 -
 6
6 -
 7
7 -
8
-
9
-
10
-
11
-
12
-
13
-
14
-
15
-
16
-
17
-
18
-
19
-
20
-
21
-
22
-
23
-
24
 |
 |
®
Review this manual before
operating the cleaner
.
www.hoover.com
Owner’s Manual
ENGLISH
pp. 1-12
ESPAÑOL
pág 13-20
Elite™ Rewind™ Upright Cleaner