Hoover U8347 Manual - Page 11
Cleaning the filters
 |
UPC - 719881178424
View all Hoover U8347 manuals
Add to My Manuals
Save this manual to your list of manuals |
Page 11 highlights
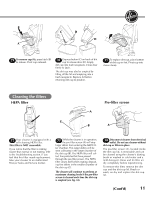
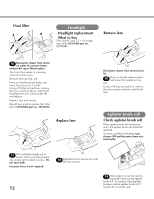
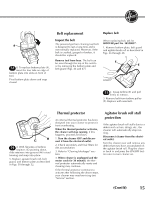
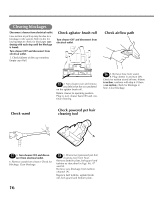
® B C D D A 29 To remove cup (A), press latch (B) to release. Pivot cup outward. 30 Depress button (C) on back of dirt cup to release door (D). Empty dirt cup into trash receptacle. Close door firmly to latch. The dirt cup may also be emptied by lifting off the lid and emptying into a trash receptacle. Replace lid before returning dirt cup to position. 31 To replace dirt cup, place bottom of dirt cup in first. Pivot cup into cleaner body. Cleaning the filters HEPA filter C Pre-filter screen A B A 32 Your cleaner is equipped with a self-cleaning HEPA filter. This filter is NOT removable. If you notice that the filter is rotating slower than normal or not rotating, refer to the Troubleshooting section. If you feel that this filter needs replacement, take your cleaner to an Authorized Hoover Sales and Service Center. 33 While the cleaner is in operation, the pre-filter screen (A) will stop larger debris from entering the HEPA fil- ter chamber. This larger debris will be seen collecting in the larger chamber of the dirt cup (B). The HEPA filter will col- lect fine particles that have passed through the pre-filter screen. The HEPA filter cleans itself while rotating, deposit- ing fine debris in the smaller chamber of the dirt cup (C). The cleaner will continue to perform at maximum cleaning levels if the pre-filter screen is cleaned each time the dirt cup is emptied (see Fig. 34). 34 Disconnect cleaner from electrical outlet. Do not use cleaner without dirt cup or filters in place. The pre-filter screen (A), located inside the dirt cup lid, is removable and can be cleaned using the cleaner's dusting brush or washed in cold water and a mild detergent. Rinse and let filter air dry completely before repositioning. To remove this filter, remove the dirt cup and the dirt cup lid. Brush or wash, air dry and replace the dirt cup lid. (Cont'd) ¡ 11
-
 1
1 -
2
-
3
-
4
-
5
-
 6
6 -
 7
7 -
 8
8 -
 9
9 -
 10
10 -
 11
11 -
 12
12 -
 13
13 -
 14
14 -
 15
15 -
 16
16 -
17
-
18
-
19
 |
 |
