Hoover UH30015 Manual
Hoover UH30015 Manual
 |
View all Hoover UH30015 manuals
Add to My Manuals
Save this manual to your list of manuals |
Hoover UH30015 manual content summary:
- Hoover UH30015 | Manual - Page 1
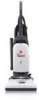
56511A66 ID100224-R7 Guide d'utilisation Instructions d'utilisation et d'entretien www.hoover.com www.hoover.com IMPORTANT : LIRE CES INSTRUCTIONS ATTENTIVEMENT AVANT D' Limited. Tous droits réservés. #56511A66 ID100224-R7 Owner's Manual Operating and Servicing Instructions Español - página E1 - Hoover UH30015 | Manual - Page 2
...6 Cleaner Description 6 Cleaning Tools...9 Maintenance...10 Filter Bag...10 Filters...11 Headlight...12 Belt...12 Agitator Brushroll 13 Clearing Blockages 14 Lubrication...14 Troubleshooting Guide 15 Service...15 Warranty...16 Contents Hint: Attach your sales receipt to this owner's manual - Hoover UH30015 | Manual - Page 3
INSTRUCTIONS BEFORE USING THIS APPLIANCE. WARNING: TO REDUCE THE RISK OF FIRE, ELECTRIC SHOCK OR INJURY: • Fully assemble before operating. • Operate vacuum only at voltage specified on data label on bottom of cleaner this manual. Use take it to a service center prior to without Dust bag and Filters - Hoover UH30015 | Manual - Page 4
hose tube, dirt duct, hose, filter bag inlet, secondary filter, and final filter. 4. When cleaner is unplugged and motor cools for 30 minutes, the thermal causer le cancer ou, entraîner des malformations congénitales ou d'autres troubles de la reproduction. ! AVIS ! L'aspirateur est doté d'un - Hoover UH30015 | Manual - Page 5
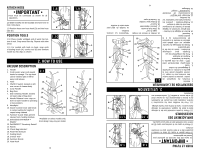
at top of door and pulling door outward. Switch (A) above bag door should be in OFF position. 1.3 Slide handle onto cleaner body. 1.4 Push bolts into holes on back of handle. C. Hose, cleaning tools and wands A B. Cleaner body A. Handle section 1.1 B C Carton contents 1. Vacuum ASSEMBLY 5 - Hoover UH30015 | Manual - Page 6
18 14 6. Bag Door 6 5. Carry Handle 15 4. ON/OFF Switch: located on left rear corner of cleaner body 5 4 easy cord release. 3. Hose 4 16 3 19 20 can be rotated right or left for 2 2 hooks for storage. The top hook 1. Handle 2. Cord Hooks: wrap cord around 2.1 1 Vacuum Description - Hoover UH30015 | Manual - Page 7
. • The red light may seldom come on during cleaning. This means that your cleaner is picking up primarily fine surface dust and lint which the system may not detect, keep the cord out of the way while vacuuming, position cord down into cord clip (B) located between top cord hook and handle. 2.3 B - Hoover UH30015 | Manual - Page 8
by Stair Cleaning Handle and position on stairs. Clean forward to back. Never leave the vacuum standing on stairs when not cleaning. 2.12 Cleaning lightweight flexible rugs Stand on one end of rug and move cleaner toward other end or edge. Before reaching edge, push down on handle. This will lift - Hoover UH30015 | Manual - Page 9
end as shown. When using cleaning tools, cleaner handle should be in the upright position. Also, turn cleaner OFF before disconnecting and connecting hose to hose surfaces above the floor and for reaching hard to clean areas. The vacuum is ready for tool use when handle is in upright position. - Hoover UH30015 | Manual - Page 10
® bags with your vacuum. When purchasing a new bag, ask for HOOVER® Allergen Type Y Part No. 4010100Y. Filter bag: When to Replace Check filter bag from time to time. It is recommended that you change the filter bag when dirt reaches the dotted line. If more dirt than this accumulates, your cleaner - Hoover UH30015 | Manual - Page 11
before servicing. Do not operate cleaner without either the secondary or final filter in place. Secondary Filter 4.4 The secondary filter (A), located behind the grill in the bottom of bag compartment, protects the motor from dirt particles. If filter becomes dirty, pull off grill and lift out - Hoover UH30015 | Manual - Page 12
remove bottom plate as shown in "How to replace". Replace belt if it is stretched, cut or broken. ! CAUTION ! To reduce the risk of injury from moving parts, unplug vacuum before servicing. Belt: How to Replace The belt on your Hoover® cleaner causes the agitator to rotate and is important for the - Hoover UH30015 | Manual - Page 13
CAUTION ! To reduce the risk of injury from moving parts, unplug vacuum before servicing. 4.16 The Agitator Brushroll: How to Replace HOOVER® Part No. 38528-033. vacuum. When purchasing a new Belt, ask for Use only genuine HOOVER® Belt with your What to Buy G 4.15 Reposition bottom plate and - Hoover UH30015 | Manual - Page 14
add lubricant to motor bearings. The agitator is equipped with two ball bearings that should be lubricated periodically by an Authorized Hoover Warranty Service Dealer (Depot). Clearing blockages ! CAUTION ! To reduce the risk of injury from moving parts, unplug vacuum before servicing. Low suction - Hoover UH30015 | Manual - Page 15
firmly 5. TROUBLESHOOTING If a minor problem occurs, it usually can be solved quite easily when the cause is found by using the checklist below. Any other servicing should be done by an authorized service representative. ! WARNING ! To reduce risk of personal injury - unplug vacuum before servicing - Hoover UH30015 | Manual - Page 16
in accordance with the Owner's Manual, your HOOVER® product is warranted against original mail your product to a Hoover® Sales and Service Center for warranty service, cost of shipping will d'entretien domestiques, comme il est stipulé dans le Guide de l'utilisateur, contre les défauts de matériaux - Hoover UH30015 | Manual - Page 17
año (Para uso doméstico) QUÉ CUBRE ESTA GARANTÍA Siempre que el uso y el mantenimiento de su producto HOOVER® se realicen en condiciones de uso doméstico normales y según el Manual del usuario, el producto estará garantizado contra defectos originales en el material y la fabricación durante de un - Hoover UH30015 | Manual - Page 18
su recibo de compra a este Manual del propietario. Para obtener el servicio de garantía de su producto HOOVER® puede requerirse la verificación se disparó el disyuntor. 4. Protector térmico activado. 1. Broken or worn belt La correa está rota o desgastada. 2. AEl rodillo de escobillas del agitador - Hoover UH30015 | Manual - Page 19
motor. El rodillo de escobillas del agitador tiene dos cojinetes de bolas que deberán ser lubricados periódicamente en un Centro de ventas y de servicio de garantía de Hoover • Use el producto sólo como se describe en este manual. Use sólo los accesorios y productos recomendados por el fabricante. - Hoover UH30015 | Manual - Page 20
que se muestra en el recuadro (D), deslice la nueva correa sobre la polea del motor (B). 4.12 B 4.13 C 4.13 Introduzca el agitador a través de la correa 13 pulgadas - No. de pieza 48414-110 de HOOVER 15 pulgadas - No. de pieza 48414-115 de HOOVER Para volver a colocar la correa, el nuevo - Hoover UH30015 | Manual - Page 21
Esta aspiradora usa un bombillo de 12 voltios de base en cuña, tipo 912. Pieza No. 27313101 de HOOVER. 4.8 4.9 correa: Cuándo reemplazarla La correa de su aspiradora Hoover hace posible que el agitador gire y es importante para el funcionamiento eficaz de su aspiradora. La correa está ubicada - Hoover UH30015 | Manual - Page 22
la rejilla en la parte inferior del compartimento de la bolsa, protege el motor contra las partículas de suciedad. Si el filtro se ensucia, extraiga la final genuinas de HOOVER® con su aspiradora. Al comprar una correa nueva, solicite el ffiltro final pieza n.° 40110-004 de HOOVER®. 4.5 Para sacar - Hoover UH30015 | Manual - Page 23
® con su aspiradora. Al comprar una correa nueva, solicite la bolsas de filtro desechables genuinas de Hoover® para filtración de alergenos, tipo Y pieza n.° 4010100Y de HOOVER®. E10 Interruptor de encendido y apagado (ON/OFF) Enchufe el cordón en una toma de corriente eléctrica. Para encender - Hoover UH30015 | Manual - Page 24
Ajuste de la altura para Posición del mango alfombras 2.8 La limpieza de Para facilitar el deslizamiento de la 2.9 alfombras y alfombras individuales ocurre en perilla, coloque el mango en la posición C la boquilla (A). vertical (C). Cuando sea necesario B La boquilla no se elevar y
-
 1
1 -
 2
2 -
 3
3 -
 4
4 -
 5
5 -
 6
6 -
 7
7 -
8
-
9
-
10
-
11
-
12
-
13
-
14
-
15
-
16
-
17
-
18
-
19
-
20
-
21
-
22
-
23
-
24
 |
 |

www.hoover.com
OWNER’S MANUAL
Operating and Servicing Instructions
©2009 Techtronic Floor Care Technology Limited. All rights reserved. #56511A66 ID100224-R7
IMPORTANT: READ CAREFULLY BEFORE ASSEMBLY AND USE.
Questions or concerns? For assistance, please call Customer Service at
1-800-944-9200 Mon-Fri 8am-7pm EST before returning this product to the store.
THIS PRODUCT IS INTENDED FOR HOUSEHOLD USE ONLY.
IF USED COMMERCIALLY WARRANTY IS VOID.
IMPORTANT : LIRE CES INSTRUCTIONS ATTENTIVEMENT AVANT
D’UTILISER L’ASPIRATEUR.
Vous avez des questions ou des inquiétudes? Pour obtenir de l’aide et avant de retourner
ce produit au magasin, veuillez appeler le service à la clientèle au 1 800 9449200 du
lundi au vendredi, de 8 h à 19 h (HNE).
www.hoover.com
GUIDE D’UTILISATION
Instructions d’utilisation et d’entretien
©2009 Techtronic Floor Care Technology Limited. Tous droits réservés. #56511A66 ID100224-R7
L’UTILISATION DE CE PRODUIT À DES FINS COMMERCIALES INVALIDE
LA PRÉSENTE GARANTIE.
Español - página E1