Hoover UH60010 Product Manual
Hoover UH60010 - WindTunnel Bagless Self Propelled Upright Vacuum Manual
 |
UPC - 073502030752
View all Hoover UH60010 manuals
Add to My Manuals
Save this manual to your list of manuals |
Hoover UH60010 manual content summary:
- Hoover UH60010 | Product Manual - Page 1
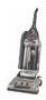
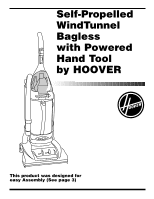
Self-Propelled WindTunnel™ Bagless with Powered Hand Tool by HOOVER ® This product was designed for easy Assembly (See page 3) www.hoover.com - Hoover UH60010 | Product Manual - Page 2
Dirt FINDERTM Feature .5 Upright Cleaner 4-6 Self-Propel Feature 4 Important Safeguards 2 Maintenance Authorized Service 13 Cleaning Filters 8-9 Emptying Cup 7-9 Lubrication 13 Replacing Belts 10-11 Replacing Power Hand Tool Belt .12 Replacing Brush Roll 10-11 Replacing Power Hand Tool - Hoover UH60010 | Product Manual - Page 3
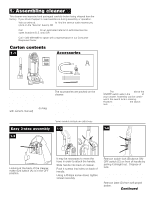
shown. Make sure all parts are located before disposing of packing. A. Handle section B. Cleaner body C. Handle screw packet (in bag with owner's manual) EI F G H The accessories are packed on the cleaner. Not all accessories are included with every model. D. Hose* E. Dusting brush F. Furniture - Hoover UH60010 | Product Manual - Page 4
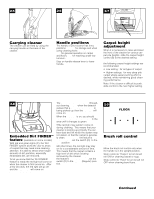
feature This feature allows you to control how quickly the cleaner moves. Note: The self-propel feature operates only when the cleaner switch and the self propel button are both ON. To move forward, push handle forward and guide cleaner away from you. To move backward, gently pull handle back and - Hoover UH60010 | Product Manual - Page 5
cleaner The cleaner can be lifted by using the carrying handle on the back of the cleaner. Handle positions The handle of your cleaner has three positions; upright cleaner is difficult to push, slide control to the next higher setting. 2-8 CD Embedded Dirt FINDERTM feature (available on some models - Hoover UH60010 | Product Manual - Page 6
sides of the nozzle to remove dirt in carpet near baseboards and furniture. Guide either side of nozzle parallel to the edge of carpet or furniture. the cleaner from falling, always place it at bottom of stairs. Cleaning tools When using cleaning tools, cleaner handle must be in the upright - Hoover UH60010 | Product Manual - Page 7
hose to your vacuum cleaner, follow the instructions below. 2-18 M N Turn cleaner OFF before disconnecting filters often. 3-2 F Dirt cup The dirt cup assembly consists of the following parts: Lid (A) Dirt Cup (B) Pre-filter (C) HEPA Cartridge Filter(D) Dirt Inlet Opening (E) While the cleaner - Hoover UH60010 | Product Manual - Page 8
reattach, align hinges of lid with slots in handle area of dirt cup. Push lid down to snap in place. Filter assembly The HEPA cartridge filter and pre-filter are essentially self-shedding. Turning the knob on the lid as described in "How to empty dirt cup" should sufficiently remove dust and fine - Hoover UH60010 | Product Manual - Page 9
reattach, align hinges (O) of cover with slots on sides of filter area. Press door back into place. Headlight replacement What to buy This cleaner uses a 12 volt, wedge base type 912 bulb, Hoover part No. 27313101. 3-15 3-16 Slide filter assembly down into cup until a light snap is felt. Gently - Hoover UH60010 | Product Manual - Page 10
, cut or broken. What to buy To assure effective operation, use only genuine HOOVER belts with your cleaner. When purchasing a new belt, ask for flat belt Hoover belt part no. 38528035 (belt package part no. 40201170). Replacing flat belt Disconnect cleaner from electrical outlet. Warning - Brush - Hoover UH60010 | Product Manual - Page 11
roll brushes are worn, the brush roll should be replaced. Ask for HOOVER part No. 48414088. 3-28 A Installing brush roll Grasp brush roll and fit it into position by first sliding end, opposite the belt, into the rectangular slot (G) on side of cleaner. Push other side of brush roll (H) into place - Hoover UH60010 | Product Manual - Page 12
can be seen through the top of the nozzle or by removing the bottom plate and belt guard (Figs. 3-28 and 3-29. Replacing belt When replacing belt, ask for HOOVER part No. 38528037. 1. Remove bottom plate, belt guard and brush roll as described in Figs. 3-28 through 3-30. 3-35 F E 2. Grasp turbine - Hoover UH60010 | Product Manual - Page 13
on both sides of the nozzle, should be replaced when they are worn. What to buy When purchasing edge groomers, ask for HOOVER part No. 39511004. How to replace Disconnect cleaner from electrical outlet. Remove bottom plate as described in "The belt" section (Fig.3-18). 3-37 Installing groomers Lift - Hoover UH60010 | Product Manual - Page 14
Possible solution 14 • Cleaner handle not in upright position • Ensure that cleaner handle is locked in upright position. • Blockage in hose • Clear blockage. Problem: Cleaner won't self-propel Possible cause Possible solution • Flat belt broken or worn • Replace belt. • Self-propel button in OFF - Hoover UH60010 | Product Manual - Page 15
(Domestic Use) Your HOOVER® appliance is warranted in normal household use, in accordance with the Owner's Manual against original defects in material and workmanship for a period of one full year from date of purchase. This warranty provides, at no cost to you, all labor and parts to place this - Hoover UH60010 | Product Manual - Page 16
HOOVER y son marcas registradas HOOVER et sont des marques déposées HOOVER and are registered trademarks R1 10-02 U6625/30-/55-900, U6630-960 Printed in Mexico 56511-B64
-
 1
1 -
 2
2 -
 3
3 -
 4
4 -
 5
5 -
 6
6 -
 7
7 -
8
-
9
-
10
-
11
-
12
-
13
-
14
-
15
-
16
 |
 |

®
This product was designed for
easy Assembly (See page 3)
www.hoover.com
Self-Propelled
WindTunnel
™
Bagless
with Powered
Hand Tool
by HOOVER