Hoover UH70035B Manual - Page 11
Belts
 |
UPC - 073502030295
View all Hoover UH70035B manuals
Add to My Manuals
Save this manual to your list of manuals |
Page 11 highlights
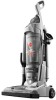
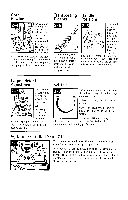
Belts D i s c o n n e cctl e a n efrr o m e l e c t r i c aol u t l e t . W A R N I N GA: g i t a t o rb r u s hr o l l c a ns t a r t s u d d e n l yU. n p l u gc l e a n e rb e f o r et u r n i n gi t o v e r . T h c b e l t sa r el o c a t e du n d c rt h c b o t t o r r rp l a t r o f t h c c l c a n c ra n d s h o u l db c c h e c k e df r o m t i m e t o t i m e [ o b e s u r r t ] r c ya r ei n g o o d c o r r d i t i o n . Repl a ci nFglatB elt R c p l a c cb c l t i f i t i s s t r c t c h c dc, u t o r b r o k c n .T o c l r c c kt h c f l a t b c l t ,r c f c r t o F i g .4 - 1 3 . R e m o v i n gB o t t o m Plate Rem o v i nBg e l t P o s i ti o n i nBge l t W i t h l e t t e r i n go r r o u t s i d eo f b e l t ,s l i d e new beltoverrnotor shaft(A). P l a c eo t h e re n d o f b e l t o v e rl a r g ep u l l c y { B )w h i l er o l l i r r gt h e p u l l e yi n d i r e c t i o n showrr. P l a c eh a n d l ci r rl o w positiorat ndturn c l c a r r cor v e rs o b o t t o n r sidr:is facingup. Rcrnovcthe 6 screwsas s h o w rwr i t h a P h i l l i p s screwdrivcr. Liftoff bottornplate. R e m o v eu s c db e l t ( A ) f r o r nl a r g ep u l l e y{ l l ) a n dd i s c a r d . l u r r r a g i t a t o rb r u s hr o l l r n a k i r r gs u r eb e l t t u r n s f r e c l ya r r di s n o t p i n c h e db e t w e e rar g i t a t o rb r u s h r o l l a r t da g i t a t o rs h i e l d . R e p o s i t i o nb o t t o mp l a t e a n d6 P h i l l i p sh e a d s c r e w sT. i g h t e ns c r e w s sccurcly. F la tBe l t:What t o B uy U s eo n l yg c n u i n el l 0 0 V E Rb c l t sw i t h y o u r c l e a n e r .W h e np u r c h a s i r ragn e wb c l t ,a s kf o r l ' l a tb c l t - l l O O V I r Ro a r t N o . 4 0 2 0 1 - 2 7 1 , I n s p e c t i n gV - B e l t T h cV - b c l ti s d c s i g n c dt o l a s tf o r a l o n g t i r n ea n d i s n o t n o r n r a l l yr e p l a c c dl.l o w e v er , i f t h c V - b e l ti s c r a c k e dg, o u g e do r b r o k e r ri,t s h o u l db e r e p l a c c d . S l i d ef l a t b e l t o f f l a r g ep u l l e ya ss h o w ni n F i g .4 - 1 4 . T o r e n r o v eV - b e l t ,s l i d eb a c ko f b c l t o v c rp u l l c y( A ) . T h e nf i r r n l yp u l l o n b e l ta n d " s n a p "i t o u t . D i s c a r du s e db c l t . T o i n s t a l ln c w b e l t ( w i t hl c t t c r i r r go r ro u t s i d eo f b e l t ) ,s l i d eb a c ko f b e l to v e rp u l l e ya n d p u l l f r o r r to l ' b e l t t o w a r dg r o o v e( l l ) n e x t t o p u l l e y .B c l t w i l l " p o p " i n t o p l a c e . V-Belt:Whatto Buy U s eo n l yg c n u i n eH O O V E Rb c l t sw i t h y o u r c l e a n e rW. h c np u r c h a s i nag ttewbcft, askfor V bclt - H00VERpart No. 40201-2O0. I n s e r ta g i t a t o rb r u s h r o l l t h r o u g hb e l t a n dp o s i t i o nb e l ti r r g r o o v e( A )o n a g i t a t o r b r u s hr o l l .
-
 1
1 -
2
-
3
-
4
-
5
-
 6
6 -
 7
7 -
 8
8 -
 9
9 -
 10
10 -
 11
11 -
 12
12 -
 13
13 -
 14
14 -
 15
15 -
 16
16 -
17
-
18
 |
 |
