Hoover WindTunnel 2 Whole House Rewind Upright Vacuum Product Manual
Hoover WindTunnel 2 Whole House Rewind Upright Vacuum Manual
 |
View all Hoover WindTunnel 2 Whole House Rewind Upright Vacuum manuals
Add to My Manuals
Save this manual to your list of manuals |
Hoover WindTunnel 2 Whole House Rewind Upright Vacuum manual content summary:
- Hoover WindTunnel 2 Whole House Rewind Upright Vacuum | Product Manual - Page 1
OWNER'S MANUAL Operating and Servicing Instructions Español - página E1 hoover.com IMPORTANT: READ CAREFULLY BEFORE ASSEMBLY AND USE. Questions or concerns? For assistance, please call Customer Service at 1-800-944-9200 Mon-Fri 8am-7pm EST. PLEASE DO NOT RETURN THIS PRODUCT TO THE STORE. THIS - Hoover WindTunnel 2 Whole House Rewind Upright Vacuum | Product Manual - Page 2
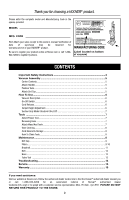
Tools...7 Stair Cleaning...8 Cord Rewind & Storage...8 How To Clean Tools...8 Maintenance...8 Dirt Cup...9 Filters...9-10 Brushroll...11 Belt ...12 Hose...13 Turbo Tool ...13 Troubleshooting 14 Service...15 Warranty...16 If you need assistance: Visit our website at hoover.com. Follow the authorized - Hoover WindTunnel 2 Whole House Rewind Upright Vacuum | Product Manual - Page 3
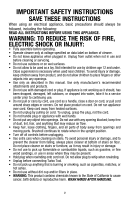
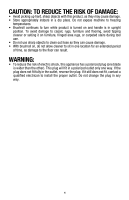
appliance, basic precautions should always be followed, including the following: READ ALL INSTRUCTIONS BEFORE USING THIS APPLIANCE. WARNING: TO REDUCE THE RISK OF FIRE, ELECTRIC SHOCK OR INJURY: • Fully assemble before operating. • Operate cleaner only at voltage specified on data label on bottom of - Hoover WindTunnel 2 Whole House Rewind Upright Vacuum | Product Manual - Page 4
machine to freezing temperatures. • Brushroll continues to turn while product is turned on and handle is in upright position. To avoid damage to carpet, rugs, furniture and flooring, avoid tipping cleaner or setting it on furniture, fringed area rugs, or carpeted stairs during tool use. • Do not use - Hoover WindTunnel 2 Whole House Rewind Upright Vacuum | Product Manual - Page 5
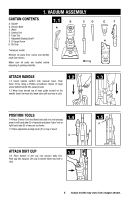
base. Push down firmly. Using a Phillips screwdriver, fasten (1) large screw behind handle into vacuum base. 1.3 Wrap hose around top of hose guide located on the handle. Insert the hose into hose tube until you hear a click. 1.2 1.3 POSITION TOOLS 1.4 Place Crevice Tool into Wand and slide - Hoover WindTunnel 2 Whole House Rewind Upright Vacuum | Product Manual - Page 6
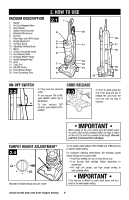
Filter Access 2 10 6. Dirt Cup 7. Filter made with HEPA media 16 8. Height Adjustment 3 9. Furniture Guard 4 10. Adjustable Dusting Brush 11. Wand 5 11 12. Crevice Tool (inside wand) 13. Cord Rewind ease pushing effort. IMPORTANT If the vacuum is difficult to push, push down and turn - Hoover WindTunnel 2 Whole House Rewind Upright Vacuum | Product Manual - Page 7
vacuum is ready for tool use when handle is in upright position. IMPORTANT Brushroll continues to turn while product is turned on and handle is in upright position. To avoid damage to carpet, rugs, furniture and flooring, avoid tipping cleaner parts - Unplug before servicing. 3.3 3.3 To attach - Hoover WindTunnel 2 Whole House Rewind Upright Vacuum | Product Manual - Page 8
at bottom of stairs on floor. Do not place cleaner on stairs or furniture, as it may result in injury or damage. When using tools, always ensure handle is in the upright position. 3.4 3.5 CORD REWIND AND STORAGE 3.5 To return cord for storage, hold plug and press down Cord Release Pedal (B) on - Hoover WindTunnel 2 Whole House Rewind Upright Vacuum | Product Manual - Page 9
filter, rinsable filter, and HEPA filter. Clear obstructions if present. 4. When cleaner is vacuum in the upright position before removing the dirt cup. 4.2 ! WARNING ! To reduce the risk of personal injury - Unplug before cleaning or servicing. Do not use vacuum without dirt cup or filters - Hoover WindTunnel 2 Whole House Rewind Upright Vacuum | Product Manual - Page 10
How to Clean ! WARNING ! To reduce the risk of personal injury - Unplug before cleaning or servicing. Do not use vacuum without dirt cup or filters in place. Do not use vacuum without dirt cup or filters in place. Remove dirt cup and twist the dirt cup handle counterclockwise to open and remove lid - Hoover WindTunnel 2 Whole House Rewind Upright Vacuum | Product Manual - Page 11
BRUSHROLL: How to Clean ! CAUTION ! To reduce the risk of injury from moving parts - Unplug before servicing. Brushroll - Bottom plate with screws Place handle in the low position and turn the cleaner over so the bottom side is up. 4.17 Remove the 6 screws as shown with a Phillips screwdriver. 4.18 - Hoover WindTunnel 2 Whole House Rewind Upright Vacuum | Product Manual - Page 12
reduce the risk of injury from moving parts - Unplug before servicing. 4.20 4.21 The belt is located under the bottom plate of the vacuum and should be checked from time to time to be sure it is in good condition. When To Replace Replace belt if it is damaged, cut or broken. Refer to - Hoover WindTunnel 2 Whole House Rewind Upright Vacuum | Product Manual - Page 13
click. POWERED HAND TOOL: How to Clean (Tool varies per model) ! CAUTION ! To reduce the risk of injury from moving parts - Unplug vacuum before servicing. 4.26 Clean the Turbo Tool by removing the two screws (A), located on the bottom cover, with a Phillips head screwdriver. 4.27 Remove the bottom - Hoover WindTunnel 2 Whole House Rewind Upright Vacuum | Product Manual - Page 14
won't pick up or Low suction Cord Rewind does not work Dust escaping from vacuum 1.Rinsable Filter and/ or Filter made with HEPA media is dirty. 2. Dirt cup full and/ or clogged. 3. Broken or worn belt. 4. Brushroll and/ or Hose clogged. 5. Carpet height setting is incorrect. 1. Cord reel does - Hoover WindTunnel 2 Whole House Rewind Upright Vacuum | Product Manual - Page 15
Hoover® service and genuine Hoover® parts, locate the nearest Authorized Hoover® Warranty Service Dealer (Depot) by: • Checking the Yellow Pages under "Vacuum Cleaners" or "Household". • Visit our website at hoover.com (U.S. Customers) or hoover.ca (Canadian customers). Follow the service - Hoover WindTunnel 2 Whole House Rewind Upright Vacuum | Product Manual - Page 16
the Owner's Manual, your HOOVER® product is services), brushroll, belt, improper maintenance of the product, damage due to misuse, acts of God, nature, vandalism or other acts beyond the control of Hoover or house calls. However, if you mail your product to a Hoover® Authorized Warranty Service
-
 1
1 -
 2
2 -
 3
3 -
 4
4 -
 5
5 -
 6
6 -
 7
7 -
8
-
9
-
10
-
11
-
12
-
13
-
14
-
15
-
16
 |
 |
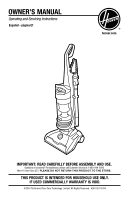
OWNER’S MANUAL
Operating and Servicing Instructions
©2018 Techtronic Floor Care Technology Limited. All Rights Reserved. #961151110-R4
THIS PRODUCT IS INTENDED FOR HOUSEHOLD USE ONLY.
IF USED COMMERCIALLY WARRANTY IS VOID.
Español - página E1
IMPORTANT: READ CAREFULLY BEFORE ASSEMBLY AND USE.
Questions or concerns? For assistance, please call Customer Service at 1-800-944-9200
Mon-Fri 8am-7pm EST.
PLEASE DO NOT RETURN THIS PRODUCT TO THE STORE.
hoover.com