Hoover WindTunnel All-Terrain Dual Brush Roll Product Manual English - Page 2
Warning, Caution
 |
View all Hoover WindTunnel All-Terrain Dual Brush Roll manuals
Add to My Manuals
Save this manual to your list of manuals |
Page 2 highlights
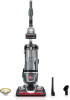
ASSEMBLY WARNING: Fully assemble product prior to use. 1 Insert the handle firmly into the body of the vacuum. OPERATION CAUTION: Not to be used for grooming a pet. CAUTION: Use extra care when cleaning on stairs. To avoid personal injury or damage, and to prevent the cleaner from falling, always place cleaner at the bottom of the stairs or on the floor. Do not place cleaner on stairs or furniture, as it may result in injury or damage. When using tools, always ensure handle is in the upright position. USING THE HOSE AND TOOLS 1 Make sure the vacuum is upright and press the wand release button. MAINTENANCE WARNING: To reduce the risk of personal injury, unplug before cleaning or servicing. This product contains no serviceable parts. If appliance is not working as it should, has been dropped, damaged, left outdoors, or dropped into water, call customer service at 1-800-944-9200 prior to continuing use. EMPTYING THE DIRT CUP SUCTION 1 Push the Power Button to turn ON/OFF. 2 Press the handle release button to use the handle only for above floor cleaning. 1 Press the dirt cup release button. SUCTION SUCTION 2 Insert the hose into the hose port. It will click when secured. 2 Step on the nozzle and lean the handle back. 3 Attach the desired accessory to the end of the wand or the handle. • Turbo Tool Part #: 440015876 • 2-in-1 Upholstery Tool & Dusting Brush Part #: 440015873 • Standard Crevice Tool Part #: 440015874 • LED Crevice Tool Part #: 440015875 2 Empty over a trach can by pressing the dirt cup door release. CLEANING THE EXHAUST FILTER PART #440015877 USING YOUR PRODUCT A B C 1 Tilt the vacuum back, then release the latch to remove the Exhaust Filter 1 A. Releases handle for above floor cleaning. B. ON/OFF Power button. C. Unit will be in Max Suction Power when turned on. • To decrease suction power to low mode, press button once. • Press and hold to turn brush roll off.
-
 1
1 -
 2
2 -
 3
3 -
 4
4 -
 5
5 -
 6
6 -
 7
7 -
 8
8 -
9
-
10
-
11
-
12
 |
 |
