Hotpoint RGA720PKWH Use and Care Manual / Warranty - Page 34
Troubleshooting Tips - problems
 |
UPC - 084691131700
View all Hotpoint RGA720PKWH manuals
Add to My Manuals
Save this manual to your list of manuals |
Page 34 highlights
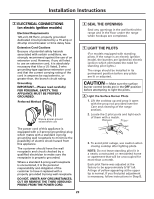
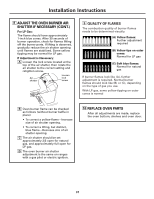
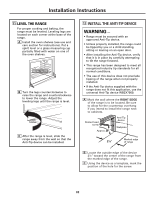
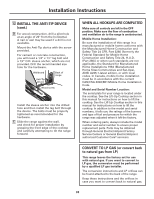
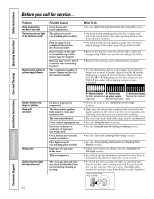
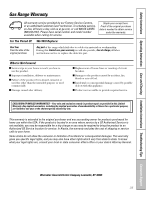
Consumer Support Troubleshooting Tips Installation Instructions Care and Cleaning Operating Instructions Safety Instructions Before you call for service... Problem Oven temperature too hot or too cold Top burners do not light or do not burn evenly Possible Causes Oven thermostat needs adjustment. The pilots are not lit. (on standing pilot models) Burners have yellow or yellow-tipped flames Plug on range is not completely inserted in the electrical outlet. Burner holes on the side or around the top of the burner may be clogged. Burners may not be fitted correctly onto mounting brackets. The combustion quality of burner flames needs to be determined visually. What To Do • See the Adjust the oven thermostat-Do it yourself! section. • On models with standing pilots, lift the cooktop and hold a lit match next to the pilot opening between the front and rear burners. • On models with electric ignition, make sure electrical plug is plugged into a live, properly grounded outlet. • Remove the burners and clean them with a safety pin or paper clip. Make sure you do not enlarge the holes. • Remove the burners and reinstall them properly. • Use the illustrations below to determine if your burner flames are normal. If burner flames look like A, further adjustment is required. Normal burner flames should look like B or C, depending on the type of gas you use. With LP gas, some yellow tipping on outer cones is normal. Burner flames very large or yellow Oven will not work Strong odor Surface burners light but oven does not LP gas is improperly connected. The thermostat capillary bulb must be clean and unobstructed. The oven vent is blocked. Oven control improperly set. Incorrect cookware or cookware of improper size being used. Oven bottom not securely seated in position. Pilot light is not lit (on standing pilot models) Improper air/gas ratio in the oven. This is temporary. The oven gas shut-off valve may have accidentally been moved during cleaning or moving. A-Yellow flames B-Yellow tips C-Soft blue flames Further adjustment on outer cones Normal for natural required Normal for LP gas gas • Check all steps in the Installation of the range section. • Make sure the thermostat capillary bulb (located in the upper portion of the oven) is in the correct position, not touching oven sides and not coated with anything. • The oven vent, on the back of the range, must be unobstructed. • See the Using the oven sections. • See the Using the oven for baking or roasting section. • See the Care and cleaning of the range section. • See the Oven Lighting Instructions for Standing Pilot Models section. • Adjust oven burner air shutter. See the Installation of the range section. • An odor from the insulation around the oven liner is normal for the first few times the oven is used. • To check the oven gas shut-off valve on standard twin burner models, raise cooktop and look for gas shut-off lever at the extreme left rear corner. (Standing pilot models do not have a gas shut-off valve on the regulator.) Lever is shown closed. PULL TO OPEN. 34
-
 1
1 -
2
-
3
-
4
-
5
-
6
-
7
-
8
-
9
-
10
-
11
-
12
-
13
-
14
-
15
-
16
-
17
-
18
-
19
-
20
-
21
-
22
-
23
-
24
-
25
-
26
-
27
-
28
-
 29
29 -
 30
30 -
 31
31 -
 32
32 -
 33
33 -
 34
34 -
 35
35 -
 36
36
 |
 |