Hotpoint RGB745BEHCT Installation Instructions
Hotpoint RGB745BEHCT - HotpointR 30" Gas Range Manual
 |
View all Hotpoint RGB745BEHCT manuals
Add to My Manuals
Save this manual to your list of manuals |
Hotpoint RGB745BEHCT manual content summary:
- Hotpoint RGB745BEHCT | Installation Instructions - Page 1
24, 25 Racks 33 Stainless Steel Surfaces 29 Storage Drawer 31 Installation Owner's Manual Instructions 34-45 & Installation Air Adjustment 44 Instructions Anti-Tip Device 37, 45 Checking Burner Ignition . . . . . .43 JGBP36 Connecting the Range JGBP86 to Gas 38-40 JGBP87 Dimensions - Hotpoint RGB745BEHCT | Installation Instructions - Page 2
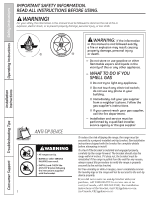
properly. If you did not receive an anti-tip bracket with your purchase, call 1.800.626.8774 to receive one at no cost (in Canada, call 1.800.561.3344). For installation instructions of the bracket, visit GEAppliances.com 2 (in Canada, GEAppliances.ca). Consumer Support Troubleshooting Tips - Hotpoint RGB745BEHCT | Installation Instructions - Page 3
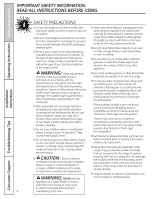
with the Installation Instructions. Any adjustment and service should be performed only by qualified gas range installers or service technicians. ■ Do not attempt to repair or replace any part of your range unless it is specifically recommended in this manual. All other service should be referred - Hotpoint RGB745BEHCT | Installation Instructions - Page 4
in an oven, ■ Be sure your range is correctly adjusted by a qualified service technician or installer for a range storage drawer, a warming drawer or near a cooktop. the type of gas (natural or carbon monoxide poisoning and 4 overheating of the oven. Consumer Support Troubleshooting Tips - Hotpoint RGB745BEHCT | Installation Instructions - Page 5
The hot point support service technician. Never use an open flame to locate a leak. ■ Always turn the surface burner controls off before removing cookware. ■ Do not lift the cooktop on sealed burner models. Lifting the cooktop can lead to damage and improper operation of the range. 5 Troubleshooting - Hotpoint RGB745BEHCT | Installation Instructions - Page 6
should have a grease fire in a broiler pan, touch the Clear/Off pad, and keep the oven door closed to contain fire until it burns out. ■ For safety and proper cooking performance, always bake and broil with the oven door closed. Installation Instructions Consumer Support Troubleshooting Tips 6 - Hotpoint RGB745BEHCT | Installation Instructions - Page 7
any kind should be used in or around any part of the oven. Residue from oven cleaners will damage the inside of the oven when the self-clean cycle is used. READ AND FOLLOW THIS SAFETY INFORMATION CAREFULLY. SAVE THESE INSTRUCTIONS Installation Instructions Troubleshooting Tips Consumer Support 7 - Hotpoint RGB745BEHCT | Installation Instructions - Page 8
down from Hi to Lo to suit a wide range of cooking needs. Extra-large burner only On some models The center oval burner (on some models) is for large pots/pans or for use with the griddle. Installation Instructions Consumer Support Troubleshooting Tips Medium 8 Large How to Select Flame Size - Hotpoint RGB745BEHCT | Installation Instructions - Page 9
slowly. Heatproof Glass Ceramic: Can be used for either surface or oven cooking. It conducts heat very slowly and cools very slowly. Check cookware manufacturer's directions to be sure it can be used on gas ranges. Stainless Steel: This metal alone has poor heating properties and is usually combined - Hotpoint RGB745BEHCT | Installation Instructions - Page 10
Operating Instructions Safety Instructions Using the griddle. (on some models) Your non-stick coated griddle provides an extra-large cooking surface for meats, the griddle, remove the center grate and replace with the griddle. Installation Instructions Consumer Support Troubleshooting Tips 10 - Hotpoint RGB745BEHCT | Installation Instructions - Page 11
using metal utensils with sharp points or rough sharp edges which might damage the griddle surface. ■ Do not cut foods on the griddle. NOTE: Griddle settings may need to be adjusted if the griddle is used for an extended time. Installation Instructions Troubleshooting Tips Consumer Support 11 - Hotpoint RGB745BEHCT | Installation Instructions - Page 12
Operating Instructions Safety Instructions Using the oven controls. Throughout this manual, features and appearance may vary from your model. Installation Instructions Consumer Support Troubleshooting Tips Oven Control, Clock and Timer Features and Settings (on some models) Bake/Temp Recall Pad - Hotpoint RGB745BEHCT | Installation Instructions - Page 13
range does not have a latch, the door will unlock automatically. Clear/Off Pad Touch this pad to cancel ALL oven at this point. Glows when the oven is in point it will turn off and the Bake/Temp Recall pad light will light up). Installation Instructions Troubleshooting Tips Consumer Support 13 - Hotpoint RGB745BEHCT | Installation Instructions - Page 14
the flow of gas is automatically stopped and will not resume when power is restored until the glow bar has reached operating temperature. Oven Light Touch the Oven Light pad on the upper control panel to turn the light on or off. Installation Instructions Consumer Support Troubleshooting Tips 14 - Hotpoint RGB745BEHCT | Installation Instructions - Page 15
when baking is finished and then remove the food from the oven. Installation Instructions Troubleshooting Tips Consumer Support Preheating and Pan Placement Preheat the oven if the recipe calls for it. To preheat, set the oven at the correct temperature. Preheating is necessary for good results - Hotpoint RGB745BEHCT | Installation Instructions - Page 16
Operating Instructions Safety Instructions Installation Instructions Using the oven. If your model has a door latch, do not lock the oven door with the latch during broiling. The latch is used for self-cleaning only. Close the door. Always broil with the door closed. How to Set the Oven for - Hotpoint RGB745BEHCT | Installation Instructions - Page 17
Instructions Operating Instructions Using the clock and timer. GEAppliances.com Not all features are on all models. To Set the Clock The clock must be set to the correct time of day for the automatic oven display on your range. Touch the Clock Instructions Troubleshooting Tips Consumer Support 17 - Hotpoint RGB745BEHCT | Installation Instructions - Page 18
Cancel the Timer Touch the Kitchen Timer On/Off pad twice. End of Cycle Tones (on some models) Clear the tones by pressing the pad of the function you are using. Power Outage If a the + or - pads. Touch the Start/On pad. Installation Instructions Consumer Support Troubleshooting Tips 18 - Hotpoint RGB745BEHCT | Installation Instructions - Page 19
the food from the oven. Remember, even though the oven shuts off automatically, foods continue cooking after controls are off. Touch the Start/On pad. NOTE: An attention tone will sound if you are using timed baking and do not touch the Start/On pad. Troubleshooting Tips Consumer Support 19 - Hotpoint RGB745BEHCT | Installation Instructions - Page 20
Hour Shut-Off With this feature, should you forget and leave the oven on, the control will automatically turn off the oven after 12 hours during baking functions or after 3 hours during a control set in this special features mode. Installation Instructions Consumer Support Troubleshooting Tips 20 - Hotpoint RGB745BEHCT | Installation Instructions - Page 21
may be removed. See the Oven Light Replacement section. On models with a light switch on the control panel, the oven light may be turned on Instructions When the display shows ⊃ the oven is set in Sabbath. When the display shows ⊃ the oven is baking/roasting. Troubleshooting Tips Consumer Support - Hotpoint RGB745BEHCT | Installation Instructions - Page 22
the 12 Hour Shut-Off feature. Touch the Start/On pad. NOTE: If a power outage occurred while the oven was in Sabbath, the oven will automatically turn off and stay off even when the power returns. The oven control must be reset. Installation Instructions Consumer Support Troubleshooting Tips 22 - Hotpoint RGB745BEHCT | Installation Instructions - Page 23
oven is too hot or too cold, you can adjust the thermostat yourself. Do not use thermometers, such as those found in grocery stores, to check the temperature setting of your oven at least 80% fat by weight. Low fat spreads, on the other hand, Instructions Troubleshooting Tips Consumer Support 23 - Hotpoint RGB745BEHCT | Installation Instructions - Page 24
off during the self-cleaning cycle of any range. Move birds to another well-ventilated room. Installation Instructions Consumer Support Troubleshooting Tips How to Set the Oven for Cleaning Follow the directions in the Before a Clean Cycle section. If your model has a latch, latch the door. NOTE - Hotpoint RGB745BEHCT | Installation Instructions - Page 25
door will unlock automatically. Installation Instructions Troubleshooting Tips Consumer Support To Stop a Clean Cycle Touch the Clear/Off pad. When the Self Clean light goes off indicating the oven has cooled below the locking temperature, unlatch the door (on models with a latch) and open the - Hotpoint RGB745BEHCT | Installation Instructions - Page 26
. Clean under the griddle as soon as it is cool. Clean with hot soapy water. ■ Do not place your griddle in the microwave. ■ Always turn off all surface burners before removing the griddle. Use caution when handling a hot griddle. Installation Instructions Consumer Support Troubleshooting Tips 26 - Hotpoint RGB745BEHCT | Installation Instructions - Page 27
CAUTION: Do not operate the cooktop without all burner parts and grates in place. The oval center burner head and cap assembly (on some models) can be lifted off, making it easy to could cause you to knock over hot cookware. Installation Instructions Troubleshooting Tips Consumer Support 27 - Hotpoint RGB745BEHCT | Installation Instructions - Page 28
burner head and cap Front of range Large burner head and cap Make sure the slot in the burner head is positioned over the electrode. Slot Slot Electrode Make sure that the heads and caps are replaced in the correct locations. Installation Instructions Consumer Support Troubleshooting Tips 28 - Hotpoint RGB745BEHCT | Installation Instructions - Page 29
purchasing stainless steel appliance cleaner or polish, or to find the location of a dealer nearest you, please call our toll-free number: National Parts Center 800.626.2002 (U.S.) 800.661.1616 (Canada) GEAppliances.com (U.S.) www.GEAppliances.ca (Canada) Troubleshooting Tips Consumer Support 29 - Hotpoint RGB745BEHCT | Installation Instructions - Page 30
can concentrate heat at the bottom of the oven, resulting in poor baking performance. To clean up spillovers, use soap and water, an abrasive cleaner or soap-filled scouring pad. Rinse well to remove any soap before self-cleaning. Installation Instructions Consumer Support Troubleshooting Tips 30 - Hotpoint RGB745BEHCT | Installation Instructions - Page 31
the front of the drawer up and free of the range. To replace storage drawer: Set the stops on the back of the drawer over the stops in the range. Slide drawer evenly and straight back, so that the rails in the range are engaged. Installation Instructions Troubleshooting Tips Consumer Support 31 - Hotpoint RGB745BEHCT | Installation Instructions - Page 32
replacing. Replace the knobs in the Off position to ensure proper placement. Metal parts can be cleaned with soap and water. Do not use steel wool, abrasives, ammonia, acids or commercial oven cleaners. Dry with a soft cloth. Installation Instructions Consumer Support Troubleshooting Tips 32 - Hotpoint RGB745BEHCT | Installation Instructions - Page 33
, the wire holds the cover firmly. Be certain the wire is in the depression in the center of the cover. Connect electrical power to the range. Installation Instructions Troubleshooting Tips Consumer Service 33 - Hotpoint RGB745BEHCT | Installation Instructions - Page 34
Instructions Range Questions? Call 800.GE.CARES (800.432.2737) or visit our Website at: GEAppliances.com In Canada, call 1.800.561.3344 or visit www.GEAppliances.ca In the Commonwealth of Massachusetts: • This product must be installed by a licensed plumber or gas fitter. • When using ball-type gas - Hotpoint RGB745BEHCT | Installation Instructions - Page 35
material and literature from oven before connecting gas and electrical supply to range. CAUTION - Do not attempt to operate the oven of this range during a power failure (Electric Ignition models only). ■ Have your range installed by a qualified installer. ■ Your range must be electrically grounded - Hotpoint RGB745BEHCT | Installation Instructions - Page 36
surfaces. These dimensions must be met for safe use of your range. The location of the electrical outlet and pipe opening (see Gas Pipe and Electric Outlet Locations) may be adjusted to meet specific requirements. The range may be placed with 0" clearance (flush) at the back wall. Minimum - Hotpoint RGB745BEHCT | Installation Instructions - Page 37
(up to 200°F) by the range. (See the Installation Safety Instructions section.) IMPORTANT! Remove all tape and packaging. Make sure the burners are properly seated and level. Take the accessory pack out of the oven and/or drawer. Check to be sure that no range parts have come loose during shipping - Hotpoint RGB745BEHCT | Installation Instructions - Page 38
Instructions 1 PROVIDE ADEQUATE GAS SUPPLY Your range is designed to operate at a pressure of 4" of water column on natural gas or, if designed for LP gas (propane or butane), 10" of water column. Make sure you are supplying your range with the type of gas for which it is designed. This range - Hotpoint RGB745BEHCT | Installation Instructions - Page 39
Installation Instructions GAS PIPE AND ELECTRICAL OUTLET LOCATIONS This area allows for flush range installation with through-the-wall connection of pipe stub/shut-off valve and rear wall 120V outlet. Shortest connection from hard pipe stub location to range hookup. This area allows for flush range - Hotpoint RGB745BEHCT | Installation Instructions - Page 40
Installation Instructions FLEXIBLE CONNECTOR HOOKUP Pressure regulator Adapter Installer: Inform the consumer of the location of the gas shut-off valve. 1/2" or 3/4"" Gas pipe Gas Flow into Range Flex connector (6 ft. max.) Adapter Gas shut-off valve RIGID PIPE HOOKUP OPTIONS 45° Elbow Gas - Hotpoint RGB745BEHCT | Installation Instructions - Page 41
Instructions rating of the cord in amperes be equivalent to, or greater than, the circuit rating Canada for gas range manually reset by the consumer. The National Electrical Code requires the use of GFCI's in kitchen receptacles installed to serve countertop surfaces. Performance of the range - Hotpoint RGB745BEHCT | Installation Instructions - Page 42
grates on the cooktop. These grates are position specific. The undersides of the left and right grates are marked "LEFT FRONT" and "RIGHT FRONT." Place the middle grate with its bowed front toward the front of the range. Left Front Center Right Front NOTE: Some models only have side grates. 42 - Hotpoint RGB745BEHCT | Installation Instructions - Page 43
require electrical power to operate. In case of a power outage, the oven burners on these models cannot be lit manually with a match. Gas will not flow unless the glow bar is hot. If the oven is in use when a power outage occurs, the burner will shut off and cannot be re-lit until power is restored - Hotpoint RGB745BEHCT | Installation Instructions - Page 44
and then pull it up and out. 9 LEVELING THE RANGE A. Install the oven racks in the oven and position the range where it will be installed. Lower range Raise range Lower range Leg leveler Raise range (on some models) (on some models) B. Check for levelness by placing a spirit level or a cup - Hotpoint RGB745BEHCT | Installation Instructions - Page 45
is unobstructed. CONVERTING TO LP GAS (or converting back to natural gas from LP) This range leaves the factory set for use with natural gas. If you want to convert to LP gas, the conversion must be performed by a qualified LP gas installer. The conversion instructions and LP orifices can be found - Hotpoint RGB745BEHCT | Installation Instructions - Page 46
Instructions Before you call for service... Troubleshooting Tips Save time and money! Review the charts on the following pages first and you may not need to call for service. Problem Top burners do not light or do not burn evenly Burner flames very large or yellow Surface burners light but oven - Hotpoint RGB745BEHCT | Installation Instructions - Page 47
.com Installation Instructions Problem Food does not bake or roast properly Possible Causes Oven controls improperly set. Rack position is incorrect. Incorrect cookware or cookware of improper size being used. Oven thermostat needs adjustment. Clock not set correctly. (on some models) Aluminum - Hotpoint RGB745BEHCT | Installation Instructions - Page 48
Operating Instructions Safety Instructions Before you call for service... Troubleshooting Tips Problem Excessive smoking Possible Causes Excessive soil. What To Do • Touch the Clear/Off pad. Oven door will not open Oven too hot. after a clean cycle • Allow the oven to cool below locking - Hotpoint RGB745BEHCT | Installation Instructions - Page 49
is over-loaded or load is unbalanced. • Fully extend the drawer and push it all the way in. See the Care and cleaning of the range section. • Reduce weight. Redistribute drawer contents. Installation Instructions Troubleshooting Tips Consumer Support 49 - Hotpoint RGB745BEHCT | Installation Instructions - Page 50
your model number ready. Installation Instructions Consumer Support Troubleshooting Tips Grates Surface Burners & Caps Oven Racks Broiler Pan Stainless Steel Cleaner Light Bulbs Knobs Tired of discolored racks? Wishing you had extra-heavy-duty oven racks? NOW AVAILABLE for your range: GE - Hotpoint RGB745BEHCT | Installation Instructions - Page 51
Please place in envelope and mail to: Veuillez mettre dans une enveloppe et envoyez à : OWNERSHIP REGISTRATION P.O. BOX 1780 MISSISSAUGA, ONTARIO L4Y 4G1 (FOR CANADIAN CONSUMERS ONLY) 51 - Hotpoint RGB745BEHCT | Installation Instructions - Page 52
52 - Hotpoint RGB745BEHCT | Installation Instructions - Page 53
Notes. GEAppliances.com Safety Instructions Operating Instructions Installation Instructions Troubleshooting Tips Consumer Support 53 - Hotpoint RGB745BEHCT | Installation Instructions - Page 54
Operating Instructions Safety Instructions GE Gas Range Warranty. (For customers in the United States) All warranty service provided by our Factory Service Centers or an authorized Customer Care® technician. To schedule service, visit us on-line at GEAppliances.com, or call 800.GE.CARES (800.432. - Hotpoint RGB745BEHCT | Installation Instructions - Page 55
Operating Instructions GE Gas Range Warranty. (For customers in Canada) All warranty service provided by our Factory Service Centres or an authorized Customer Care® technician. To schedule service, visit us on-line at www.GEAppliances.ca, or call 1.800.561.3344. Please have serial number and model - Hotpoint RGB745BEHCT | Installation Instructions - Page 56
any day of the year! For greater convenience and faster service, you can now download Owner's Manuals, order parts or even schedule service on-line. In Canada: www.GEAppliances.ca Schedule Service In the U.S.: GEAppliances.com Expert GE repair service is only one step away from your door. Get on
-
 1
1 -
 2
2 -
 3
3 -
 4
4 -
 5
5 -
 6
6 -
 7
7 -
8
-
9
-
10
-
11
-
12
-
13
-
14
-
15
-
16
-
17
-
18
-
19
-
20
-
21
-
22
-
23
-
24
-
25
-
26
-
27
-
28
-
29
-
30
-
31
-
32
-
33
-
34
-
35
-
36
-
37
-
38
-
39
-
40
-
41
-
42
-
43
-
44
-
45
-
46
-
47
-
48
-
49
-
50
-
51
-
52
-
53
-
54
-
55
-
56
 |
 |

183D5580P243
49-85161
01-09 JR
GEAppliances.com
Write the model and serial
numbers here:
Model #
____________________
Serial #______________________
You can find them on a label on
the front of the range behind the
storage drawer or kick panel.
Safety Instructions
. . . . . .2–7
Operating Instructions
Aluminum Foil
. . . . . . . . . . . . . . . .15
Clock and Timer . . . . . . . . . . .17, 18
Oven . . . . . . . . . . . . . . . . . . . . . .12–25
Baking and Roasting
. . . . . . . .15
Broiling, Broiling Guide . . . . . . .16
Oven Control . . . . . . . . . . . . .12, 13
Power Outage
. . . . . . . . . . .14, 18
Preheating . . . . . . . . . . . . . . . . . . .15
Sabbath Feature . . . . . . . . .21, 22
Self-Cleaning . . . . . . . . . . . . .24, 25
Special Features . . . . . . . . . . . . .20
Thermostat Adjustment
. . . . .23
Timed Baking
and Roasting . . . . . . . . . . . . . . . .19
Surface Cooking . . . . . . . . . . . . .8, 9
Griddle . . . . . . . . . . . . . . . . . . .10, 11
Care and Cleaning
Burner Assembly . . . . . . . . . .27–29
Burner Grates . . . . . . . . . . . . . . . . .29
Control Panel and Knobs
. . . . .32
Cooktop Surface . . . . . . . . . . . . . .29
Door Removal . . . . . . . . . . . . . . . . .30
Griddle . . . . . . . . . . . . . . . . . . . . . . . .26
Kick Panel . . . . . . . . . . . . . . . . . . . . .31
Oven Bottom
. . . . . . . . . . . . . . . . .30
Oven Light Replacement . . . . . .33
Oven Vents
. . . . . . . . . . . . . . . . . . .32
Self-Cleaning . . . . . . . . . . . . . .24, 25
Racks . . . . . . . . . . . . . . . . . . . . . . . . .33
Stainless Steel Surfaces . . . . . . .29
Storage Drawer . . . . . . . . . . . . . . .31
Installation
Instructions
. . . . . . . . . . . .34–45
Air Adjustment . . . . . . . . . . . . . . . .44
Anti-Tip Device . . . . . . . . . . . .37, 45
Checking Burner Ignition . . . . . .43
Connecting the Range
to Gas
. . . . . . . . . . . . . . . . . . . .38–40
Dimensions and Clearances . .36
Electrical Connections . . . . .41, 42
Leveling the Range
. . . . . . . . . . .44
Location
. . . . . . . . . . . . . . . . . . . . . .37
LP . . . . . . . . . . . . . . . . . . . . . . . . . . . . .45
Troubleshooting
Tips
. . . . . . . . . . . . . . . . . . . . . .46–49
Accessories
. . . . . . . . . . . . . . . .50
Consumer Support
Consumer
Support . . . . . . . . . . . . . .Back Cover
Ownership Registration
for Customers in
Canada only
. . . . . . . . . . .51, 52
Warranty for Customers
in Canada . . . . . . . . . . . . . . . . . . . . .55
Warranty for Customers
in the U.S.A.
. . . . . . . . . . . . . . . . . .54
Ranges
JGBP36
JGBP86
JGBP87
RGB735
RGB740
RGB745
RGB746
RGB790
Owner’s Manual
& Installation
Instructions
Self-Cleaning Gas
In Canada contact us at:
www.GEAppliances.ca