Huawei WS880 Setup Guide - Page 1
Huawei WS880 Manual
 |
View all Huawei WS880 manuals
Add to My Manuals
Save this manual to your list of manuals |
Page 1 highlights
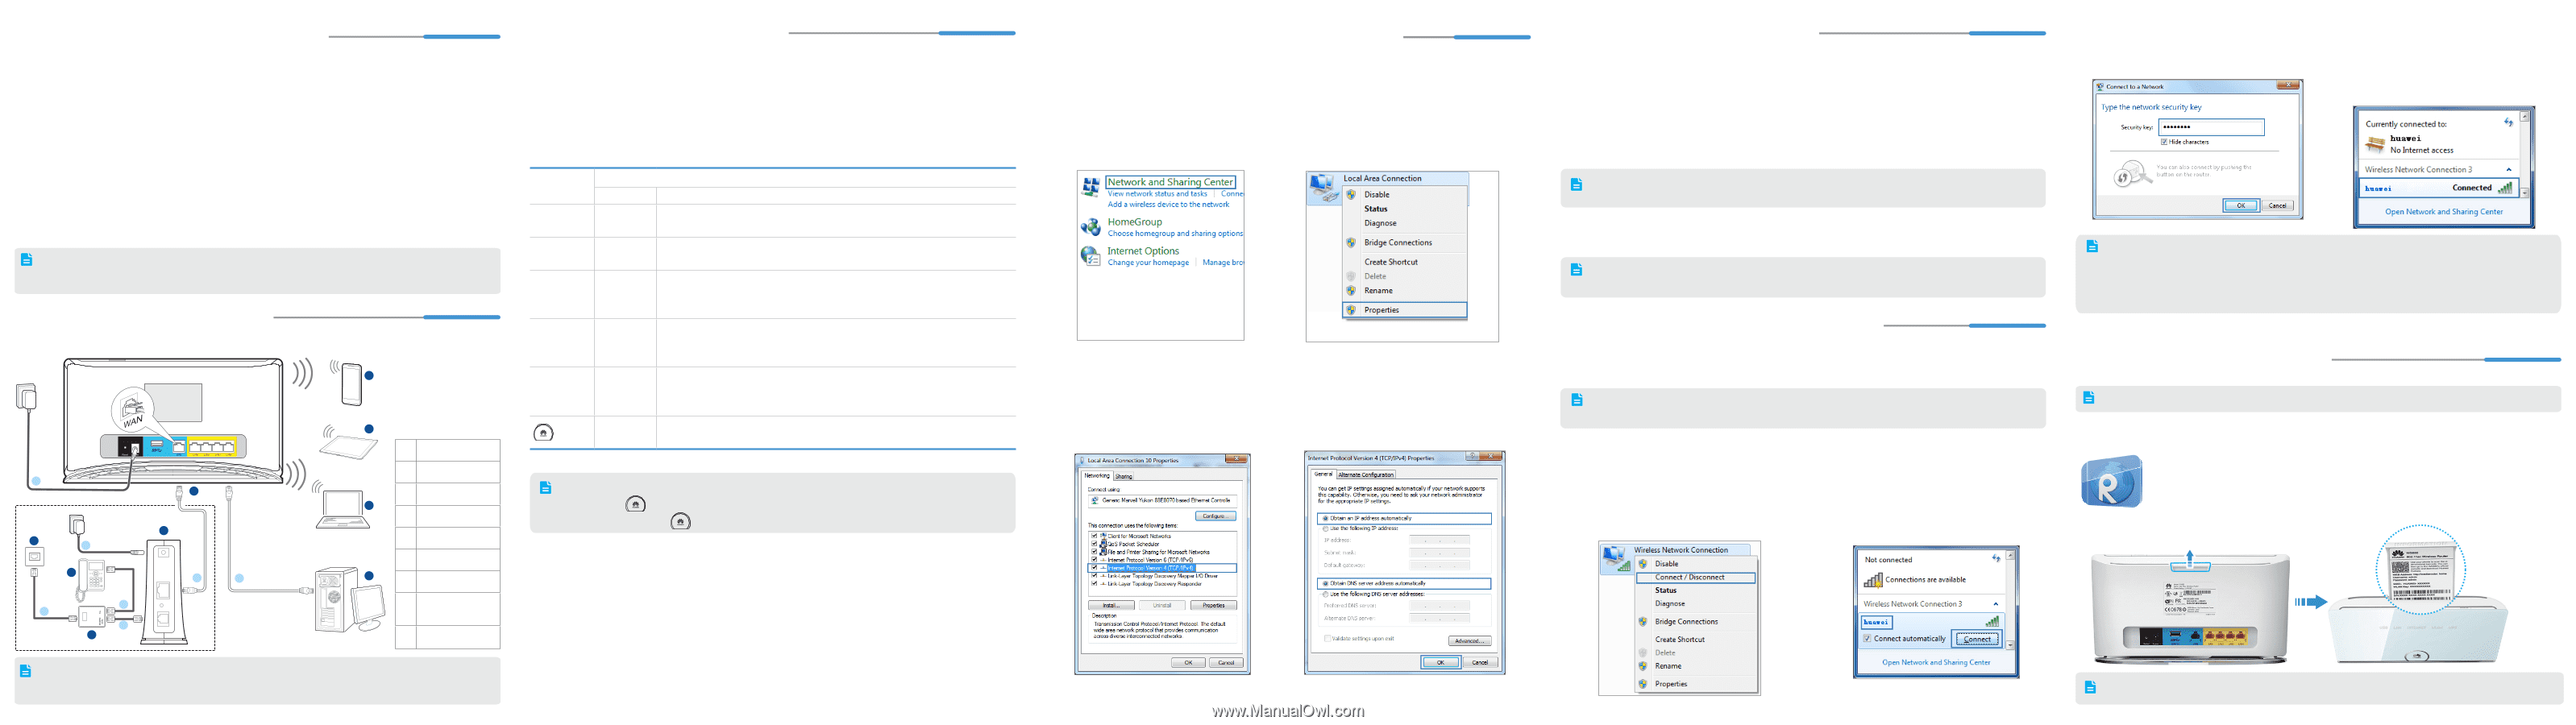
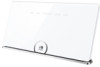
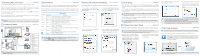
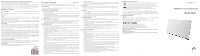
1 Obtaining More Information Thanks for purchasing the WS880 802.11ac Wireless Router (WS880 for short). This quick start will show you how to connect your WS880 to a network and access the Internet. The figures in this guide are for reference only. The appearance and display features may vary slightly depending on the actual product version. For the full user guide, visit http://www.huaweidevice.com. Enter WS880 in the website search box and press Enter. Please visit www.huaweidevice.com/worldwide/support/hotline for recently updated hotline and email address in your country or region. Packing list: 1 x WS880, 1 x power adapter, 1 x network cable, 1 x Quick Start and 1 x Warranty Card. 2 Connecting Cables Connect your devices in the sequence indicated in the following figure. A USB 3.0 7 E H 6 G F POWER 4 5 2 LAN 1 RESET 3 ADSL I B A Phone B Tablet C Laptop C D Computer E WS880 F Modem D G Telephone H Telephone wall jack I Splitter 3 Powering On With all the cables connected, plug the power adapter into the wall-mounted power outlet to power on the WS880. After the WS880 is powered on, the WS880 indicator turns on. The following table lists how the indicators behave when the WS880 is operating correctly. If the indicators do not behave as expected, ensure that everything is plugged in correctly. Indicator USB LAN INTERNET WLAN WPS Expected State Starting up Working Steady off • Steady off (No USB device connected to the USB port) • Steady on (USB device connected to the USB port) Steady on • Steady off (No LAN port connected to a computer) • Steady on (any of the LAN1 to LAN4 ports connected to a computer) Steady on • Steady off (WAN port not connected to a network) • Steady on (WAN port connected to a network) • Blinking (WAN interface is connecting to the network) Steady on • Steady off (WLAN enabled) • Steady on (WLAN disabled) Press the WLAN button (more than 3 seconds) to enable/disnable WLAN. Steady off • Steady off (WPS disabled) • Blinking (WPS enabled) Press the WPS button(less than 3 seconds) to start WPS negotiation. Steady on • Steady off (WS880 powered off) • Steady on (WS880 powered on) After the WS880 power adapter is plugged into a wall-mounted power outlet: • Touch the icon to turn all the indicators off or on. • Touch and hold the icon for more than 2 seconds to power the WS880 off or on. 4 Setting the Computer IP Address The following example uses Windows 7 to describe how to set the computer IP address: 1. Choose Start > Control Panel > Network and Internet > Network and Sharing Center. 2. Choose Change adapter settings. Right-click Local Area Connection and choose Properties. 3. D o u b l e - c l i c k I n t e r n e t P r o t o c o l Version 4 (TCP/IPv4). 4. S e l e c t O b t a i n a n I P a d d r e s s automatically and Obtain DNS server address automatically. Click OK. 5 Quick Setup 1. Open a browser. In the address box, enter http://mediarouter.home. Press Enter. Enter the login user name (admin by default) and password (admin by default). Click Login. 2. On the Home tab, click Connect to The Internet. Then select a network connection type and set network parameters based on the network provided by your Internet service provider. You can choose Connect automatically, WS880 will automatically select the network connection type. 3. On the Home tab, click Connect to Internet by WLAN, set WLAN parameters, Click Save to complete the configuration. To protect against unauthorized access, change your user name and password after the first login. 6 Wireless Connection Setup The following example uses Windows 7 to describe how to set up a wireless connection: To obtain the default SSID and key, check the label on the rear panel. To better secure your WLAN, promptly change the SSID and key. 1. Choose Start > Control Panel > Network and Internet > Network and Sharing Center > Change adapter settings. Right-click Wireless Network Connection, and choose Connect / Disconnect. 2. From the wireless network list, select the WLAN provided by the WS880. Click Connect. 3. In the displayed dialog box, enter the WLAN key and click OK. 4. In the wireless network list, check the WLAN connection status. If the status is Connected, the computer is wirelessly connected to the WS880. • After the SSID and key had been changed, your computer should use the new ones to establish a wireless connection to the WS880. • By default, WLAN has enabled. When you don't use it, you can press the WPS/ WLAN button (more than 3 seconds) to disnable/enable WLAN. 7 QR Code Scanning To use this function, your phone or tablet must have a QR code scanner installed. You can use your phone or tablet to manage and configure your WS880. To do so: Use the QR code scanner on your Android-based phone or tablet to scan the QR code on the security token card that pulls out from the top of the WS880. Enter RuMate in the search box to download the Huawei RuMate software. With Huawei RuMate installed, your phone or tablet is ready to manage and configure your WS880. When configuring the WS880 for the first time, use a network cable to connect the WS880 to a computer. If your phone or tablet is running iOS or Windows Mobile, download Huawei RuMate from the App Store or Windows Phone Store. 1 2 3 4 5
-
 1
1 -
 2
2
 |
 |