Hunter 25579 Owner's Manual - Page 14
Uninstalling the Light Fixture
 |
View all Hunter 25579 manuals
Add to My Manuals
Save this manual to your list of manuals |
Page 14 highlights
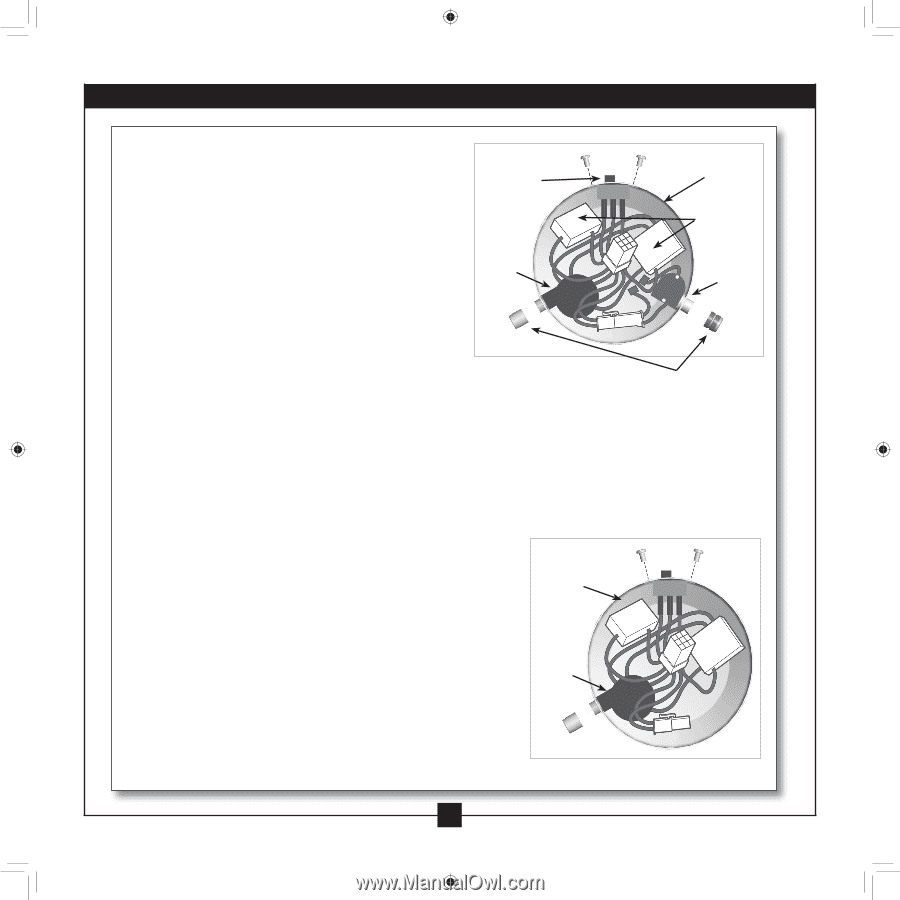
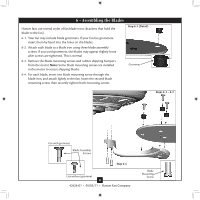
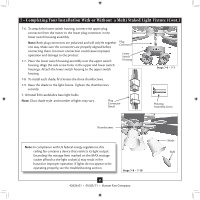
7 • Completing Your Installation With or Without a Multi Staked Light Fixture (Cont.) Uninstalling the Light Fixture 7-11. You must remove the wiring harness and its components from the integrated light fixture. You Steps 7-11 - 7-16 Reversing Switch Light Assembly Housing must then install the wiring harness into the empty switch housing included with the fan. Capacitors 7-12. Locate the reversing switch and carefully remove Fan the two screws holding the reversing switch to the Speed lower switch housing. Now, remove the reversing Switch Light Switch switch from the housing. 7-13. Remove the patented breakaway connector from the end of the fan pull chain. Carefully loosen the bellmouth nut from the pull chain and remove the pull chain switch from the light fixture housing. Bellmouth Nuts 7-14. Locate and carefully remove the two capacitors. 7-15. Unplug the two-wire connectors; one connector will have a black with white striped wire and a white wire coming from the multi-wire connector. 7-16. You have now disconnected the wiring harness and its components and are ready to install them into the empty switch housing. (The light switch remains in the light assembly housing.) 7-17. Insert the pull chain and fan pull chain switch through the Steps 7-17 - 7-21 round opening on the side of the empty switch housing. Thread the bellmouth nut over the pull chain and hand tighten the bellmouth nut. Switch Housing 7-18. Reattach the breakaway connector to the pull chain. 7-19. Insert the reversing switch into the square hole on the side of the switch housing. Install and tighten the two screws you removed previously from the other switch housing. 7-20. Carefully place the capacitors in the switch housing. Fan Speed Switch 7-21. Continue with Step 7-6. 14 42626-01 • 05/05/11 • Hunter Fan Company
-
 1
1 -
2
-
3
-
4
-
5
-
6
-
7
-
8
-
 9
9 -
 10
10 -
 11
11 -
 12
12 -
 13
13 -
 14
14 -
 15
15 -
 16
16
 |
 |