Hunter 90022 Owners Guide - Page 6
Hunter 90022 Manual
 |
View all Hunter 90022 manuals
Add to My Manuals
Save this manual to your list of manuals |
Page 6 highlights
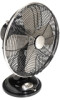
MAINTENANCE This fan is permanently lubricated and will not require additional lubrication (oil) for the life of the fan. This fan requires little maintenance and contains no user serviceable parts. DO NOT try to fix it yourself. Contact qualified service personnel if servicing is needed. TO CLEAN: 1. Before cleaning, turn fan off and unplug from electrical outlet. Wipe off excess dust with a lintfree cloth. 2. To ensure adequate air circulation to the motor, keep vents located at the rear of the motor housing free from dust accumulation. A vacuum cleaner hose can be used to clean these vents. 3. DO NOT immerse the fan in water or any other liquid. CLEANING GRILL AND BLADE: 1. Turn the fan off and unplug from the electrical outlet. 2. Disassemble grills by carefully removing the screw on the bottom of the grill and by squeezing the ring to remove the hook from the hole. See Figure 4. Blade 4. Grills and blades may be cleaned with mild soap and water. 5. Use a soft, slightly damp cloth to wipe the remaining fan parts. 6. DO NOT allow water or any other liquid to get into the motor housing or base. 7. Reassemble the fan after blades and grills have dried completely. First, replace the blades. When replacing the blade screw, you should feel some resistance as the screw engages the bar. Next, align the grills, replace the ring, place the hook in the hole and replace the screw. 8. DO NOT plug fan into an electrical outlet until it has been fully reassembled. Front Grill Blade Screw Back Grill Handle Oscillation Knob Motor Housing Up/Down Adjustment Screw 3. Disassemble blades by carefully removing the blade screw behind the blades. The blades should slide off. Ring Base Power/Speed Control Switch FIGURE 4 6 41479-01 01/06/2005 41479-01 Rev 01-06-05.pmd 6 1/6/05, 5:06 PM
-
 1
1 -
 2
2 -
 3
3 -
 4
4 -
 5
5 -
 6
6 -
 7
7 -
 8
8
 |
 |
