Husqvarna 223R Owners Manual
Husqvarna 223R Manual
 |
View all Husqvarna 223R manuals
Add to My Manuals
Save this manual to your list of manuals |
Husqvarna 223R manual content summary:
- Husqvarna 223R | Owners Manual - Page 1
Operator's manual (EPA) 223R Please read the operator's manual carefully and make sure you understand the instructions before using the machine. English - Husqvarna 223R | Owners Manual - Page 2
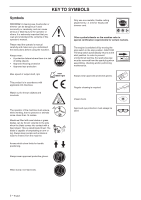
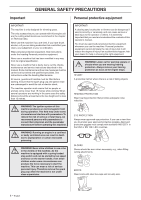
's manual carefully and make sure you understand the instructions before using the machine. Always wear: • A protective helmet where there is a risk of falling objects • Approved hearing protection • Approved eye protection Only use non-metallic, flexible cutting attachments, i.e. trimmer heads with - Husqvarna 223R | Owners Manual - Page 3
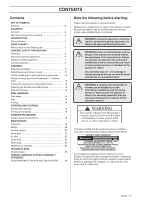
instructions 18 MAINTENANCE Carburetor 20 Muffler 22 Cooling system 22 Bevel gear 22 Air filter 23 Drive shaft 23 Spark plug 23 Maintenance the use of non-authorized accessories or replacement parts. WARNING! A clearing saw, brushcutter or ! trimmer can be dangerous if used incorrectly or - Husqvarna 223R | Owners Manual - Page 4
using, service, maintenance etc) the life span and the second-hand value of the machine can be extended. If you ever lend or sell this machine, make sure that the borrower or buyer gets the operator′s manual, so they will also know how to properly maintain and use it. Thank you for using a Husqvarna - Husqvarna 223R | Owners Manual - Page 5
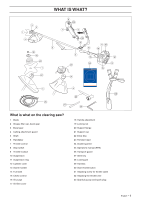
20 Support flange 21 Support cup 22 Drive disc 23 Trimmer head 24 Socket spanner 25 Operator's manual (EPA) 26 Transport guard 27 Allen key 28 Locking pin 29 Harness 30 Start throttle button 31 Adjusting screw for throttle cable 32 Adjusting the throttle wire 33 Spark plug cap and spark plug English - Husqvarna 223R | Owners Manual - Page 6
, maintenance and service instructions described in this manual. Some maintenance and service measures must be carried out by trained and qualified specialists. See instructions under the heading Maintenance. All covers, guards and handles must be fitted before starting. Ensure that the spark plug cap - Husqvarna 223R | Owners Manual - Page 7
positioned on your machine. IMPORTANT! All servicing and repair work on the machine attachment stops and remains at a standstill. If the cutting attachment rotates with the throttle in the idle position then the carburettor idle setting must be checked. See instructions under the heading Maintenance - Husqvarna 223R | Owners Manual - Page 8
attachment (wrong type or incorrectly filed, see instructions under the heading Filing the blade low spark arrestor mesh. Check whether the muffler on your machine is fitted with this kind of mesh. For mufflers it is very important that you follow the instructions on checking, maintaining and servicing - Husqvarna 223R | Owners Manual - Page 9
completely and disconnect the HT lead from the spark plug before you start to work on it. WARNING! Using an incorrect cutting ! attachment or an incorrectly sharpened blade increases the risk of blade thrust. Cutting equipment Grass blades and grass cutters are intended for cutting coarse - Husqvarna 223R | Owners Manual - Page 10
Follow our instructions and use the recommended file gauge. An incorrectly sharpened or damaged blade increases the risk of accidents. Check the cutting attachment for damage or cracks. A damaged cutting attachment should always be replaced. Trimmer head IMPORTANT! Always ensure the trimmer cord is - Husqvarna 223R | Owners Manual - Page 11
diagram). Fitting blades and trimmer heads WARNING! ! When fitting the cutting attachment it is extremely important that the raised section on the drive disc/support ! If a saw blade or grass blade are to be used the machine must be equipped with the correct handlebar, blade guard and harness - Husqvarna 223R | Owners Manual - Page 12
the blade (D), support cup (E) and support fl blade shaft until one of the holes in the drive disc aligns with the corresponding hole in the gear housing. • Insert the locking pin (C) in the hole to lock the shaft. • To fit the trimmer head, first separate the two halves (see diagram the trimmer head - Husqvarna 223R | Owners Manual - Page 13
. • Insert the locking pin (C) in the hole to lock the shaft. • Screw on the trimmer head/plastic blades (H) in the opposite direction to the direction of rotation. H H Correct height Adjust the shoulder strap so that the cutting attachment is parallel to the ground. Correct balance Let the cutting - Husqvarna 223R | Owners Manual - Page 14
clothes. Wash any part of your body service is carried out before long-term storage. • The transport guard must always be fitted to the cutting attachment when the machine is being transported or in storage. • In order to prevent unintentional starting of the engine, the spark plug Use low- HUSQVARNA - Husqvarna 223R | Owners Manual - Page 15
. Always move the machine away from the refuelling area before starting. • Clean the area around the fuel cap. Contamination in the tank can cause operating problems. • Ensure that the fuel is well mixed by shaking the container before filling the tank. English - 15 - Husqvarna 223R | Owners Manual - Page 16
Replace the blade guard if it is exposed to impact or is cracked. Choke: Set the choke control in the choke position. • Check that the trimmer head and trimmer guard are not damaged or cracked. Replace the trimmer head or trimmer throttle positions the cutting attachment will start to rotate - Husqvarna 223R | Owners Manual - Page 17
Do not put any part of your body in marked area. Contact can result in burns to the skin, or electrical shock if the spark plug cap has been damaged. unintentional starting, the spark plug cap must be removed from the spark plug when assembling, checking and/or performing maintenance. Set the - Husqvarna 223R | Owners Manual - Page 18
TECHNIQUES General working instructions IMPORTANT! This section describes the basic safety precautions for working with clearing saws and trimmers. If you encounter a situation where you are uncertain how to proceed you should ask an expert. Contact your dealer or your service workshop. Avoid all - Husqvarna 223R | Owners Manual - Page 19
the blade by following these instructions: 1 Always work at full throttle. 2 Avoid the previously cut material during the return stroke. • Stop the engine, unclip the harness and place the machine on the ground before you start to collect the cut material. Grass trimming with a trimmer head Trimming - Husqvarna 223R | Owners Manual - Page 20
MAINTENANCE Carburetor Your Husqvarna running-in period, ask your dealer/service workshop (who will have a rev oil. • The carburetor has three adjustment controls: L = Low speed jet H = High speed jet T = Idle instructions and let it warm up for 10 minutes. CAUTION! If the cutting attachment - Husqvarna 223R | Owners Manual - Page 21
remove the cutting attachment, nut, support flange and drive dealer/service will results in acceleration problems or too low a working speed. heading Starting and stopping. 3 If the start throttle speed is too low (below 4000 rpm), turn the adjuster screw A clockwise until the cutting attachment - Husqvarna 223R | Owners Manual - Page 22
low as possible the machine is equipped with a cooling system. 4 3 2 Some mufflers are equipped with a special spark replaced grease at the factory. However, before using the machine you should check that the bevel gear is filled three-quarters full with grease. Use HUSQVARNA special grease. The grease - Husqvarna 223R | Owners Manual - Page 23
spark plug can damage the piston/cylinder. Note: Use only HUSQVARNA replacement parts. Use of other brands of replacement parts can cause damage to your unit or injury to the operator or others. Your warranty does not cover damage or liability caused by the use of accessories and/or attachments - Husqvarna 223R | Owners Manual - Page 24
by an autorized service workshop. Replace the spark plug. Check that the spark plug is fitted with a suppressor. Check and clean the spark arrestor mesh on the muffler (only applies to mufflers fitted with a catalytic converter). Lubricate the drive shaft with the special grease. Daily maintenance - Husqvarna 223R | Owners Manual - Page 25
/grass cutter Grass 255-4 1" (Ø 255 4-teeth) Grass 255-8 1" (Ø 250 8-teeth) Plastic blades Tricut Ø 300 mm Trimmy Fix Trimmer head Superauto II 1" S35 T35 Support cup Fixed Cutting attachment guard, Art. no. 503 93 42-02 503 93 42-02 503 93 42-02 / 503 97 71-01 503 93 42-02 / 503 97 - Husqvarna 223R | Owners Manual - Page 26
authorized servicing dealers. MAINTENANCE, REPLACEMENT AND REPAIR OF EMISSION-RELATED PARTS Any Husqvarna Forest & Garden approved replacement part used in the performance of any warranty maintenance or repairs on emission-related parts, will be provided without charge to the owner if the part is - Husqvarna 223R | Owners Manual - Page 27
Super Auto II Super Auto II 1" 1 2 3 4 5 2,4 mm .095" 4,0 m 13' 6 ~2,0 m 6,5 ' 15 cm 6" 7 15 cm 6" 8 9 10 - Husqvarna 223R | Owners Manual - Page 28
- Husqvarna 223R | Owners Manual - Page 29
2,4-2,7 mm .095-.106" T35 1 4 2 5 3 8,5 m 28' 10 cm 4" 4,3 m 14' 6 7 15 cm 6" 9 8 "Clic" - Husqvarna 223R | Owners Manual - Page 30
2,4-2,7 mm .095-.106" S35 1 4 2 5 3 8,5 m 28' 10 cm 4" 4,2 m 14' 6 7 8 "Clic" 10 11 15 cm 6" ´´®®zz++RR99GG¶¶55¢¢¨¨ - Husqvarna 223R | Owners Manual - Page 31
S35 1 3 2 2,4-2,7 mm .095-.106" 4,25 m 14' 4 4,25 m 14' 5 15 cm 6" A B 15 cm 6" - Husqvarna 223R | Owners Manual - Page 32
1150253-95 ´´®®zz++RR99GG¶¶55¢¢¨¨ 2006-07-01
-
 1
1 -
 2
2 -
 3
3 -
 4
4 -
 5
5 -
 6
6 -
 7
7 -
8
-
9
-
10
-
11
-
12
-
13
-
14
-
15
-
16
-
17
-
18
-
19
-
20
-
21
-
22
-
23
-
24
-
25
-
26
-
27
-
28
-
29
-
30
-
31
-
32
 |
 |

English
223R
Oper
ator’s manual (EPA)
Please r
ead the operator’s manual carefully and make sure you
understand the instructions before using the machine.