Husqvarna 323R Owners Manual
Husqvarna 323R Manual
 |
View all Husqvarna 323R manuals
Add to My Manuals
Save this manual to your list of manuals |
Husqvarna 323R manual content summary:
- Husqvarna 323R | Owners Manual - Page 1
Operator's manual (EPA II) 325RXT-3SE2RI3ESR32352R5DRXX--SSEERRIIEESS Please read these instructions carefully and make sure you understand them before using the machine. English - Husqvarna 323R | Owners Manual - Page 2
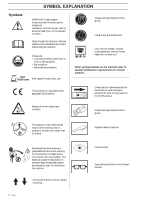
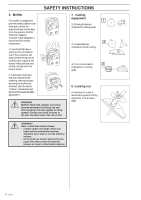
brushcutters and trimmers can be dangerous! Careless or incorrect use can result in serious or fatal injury to the operator or others. Read through the Operator's Manual use non-metallic, flexible cutting elements, that is trimmer head with trimmer cord. Other symbols/decals on the machine refer to - Husqvarna 323R | Owners Manual - Page 3
21 Adjusting the harness and clearing saw 21 FUEL HANDLING Fuel mixture 22 Fuelling 22 START AND STOP Control before starting 23 Start and stop 23 MAINTENANCE Carburetor 24 Muffler 26 Cooling system 26 Angle gear 26 Two-part shaft 26 Air filter 27 Spark plug 27 Filing the grass blade 27 - Husqvarna 323R | Owners Manual - Page 4
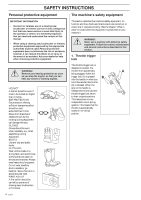
read and understand the content of this manual. • When using a clearing saw, brushcutter or trimmer, protective equipment approved by the appropriate with defective safety equipment. Follow the control, maintenance and service instructions described in this section. 1. Throttle trigger lock The - Husqvarna 323R | Owners Manual - Page 5
engine. SAFETY INSTRUCTIONS 4. Anti-vibration blade to the unit without proper installation of all required parts. Failure to use the proper parts can cause the blade persons suffering with blood circulation problems. Seek medical attention if you Adjusting the harness and clearing saw". 5 English - - Husqvarna 323R | Owners Manual - Page 6
instructions for checking, maintaining and servicing the muffler are followed. (See the section "Control, maintenance and service Cutting equipment 1 1) Clearing blades are intended for cutting wood. 2 2) Grass blades are intended for brush cutting. 3) The trimmer head is 3 intended for trimming - Husqvarna 323R | Owners Manual - Page 7
INSTRUCTIONS Control, maintenance and service of the machine's safety equipment IMPORTANT INFORMATION • All service and repairs to the machine require special training. • This applies especially to the machine's safety equipment. If the machine does not meet any of the controls listed • Start the - Husqvarna 323R | Owners Manual - Page 8
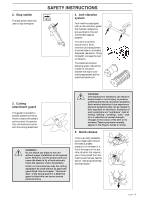
exposed to impact or is cracked. • Always use the prescribed blade an guard combination, see chapter "Technical data". 4. Vibration damping the vibration damping element regularly for material cracks and distortion. SAFETY INSTRUCTIONS 5. Muffler 1. Never use a machine that has a defective muffler - Husqvarna 323R | Owners Manual - Page 9
harness straps are correctly positioned. When the harness and machine are adjusted, check the harness' safety release catch to ensure it works correctly. 2)Keep the blade's teeth well and correctly sharpened! Follow our instructions and use the recommended filing gauge. An incorrectly sharpened or - Husqvarna 323R | Owners Manual - Page 10
Adjust the setting. This should be 1 mm. Sharpening the grass blade • See the cutting equipment's packaging for correct filing instructions. • The blades are sharpened using a single cut flat file. • Sharpen all edges equally to maintain the balance of the blade. Trimmer head • Only use a trimmer - Husqvarna 323R | Owners Manual - Page 11
instructions in this Operator's Manual. Some maintenance and service actions should be carried out by trained and qualified specialists. See the chapter "Maintenance". • All covers and guards must be fitted before starting the machine. Check that the spark plug cap and HT lead are not damaged - Husqvarna 323R | Owners Manual - Page 12
SAFETY INSTRUCTIONS General working instructions IMPORTANT INFORMATION • This section covers basic safety precautions for working with brushcutters and trimmers. • If you encounter a situation where you are uncertain how to proceed you should ask an expert. Contact your dealer or your service - Husqvarna 323R | Owners Manual - Page 13
SAFETY INSTRUCTIONS Adjusting the harness and clearing saw ! WARNING! When working with contact with stones and the like. Adjust the position of the support strap attachment ring to balance the clearing saw correctly. • Use a trimmer head or plastic blades for lighter clearing work, for example - Husqvarna 323R | Owners Manual - Page 14
material wrapping around the blade by following these instructions: a) Always work at full throttle. b) Avoid the previously cut material during the return stroke. • Stop the engine and remove the brushcutter from the harness before you start to gather the cut material. Brush cutting using the saw - Husqvarna 323R | Owners Manual - Page 15
the trimmer head and plastic blades. • Hold the trimmer head just above the ground at an angle. It is the end of the cord that carries out the work. Let the cord work at its own pace. Do not press the cord into the area to be cut. • The cord can easily remove grass and weeds - Husqvarna 323R | Owners Manual - Page 16
trigger lock 10. Hanging ring 11. Cylinder cover 12. Starter handle 13. Fuel tank 14. Choke 15. Air purge 16. Air filter cover 17. Clutch cover 18. Handlebar adjustment 16 - English 19. Locking nut 20. Support flange 21. Support cup 22. Drive disc 23. Trimmer head 24. Socket spanner 25. Operator - Husqvarna 323R | Owners Manual - Page 17
(323R) • Remove the screw at the rear of the throttle handle. • Slide on the throttle handle on the right-hand side of the handlebars, (see the diagram). harness and hang the machine in the suspension hook. Now finely adjust so that the machine gives a comfortable working position when it's - Husqvarna 323R | Owners Manual - Page 18
Assembly of the blade and trimmer head It is extremely important that the disc drive's/support flange's guide engages correctly in Do not attach any blade to the unit without proper installation of all required parts. Failure to use the proper parts can cause the blade to fly off and seriously - Husqvarna 323R | Owners Manual - Page 19
ASSEMBLY Assembling the spray guard and trimmer head Superauto II • Fit the appropriate guard (A) for use with the trimmer head. Hook the guard onto the shaft fitting and secure it with the bolt (L). • Fit the drive disc (B) on the output axle. • Turn the blade axle until one of the holes in the - Husqvarna 323R | Owners Manual - Page 20
20 - English Correct balance The cutting attachment should rest lightly on the ground. If you use a saw blade it should balance about 10 cm above the ground to prevent contact with stones and the like. Adjust the position of the support strap attachment ring to balance the clearing saw correctly. - Husqvarna 323R | Owners Manual - Page 21
Never use two-stroke oil intended for water cooled outboard motors, so-called outboard motor oil. • Never use oil intended of four-stroke engines. Mixture • Always mix gasoline and oil in a clean container intended for fuel. • Always start by filling half the quantity of gasoline required. Then add - Husqvarna 323R | Owners Manual - Page 22
guard are not damaged or cracked. Replace the trimmer head or spray guard if they are exposed to impact or are cracked. • Never use the machine without a guard or spray guard nor with a defective guard. Cold engine IGNITION: Set the stop switch to the start position. CHOKE: Set the choke control in - Husqvarna 323R | Owners Manual - Page 23
you release the throttle trigger the engine will return to idle. The part throttle function does not lock the engine at a given rpm, it is simply a brake that makes it easier to maintain the engine at a given rpm. START AND STOP Stop The engine is stopped by switching off the ignition. WARNING - Husqvarna 323R | Owners Manual - Page 24
be fitted before the machine is started, otherwise the clutch can become loose and cause personal injury. Functioning • The carburetor governs the engine speed via the throttle trigger. In the carburetor, air/fuel is mixed. This air/fuel mixture is adjustable. If you want to take advantage of the - Husqvarna 323R | Owners Manual - Page 25
attachment starts to rotate/move. CAUTION! Contact your servicing dealer, if the idle speed setting cannot be adjusted so that the cutting attachment stops. Do not use the machine until it has been properly adjusted or repaired. Correctly adjusted carburetor A correctly adjusted carburetor means - Husqvarna 323R | Owners Manual - Page 26
the exhaust fumes away from the user. The exhaust fumes are hot to the cylinder and piston. Also see under " cold 1 air onto the cylinder). Clean the cooling system using a brush at least HUSQVARNA special grease. Normally, the grease does not need to be changed except when the angle gear is repaired - Husqvarna 323R | Owners Manual - Page 27
MAINTENANCE Air filter Spark plug The air filter should be cleaned regularly removing dust and dirt to avoid: • carburetor malfunction • starting problems • reduced engine power • unnecessary wear to engine parts • abnormal fuel consumption Clean the filter after every 25 hours or more regularly - Husqvarna 323R | Owners Manual - Page 28
of accessories and/or attachments not specifically recommended by HUSQVARNA. Maintenance schedule Below you will find some general maintenance instructions. Daily maintenance • Check throttle trigger and throttle trigger lockout function. • Check stop switch function. • Check that blade/trimmer head - Husqvarna 323R | Owners Manual - Page 29
11 000-11 700 8 014 0,9/ 9 000 Yes Yes Ignition system Manufacturer/type of ignition system Spark plug Electrode gap, inch/mm Walbro MB 20 Champion RCJ 7Y 0,02/0,5 Walbro MB 20 Champion RCJ 7Y 0,02/0,5 Fuel lubrication system Manufacturer/type of carburetor Fuel pressure at the user's ear and - Husqvarna 323R | Owners Manual - Page 30
DATA Approved accessories 323R Centre hole in blades Ø 25,4 mm Threaded blade axle M10 Grass blade Saw blade Plastic knives Trimmer head Support cup Type Grass 255-4 1" (∅ 255 4-teeth) Grass 255-8 1" (∅ 250 8-teeth) Maxi X 200-26 1" (∅ 200 26-teeth) Tricut ∅ 300 Trimmy Fix Trimmy H II 1" Trimmy - Husqvarna 323R | Owners Manual - Page 31
PARTS Any Husqvarna Forest & Garden approved replacement part used in the performance of any warranty maintenance or repairs on emission-related parts, will be provided without charge to the owner if the part is under warranty. EMISSION CONTROL WARRANTY PARTS LIST 1. Carburetor and internal parts - Husqvarna 323R | Owners Manual - Page 32
Super Auto II Super Auto II 1" 1 2 3 4 5 2,4 mm .095" 4,0 m 13' 6 ~2,0 m 6,5 ' 15 cm 6" 7 15 cm 6" 8 9 32 - English 10 - Husqvarna 323R | Owners Manual - Page 33
Tri Cut 1B >20mm 2 A 3 4 5 >20mm 6 7 6 Nm ! 8 X 10 English - 33 - Husqvarna 323R | Owners Manual - Page 34
Trimmy H II 1 2 3 4 2,0-2,4 mm .080-.095" 7,5 m 25' 5 6 15 cm 6" ~ 3,7 m 12' 7 8 34 - English 15 cm 6" 9 2 1 - Husqvarna 323R | Owners Manual - Page 35
Trimmy Hit 1 2 "Click" 5 6 2,0-2,4 mm .080-.095 " 3 7,0 m 23' 4 12 cm 5" ~ 3,5 m 11' 7 8 ~ 15 cm 6" 9 "Click" 10 11 15 cm 6" English - 35 - Husqvarna 323R | Owners Manual - Page 36
2,0-2,4 mm .080-.095" Trimmy Hit Junior 1 2 5 6 3 5,75 m 19' 4 15 cm 6" ~ 2,8 m 9' 7 8 9 15 cm 6" 10 11 1.) 2.) "Click" 36 - English 12 15 cm 6" - Husqvarna 323R | Owners Manual - Page 37
2,0-2,4 mm .080-.095" Trimmy Hit Pro 1 2 5 6 3 7,5 m 25' 4 15 cm 6" ~ 3,7 m 12' 7 8 9 15 cm 6" 10 11 1.) 2.) "Click" 12 15 cm 6" English - 37 - Husqvarna 323R | Owners Manual - Page 38
Trimmy Hit VI 1 2 5 6 3 7,0 m 23' 4 12 cm 5" ~ 3,5 m 11' 2,0-2,4 mm .080-.095 " " " 7 ~ 15 cm 8 6 9 "Click" 10 38 - English 11 15 cm 6 - Husqvarna 323R | Owners Manual - Page 39
Trimmy SII 1 3 4 2,4-3,3 mm .095"-.130" 2 7,0 m 23' ~ 3,5 m 11' 12 cm 5" 5 ~ 15 cm 6 6' 7 "Clic" 8 9 35-50 NM English - 39 - Husqvarna 323R | Owners Manual - Page 40
40 - English - Husqvarna 323R | Owners Manual - Page 41
English - 41 - Husqvarna 323R | Owners Manual - Page 42
42 - English ´+H*G¶5q¨ - Husqvarna 323R | Owners Manual - Page 43
English - 43 - Husqvarna 323R | Owners Manual - Page 44
114 01 03 -95 ´+H*G¶5q¨ 2002W13
-
 1
1 -
 2
2 -
 3
3 -
 4
4 -
 5
5 -
 6
6 -
 7
7 -
8
-
9
-
10
-
11
-
12
-
13
-
14
-
15
-
16
-
17
-
18
-
19
-
20
-
21
-
22
-
23
-
24
-
25
-
26
-
27
-
28
-
29
-
30
-
31
-
32
-
33
-
34
-
35
-
36
-
37
-
38
-
39
-
40
-
41
-
42
-
43
-
44
 |
 |

Operator's manual (EPA II)
Please read these instructions carefully and make
sure you understand them before using the machine.
English
323R
325R
X-SERIES
325R
XT-SERIES
325RD
X-SERIES