Husqvarna HU725AWD Owners Manual
Husqvarna HU725AWD Manual
 |
View all Husqvarna HU725AWD manuals
Add to My Manuals
Save this manual to your list of manuals |
Husqvarna HU725AWD manual content summary:
- Husqvarna HU725AWD | Owners Manual - Page 1
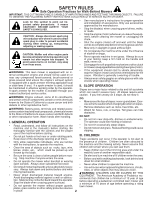
etanol (E10) anulará la garantía del producto. 115 63 62-96 Operator's Manual Manual de Operario HU725AWD / 961450017 Please read the operator's manual carefully and make sure you understand the instructions before using the machine. Por favor lea cuidadosamente y comprenda estas intrucciones antes - Husqvarna HU725AWD | Owners Manual - Page 2
manufacturer's instructions for proper operation and installation of accessories. Only use accessories approved by the manufacturer. • Stop the blade(s) when crossing gravel drives, walks, or roads. • Stop the engine (motor) whenever you leave the equipment, before cleaning the mower or unclogging - Husqvarna HU725AWD | Owners Manual - Page 3
extra caution when servicing it. • Do not change the engine governor setting or overspeed the engine. • Maintain or replace safety and instruction labels, as necessary. PRODUCT SPECIFICATIONS Gasoline Capacity and Type: Oil Type (API SG-SL): Oil Capacity: Spark Plug (Gap: .020"): Blade Bolt Torque - Husqvarna HU725AWD | Owners Manual - Page 4
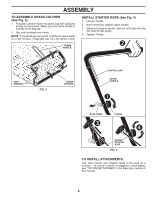
Read these instructions and this manual in its entirety before you attempt to assemble or operate your new lawn mower. IMPORTANT: THIS LAWN MOWER IS SHIPPED WITHOUT OIL OR GASOLINE IN THE ENGINE. Your new lawn mower has been assembled at the factory with the exception of those parts left unassembled - Husqvarna HU725AWD | Owners Manual - Page 5
BINDINGS FIG. 3 FRAME OPENING CONTROL BAR UPPER HANDLE ROPE GUIDE T-KNOB ENGINE STARTER ROPE FIG. 4 TO INSTALL ATTACHMENTS Your lawn mower was shipped ready to be used as a mulcher. To convert mower to bagging or discharging, see "TO CONVERT MOWER" in the Operation section of this manual. 5 - Husqvarna HU725AWD | Owners Manual - Page 6
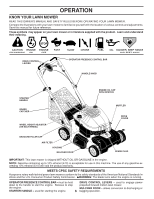
KNOB STARTER HANDLE GRASS CATCHER WHEEL HEIGHT ADJUSTER (ON EACH WHEEL) ENGINE OIL CAP WITH DIPSTICK MUFFLER DRIVE COVER GASOLINE FILLER CAP AIR FILTER HOUSING MULCHER DOOR SPARK PLUG IMPORTANT: This lawn mower is shipped WITHOUT OIL OR GASOLINE in the engine. NOTE: Gasoline containing up to 10 - Husqvarna HU725AWD | Owners Manual - Page 7
Proceed as follows: 1. Turn unit off, disconnect spark plug wire from plug. TO CONVERT MOWER Your lawn mower was shipped ready to be used as a mulcher. To convert to bagging or discharging: REAR BAGGING (See Fig. 8) • Lift rear door of the lawn mower and place the grass catcher frame hooks onto the - Husqvarna HU725AWD | Owners Manual - Page 8
9) • Rear door must be closed. • Open mulcher door and install discharge deflector under door as shown. • Mower is now ready for side discharging operation. • To convert to mulching or bagging operation, discharge deflector must be removed and mulcher door must be closed and locked. UNLOCK LATCH OPEN - Husqvarna HU725AWD | Owners Manual - Page 9
can be used within 30 days to assure fuel freshness. BAG HANDLE FIG. 10 BEFORE STARTING ENGINE ADD OIL (See Fig. 11) Your lawnmower is shipped without oil in the engine. For type and grade of oil to use, see "ENGINE" in the Maintenance section of this manual. CAUTION: DO NOT overfill engine with - Husqvarna HU725AWD | Owners Manual - Page 10
air flow and extend engine life. MULCHING MOWING TIPS IMPORTANT: FOR BEST PERFORMANCE, KEEP MOWER HOUSING FREE OF BUILT-UP GRASS AND TRASH. SEE "CLEANING" IN THE MAINTENANCE SECTION OF THIS MANUAL. • The special mulching blade MAX 1/3 FIG. 12 • Certain types of grass and grass conditions may require - Husqvarna HU725AWD | Owners Manual - Page 11
/ Replace Blade Lubrication Clean and Recharge Battery ** Check Engine Oil level Change Engine Oil Clean Air Filter Inspect Muffler Replace Spark Plug Replace Air Filter Paper Cartridge Empty fuel system or add Stabilizer * (if so equipped) ** Electric-Start mowers *** Power-Propelled mowers - Husqvarna HU725AWD | Owners Manual - Page 12
Fig. 13) 1. Disconnect spark plug wire from spark plug and place wire where it cannot come in contact with plug. 2. Turn lawn mower on its side. Make sure air filter and carburetor are up. 3. Use a wood block between blade and mower housing to prevent blade from turning when removing blade bolt. NOTE - Husqvarna HU725AWD | Owners Manual - Page 13
oil dipstick before starting engine. 9. Reconnect spark plug wire to spark plug. AIR FILTER (See Fig. 16) Your engine will not run properly and may be damaged by using a dirty air filter. Replace the air filter cartridge every 100 hours of operation or every season, whichever occurs first. Service air - Husqvarna HU725AWD | Owners Manual - Page 14
damage. SPARK PLUG Replace spark plug at the beginning of each mowing season or after every 100 hours of operation, whichever occurs first. Spark plug type and gap setting are shown in the "PRODUCT SPECIFICATIONS" section of this manual. CLEANING IMPORTANT: FOR BEST PERFORMANCE, KEEP MOWER HOUSING - Husqvarna HU725AWD | Owners Manual - Page 15
INJURY, BEFORE PERFORMING ANY SERVICE OR ADJUSTMENTS: 1. Release control bar and stop engine. 2. Make sure the blade and all moving parts have completely stopped. 3. Disconnect spark plug wire from spark plug and place where it cannot come in contact with plug. LAWN MOWER TO ADJUST CUTTING HEIGHT - Husqvarna HU725AWD | Owners Manual - Page 16
keeper. 12. Reinstall rear baffle. 13. Reinstall debris shield. 14. Reinstall blade. The recommended tightening torque is 35-40 ft. lbs. 15. Return mower to upright position. 16. Reattach spark plug wire to spark plug. REAR GEARCASE PULLEY INPUT SHAFT RETURN SPRING CABLE FRONT REAR GEARCASE - Husqvarna HU725AWD | Owners Manual - Page 17
, dry area. 1. Clean entire lawn mower (See "CLEANING" in the Maintenance section of this manual). 2. Lubricate as shown in the Maintenance section of this manual. 3. Be sure that all nuts, bolts, screws, and pins are securely fastened. Inspect moving parts for damage, breakage and wear. Replace if - Husqvarna HU725AWD | Owners Manual - Page 18
the gas tank and carburetor if using fuel stabilizer. ENGINE OIL Drain oil (with engine warm) and replace with clean engine oil. (See "ENGINE" in the Maintenance section of this manual). CYLINDER 1. Remove spark plug. 2. Pour one ounce (29 ml) of oil through spark plug hole into cylinder. 3. Pull - Husqvarna HU725AWD | Owners Manual - Page 19
fied service center. 3. Replace blade adapter. 4. Move lawn mower to cut grass or other hard surface before starting. Grass catcher 1. Cutting height too low. not filling 2. Lift on blade worn off. (if so equipped) 3. Catcher not venting air. 1. Raise cutting height. 2. Replace blade. 3. Clean - Husqvarna HU725AWD | Owners Manual - Page 20
the above listed manufacturers (for exceptions - see Exhibit A). (c) Expendable Parts. This Limited Warranty does not cover general maintenance parts and items ("Expendable Parts"), including without limitation spark plugs, bulbs, filters, lubricants, starter cords, belts, blades, and blade adapters - Husqvarna HU725AWD | Owners Manual - Page 21
/ether) is approved; (h) Use of ether or any starting fluids; (i) Pressure cleaning or steam cleaning the product; (j) Use of spark plugs other than those meeting emission performance requirements listed in the operator's manual; (k) Tampering with engine speed governor or emission components, or - Husqvarna HU725AWD | Owners Manual - Page 22
Warranty Engine* * * Transmission (if made by Husqvarna/Peerless) 3 Years No Warranty Transmission (if third Expendable Components 2 Years Tiller Tines *** Walk Behind Mowers, High Wheel Trimmer Engine* * Year Parts Only) *2 Years-1365GN (2nd Year Parts Only) * No Warranty 22 - Husqvarna HU725AWD | Owners Manual - Page 23
Parts (e.g., belts, blades, etc.) 30 days No Warranty No Warranty Parts & Accessories (if replaced in Warranty Service) Replacement parts parts & labor, with Hydro-Gear Distributor network. EZ - One (1) Year Commercial warranty, parts & labor, with Husqvarna. Two (2) Year Consumer warranty, parts - Husqvarna HU725AWD | Owners Manual - Page 24
la maquina. Para esto, debe leer y comprender todas las instrucciones que aparecen en la maquina y en los manuales de operación. • No ponga las manos o los pies cerca o debajo de las partes rotatorias. Manténgase siempre lejos de la abertura de la descarga. III. NIÑOS Se pueden producir accidentes - Husqvarna HU725AWD | Owners Manual - Page 25
reparar este tractor. Haga el favor de leer y de guardar este manual. Estas instrucciones le permitirán montar y mantener su unidad en forma NÚMERO DEL NODELO Y EL DE SERIE SE ENCUENTRAN EN LA CALCOMANIA ADJUNTA A LA PARTE TRASERA DE LA CAJA DE LA SEGADORA. DEBE REGISTRAR TANTO EL NÚMERO DE SERIE - Husqvarna HU725AWD | Owners Manual - Page 26
-OPERACIÓN Lea estas instrucciones y el manual completamente antes de tratar de montar u operar su segadora nueva. IMPORTANTE: Este cortacesped viene SIN ACEITE O GASOLINA en el motor. Su segadora nueva ha sido montada en la fábrica con la excepción de aquellas partes que se dejaron sin montar por - Husqvarna HU725AWD | Owners Manual - Page 27
superior. 3. Lentamente tire el cordón arrancador del motor hacia afuera hasta que se deslice dentro la parte redondeada de la guía del cordón. 4. Apriete una manilla-T. MANGO DEL BASTIDOR DEL RECOGEDOR SUJETADORES fiérase a "PARA CONVERIR LA SEGADORA" en la Sección de Operación de este manual. 27 - Husqvarna HU725AWD | Owners Manual - Page 28
los diversos controles y ajustes. Guarde este manual para referencia en el futuro. Estos GASOLINA SILENCIADOR CUBIERTA DE LA IMPULSIÓN FILTRO DE AIRE CAJA PUERTA DE LA ACOLCHADORA BUJÍA IMPORTANTE: Este segadoras a motor, que se conducen desde la parte de atrás, rotatorias, cumplen con los est - Husqvarna HU725AWD | Owners Manual - Page 29
OPERACIÓN La operación de cualquier segadora puede hacer que salten objetos extraños dentro de sus ojos, lo que puede producir daños graves en éstos. Siempre use anteojos de seguridad o protección para los ojos mientras opere su segadora o cuando haga ajustes o reparaciones. Recomendamos gafas o una - Husqvarna HU725AWD | Owners Manual - Page 30
OPERACIÓN PARA CONVERTIR LA SEGADORA Su segadora fue enviada lista para usarse como acolchadora de capa vegetal. Para convertirla a una operación de ensacado o de descarga: DESCARGA TRASERA (Vea Fig. 8): • Levantar la puerta trasera de cortacésped y colocar los ganchos del armazón de la recolectora - Husqvarna HU725AWD | Owners Manual - Page 31
son polvorosas o sucias. Vea "PARA CAMBIAR EL ACEITE DEL MOTOR" en la seccion de Mantenimiento de este manual. AGREGUE GASOLINA (Vea Fig. 11) • Llene el estanque de combustible hasta la parte inferior del cuello de relleno del estanque de gasolina. No lo llene demasiado. Use gasolina regular, sin - Husqvarna HU725AWD | Owners Manual - Page 32
la manguera de agua, regularmente, y déjelo secarse antes de usarlo. • Mantenga la parte superior del motor, alrededor del arrancador, despejada y sin recortes de césped y paja. Esto ayudará el flujo del aire del motor y extenderá su duración. CONSEJOS PARA SEGAR Y ACOLCHAR IMPORTANTE: PARA OBTENER - Husqvarna HU725AWD | Owners Manual - Page 33
el Filtro de Aire Inspeccionar el Silenciador Cambiar la Bujía Cambiar el Cartucho de Papel del Filtro de Aire Vaciar el sistema su unidad adecuadamente. Todos los ajustes en la sección de Servicio y Ajustes de este manual tienen que ser revisados por lo menos un vez por cada temporada. • Una vez - Husqvarna HU725AWD | Owners Manual - Page 34
LO CON PERNOS APROBADOS MOSTRADOS EN LA SECCIÓN PARTES DE REPARACIÓN DE ESTE MANUAL. RETENCIÓN DE CORREA ADAPTADOR DE LA CUCHILLA sta. 2. Haga descansar la segadora en su lado. Asegúrese que el filtro de aire y que el carburador queden mirando hacia arriba. 3. Use un bloque de madera entre la - Husqvarna HU725AWD | Owners Manual - Page 35
aparecer como centrados, pero no lo están. • Deslice la cuchilla en una parte no roscada del perno de acero o clavija y sujete el perno o la en condiciones de suciedad y polvo particulares. PARA LIMPIAR EL FILTRO DE AIRE 1. Suelte el tornillo e incline la cubierta para removerlo. 2. Cuidadosamente - Husqvarna HU725AWD | Owners Manual - Page 36
entrar en contacto con ésta. • Limpie la parte inferior de su segadora raspándola para remover la sistema eléctrico, el silenciador, el filtro de aire y el carburador estén tapados para evitar que les la sección de la operación de este manual) y deje el motor funcionar hasta que el super - Husqvarna HU725AWD | Owners Manual - Page 37
en la sección de Operación de este manual. DESVIADOR TRASERO Se proporciona un desviador trasero, que objetos sean lanzados hacia afuera de la parte trasera de la segadora, en la posición en la segadora en su lado con el filtro de aire y el carburador mirando hacia arriba. 2. Remueva perno - Husqvarna HU725AWD | Owners Manual - Page 38
SERVICIO Y AJUSTES 8. Remueva la fijador de la correa delantero. 9. Remueva la correa de la polea de la correa delantero. 10. Remueva todas las tres poleas del conjunto de la poleas. 11. Remueva la correa del polea del motor y conjunto de la poleas. 12. Remueva la polea de la correa posterior por fi - Husqvarna HU725AWD | Owners Manual - Page 39
). 2. Lubríquela según se muestra en la sección de Mantenimiento de este manual. 3. Asegúrese de que todas las tuercas y clavijas y todos los pernos y tornillos estén apretados en forma segura. Inspeccione las partes que se mueven para verificar si están dañadas, quebradas o desgastadas. Cámbielas - Husqvarna HU725AWD | Owners Manual - Page 40
IMPORTANTE EVITAR QUE SE FORMEN DEPÓSITOS DE GOMA EN PARTES FUNDAMENTALES DEL SISTEMA DE COMBUSTIBLE TALES COMO EL CARBURADOR, EL mbielo con aceite de motor limpio. (Vea "MOTOR" en la sección de Mantenimiento de este manual.) CILINDRO 1. Remueva la bujía. 2. Vacíe 29 ml (una onza) de aceite a través - Husqvarna HU725AWD | Owners Manual - Page 41
. 6. Velocidad de recorrido demasiado rápida. 1. Eleve la altura de corte. 2. Eleve la altura de corte. 3. Limpie/cambie el filtro de aire. 4. Limpie la parte inferior de la caja de la segadora. 5. Revise el nivel del aceite. 6. Corte a una velocidad de recorrido más lenta. 1. Cuchilla desgastada - Husqvarna HU725AWD | Owners Manual - Page 42
los motores y accesorios no están cubiertos por esta garantía limitada. En la mayoría de los casos, estos elementos NO han sido fabricados por Husqvarna, en cuyo caso pueden estar cubiertos por separado por la garantía de sus respectivos fabricantes, si tal garantía se proporciona e incluye con el - Husqvarna HU725AWD | Owners Manual - Page 43
y c. El mantenimiento preventivo según se describe en el manual del operador. Además, usted debe dejar de utilizar el producto producto debe llevarse a un concesionario de servicio Husqvarna autorizado antes de seguir utilizándolo. 8. Los cados. (m) Cualquier filtro de aire retirado o dañado, suciedad - Husqvarna HU725AWD | Owners Manual - Page 44
registrar el producto no es una condición del servicio de garantía. Husqvarna Professional Products, NA, Inc. 9335 Harris Corners Parkway, Suite 500 perecederos 3 años Sin garantía Cortadoras con colchón de aire Motor* * * Otros componentes perecederos Carritos para plataforma de montaje - Husqvarna HU725AWD | Owners Manual - Page 45
ía al consumidor, piezas y mano de obra, con red de distribuidores Hydro-Gear. EZ - Un (1) año de garantía comercial, piezas y mano de obra, con Husqvarna. Dos (2) años de garantía al consumidor, piezas y mano de obra, con red de distribuidores Hydro-Gear. MZ - Dos (2) años de garantía comercial - Husqvarna HU725AWD | Owners Manual - Page 46
SERVICE NOTES 46 - Husqvarna HU725AWD | Owners Manual - Page 47
NOTAS SERVICIO 47 - Husqvarna HU725AWD | Owners Manual - Page 48
11/06/2013 BY
-
 1
1 -
 2
2 -
 3
3 -
 4
4 -
 5
5 -
 6
6 -
 7
7 -
8
-
9
-
10
-
11
-
12
-
13
-
14
-
15
-
16
-
17
-
18
-
19
-
20
-
21
-
22
-
23
-
24
-
25
-
26
-
27
-
28
-
29
-
30
-
31
-
32
-
33
-
34
-
35
-
36
-
37
-
38
-
39
-
40
-
41
-
42
-
43
-
44
-
45
-
46
-
47
-
48
 |
 |

115 63 62-96
Operator’s Manual
Manual de Operario
HU725AWD / 961450017
English/Español
Gasoline containing up to 10% ethanol (E10) is accept-
able for use in this machine.
The use of any gasoline ex-
ceeding 10% ethanol (E10) will void the product warranty.
Esta máquina puede utilizar gasolina con un con-
tenido de hasta el 10% de etanol (E10).
El uso de una gasolina que supere el 10% de etanol
(E10) anulará la garantía del producto.
Please read the operator's manual carefully and make sure
you understand the instructions before using the machine.
Por favor lea cuidadosamente y comprenda
estas intrucciones antes de usar esta maquina.