Husqvarna LTA18538 Operation Manual
Husqvarna LTA18538 Manual
 |
View all Husqvarna LTA18538 manuals
Add to My Manuals
Save this manual to your list of manuals |
Husqvarna LTA18538 manual content summary:
- Husqvarna LTA18538 | Operation Manual - Page 1
use of any gasoline exceeding 10% ethanol (E10) will void the product warranty. Esta máquina puede utilizar gasolina con un contenido de hasta el 10% Operator's Manual Manual de Operario LTA18538 Please read the operator's manual carefully and make sure you understand the instructions before using - Husqvarna LTA18538 | Operation Manual - Page 2
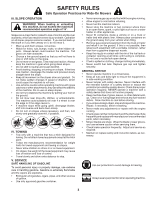
with the blades shut off. They may fall off and related accessories contain lead instructions on the machine and in the manual before starting. • Do not put hands or feet near rotating parts riding mower-related injuries. These operators should evaluate their ability to operate the riding mower - Husqvarna LTA18538 | Operation Manual - Page 3
Ride-On Mowers • Choose a low ground speed so that Clean oil or parts, when necessary. • Mower blades are sharp. Wrap the blade or wear gloves, and use extreme caution when servicing them. • Check brake operation frequently. Adjust and service as required. • Maintain or replace safety and instruction - Husqvarna LTA18538 | Operation Manual - Page 4
. Should you experience any problem you cannot easily remedy, please contact your nearest authorized service center/department. We have competent, well-trained technicians and the proper tools to service or repair this tractor. Please read and retain this manual. The instructions will enable you to - Husqvarna LTA18538 | Operation Manual - Page 5
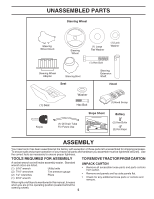
(1) 9/16" wrench UNPACK CARTON • Remove all accessible loose parts and parts cartons from carton. • Remove end panels and lay side panels flat. • Check for any additional loose parts or cartons and remove. When right or left hand is mentioned in this manual, it means when you are in the operating - Husqvarna LTA18538 | Operation Manual - Page 6
ASSEMBLY BEFORE REMOVING TRACTOR FROM SKID TO INSTALL STEERING WHEEL (See Fig. 1) ASSEMBLE EXTENSION SHAFT AND BOOT • Slide extension shaft onto lower steering shaft. • Place tabs of steering boot over tab slots in dash and push down to secure. INSTALL STEERING WHEEL • Position front wheels of the - Husqvarna LTA18538 | Operation Manual - Page 7
: If this battery is put into service after month and year indicated on label (label is located between terminals) charge battery for minimum of one hour at 6-10 amps. (See "BATTERY" in the Maintenance section of this manual for charging instructions.) • Determine battery location. Battery location - Husqvarna LTA18538 | Operation Manual - Page 8
. See "TO LEVEL MOWER" in the Service and Adjustments section of this manual. CHECK FOR PROPER POSITION OF ALL BELTS See the figures that are shown for replacing motion and mower blade drive belts in the Service and Adjustments section of this manual. Verify that the belts are routed correctly. CHECK - Husqvarna LTA18538 | Operation Manual - Page 9
LOW CHOKE FAST SLOW IGNITION SWITCH ENGINE OFF ENGINE START ENGINE ON DIFFERENTIAL LOCK CLUTCH/ BRAKE PEDAL PARKING BRAKE MOWER HEIGHT MOWER RULES SECTION) FREE WHEEL (Automatic Models only) Failure to follow instructions could result in serious injury or death. The safety alert symbol - Husqvarna LTA18538 | Operation Manual - Page 10
to familiarize yourself with the locations of various controls and adjustments. Save this manual for future reference. H D B G E A C M F K controlling engine speed. (E) ATTACHMENT CLUTCH LEVER - Used to engage the mower blades, or other attachments mounted to your tractor. (F) IGNITION SWITCH - - Husqvarna LTA18538 | Operation Manual - Page 11
pletely, as described above, and set parking brake before leaving the opera- C tor's position. Fig. 7 STOPPING (See Fig. 8) MOWER BLADES - • To stop mower blades, place attachment clutch control in the "DISENGAGED" position ( ). TO USE THROTTLE CONTROL (D) (See Fig. 9) Always operate engine at - Husqvarna LTA18538 | Operation Manual - Page 12
surface. • Adjust mower to desired cutting height (See "TO ADJUST MOWER CUTTING HEIGHT" in this section of manual). • With mower in desired height of ,4 to 101,6 mm). The heights are measured from the ground to the blade tip with the engine not running. These heights are approximate and may vary - Husqvarna LTA18538 | Operation Manual - Page 13
OPERATION REVERSE OPERATION SYSTEM (ROS) (See Fig. 14) Your tractor is equipped with a Reverse Operation System (ROS). Any attempt by the operator to travel in the reverse direction with the attachment clutch engaged will shut off the engine unless ignition key is placed in the ROS "ON" position. - Husqvarna LTA18538 | Operation Manual - Page 14
oil for easier starting. (See "OIL VISCOSITY CHART" in the Maintenance section of this manual.) • To change engine oil, see the Maintenance section in this manual in storage. To avoid engine problems, the fuel system should be next season. See Storage Instructions for additional information. Never - Husqvarna LTA18538 | Operation Manual - Page 15
mower housing is attached to tractor. • Mower should be properly leveled for best mowing performance. See "TO LEVEL MOWER HOUSING" in the Service and Adjustments section of this manual. • The left hand side of mower speed by selecting a low enough gear to give the mower cutting performance as well - Husqvarna LTA18538 | Operation Manual - Page 16
A Check/Replace Mower Blades C Lubrication Chart T Check Battery Level O Clean Battery and Terminals R Clean Debris off Steering Plate Check Mower Levelness Check V-Belts Check Engine Oil Level Change Engine Oil (models with oil filter) Change Engine Oil (models without oil filter) E Clean Air - Husqvarna LTA18538 | Operation Manual - Page 17
, repair the problem immediately. CAUTION: Use only a replacement blade approved by the manufacturer of your tractor. Using a blade not approved by the manufacturer of your tractor is hazardous, could damage your tractor and void your warranty. BLADE REMOVAL (See Fig. 18) • Raise mower to highest - Husqvarna LTA18538 | Operation Manual - Page 18
the engine and after each eight (8) hours of operation. Tighten oil fill cap/dipstick securely each time you check the oil level. TO CHANGE ENGINE OIL (See Fig. 19 - 21) Determine temperature range expected before oil change. All oil must meet API service classification SG-SL. • Be sure tractor is on - Husqvarna LTA18538 | Operation Manual - Page 19
season or every other oil change if the tractor is used more than 100 hours in one year. NOTE: If needed, remove lower dash covers using steps from "Lower dash cover removal" section of this manual. AIR FILTER Your engine will not run properly using a dirty air filter. Service air cleaner more often - Husqvarna LTA18538 | Operation Manual - Page 20
clutch in "DISENGAGED" position. • Lower attachment lift lever to its lowest position. • Remove mower belt from engine pulley (M). • Remove retainer spring (K), slide collar (L) off and push housing guide (P) out of bracket. • Remove clutch cable spring (Q) from idler arm (R). • Disconnect front - Husqvarna LTA18538 | Operation Manual - Page 21
. 27 • Hook end of clutch cable spring (Q) into hole in idler arm (R). • Push clutch cable housing guide (P) into bracket, slide collar (L) onto guide and secure with retainer spring (K). • Install belt on engine pulley (M). M C D Fig. 26 • ATTACH FRONT LINK (E) - Work from left side of trac- tor - Husqvarna LTA18538 | Operation Manual - Page 22
highest position. • At both sides of mower, position blade at side and mea- sure the distance (A) from bottom edge of blade to the ground. The distance should be the same on both sides. • If adjustment is necessary, see steps in Visual Adjustment instructions above. A A Fig. 31 TIGHTEN ADJUST - Husqvarna LTA18538 | Operation Manual - Page 23
SERVICE AND ADJUSTMENTS TO REPLACE MOWER BLADE DRIVE BELT (See Fig. 34) The mower blade drive belt may be replaced without tools. Park the tractor on level surface. Engage parking brake. BELT REMOVAL • Remove mower from tractor (See "TO REMOVE MOWER" in this section of manual). • Work belt off both - Husqvarna LTA18538 | Operation Manual - Page 24
, tire sealant may be purchased from your local parts dealer. Tire sealant also prevents tire dry rot wheel toe-in or camber, contact a qualified service center. TO START ENGINE WITH A WEAK BATTERY (See See "BATTERY" in the MAINTENANCE section of this manual). If "jumper cables" are used for emergency - Husqvarna LTA18538 | Operation Manual - Page 25
SERVICE AND ADJUSTMENTS TO REPLACE HEADLIGHT BULB • Raise hood. • Pull bulb holder out of preset at the factory and adjustment should not be necessary. If adjustment is necessary, see engine manual. TO ADJUST CHOKE CONTROL The choke control has been preset at the factory and adjustment should not - Husqvarna LTA18538 | Operation Manual - Page 26
and replace belts, if necessary. (See belt replacement instructions in the Service and Adjustments section of this manual.) • Lubricate as shown in the Maintenance section of this manual. • Be sure that all nuts, bolts and screws are securely fastened. Inspect moving parts for damage, breakage - Husqvarna LTA18538 | Operation Manual - Page 27
position. 2. Adjust throttle control. 3. Build-up of grass, leaves, trash under mower. 3. Clean underside of mower housing. 4. Dirty air filter. 4. Clean/replace air filter. 5. Low oil level/dirty oil. 5. Check oil level/change oil. 6. Faulty spark plug. 6. Clean and regap or change spark plug - Husqvarna LTA18538 | Operation Manual - Page 28
, trash under mower. 7. Clean underside of mower housing. 8. Mower drive belt worn. 8. Replace mower drive belt. 9. Blades improperly installed. 9. Reinstall blades sharp edge down. 10. Improper blades used. 10. Replace with blades listed in parts manual. 11. Clogged mower deck vent holes - Husqvarna LTA18538 | Operation Manual - Page 29
29 SUGGESTED GUIDE FOR SIGHTING SLOPES FOR SAFE OPERATION TFHOISLDISAALO15NDGEDGORTETEESDLLOINPEE ONLY RIDE UP AND DOWN HILL, NOT ACROSS HILL 15 DEGREES MAX. WARNING: To avoid serious injury, operate your tractor up and down the face of slopes, - Husqvarna LTA18538 | Operation Manual - Page 30
una edad mínima de 12 años manejar máquinas cortacésped manuales, y al menos de 16 años para manejar tractores este manual). • Desenganche las hojas cuando no esté cortando césped. Apague el motor y espere hasta que todas las partes se detengan por completo antes de limpiar la máquina, retirar la - Husqvarna LTA18538 | Operation Manual - Page 31
hojas u otros es- • Apagar todos los cigarrillos, cigarros, pipas y otras fuentes combros que pueden tocar el tubo de escape / partes del de ignición. motor calientes y quemarse. No permitir que el puente del cortacésped cargue hojas u otros residuos que pueden causar acumulaciones. Limpiar toda - Husqvarna LTA18538 | Operation Manual - Page 32
este tractor. Haga el favor de leer y de guardar este manual. Estas instrucciones le permitirán montar y mantener su unidad en de bosques, de arbustos o de césped, o menos que el sistema de escape del motor venga equipado con un amortiguador de chispas que cumpla con las leyes locales o estatales (si - Husqvarna LTA18538 | Operation Manual - Page 33
nuevo ha sido montado en la fábrica con la excepción de aquellas partes que no se han montado por razones de envío. Para asegurarse que Medidor de presión de las llantas (1) Llaves de 9/16" Pinzas Cuando en este manual se mencionan los términos "mano derecha" o "mano izquierda" se refiere a - Husqvarna LTA18538 | Operation Manual - Page 34
en el agujero ancho ranurado en el recipiente. • Empujar en el asiento para enganchar el cojíns en la ranura y empujar el asiento hacia la parte trasera del tractor. INTERRUPTOR COJÍN RANURADO BASE DEL ASIENTO CINTA ARNÉS DE ALAMBRADO Fig. 2 • Levante el asiento y apriete la perno de ajuste en - Husqvarna LTA18538 | Operation Manual - Page 35
entre los terminales) cargue la batería por un mínimo de una hora a 6-10 amps.(Vea "BATERÍA" en la sección de Mantenimento de este manual.) • Determine la ubicación de la batería. La batería estará bajo el asiento o la cubierta. • Levante la base del asiento o capucha a una posición elevada - Husqvarna LTA18538 | Operation Manual - Page 36
la sección de Servicio y Ajustes de este manual. Verifique que las correas sigan su paso correcto completado todas las instrucciones de montaje. ✓ No quedan partes sueltas en la caja de cartón. ✓ La bater su función. Opérelos antes de hacer arrancar el motor. ✓ Asegúrese que el sistema de frenos esté - Husqvarna LTA18538 | Operation Manual - Page 37
lesiones ligeras o moderadas. PRECAUCIÓN cuando se utiliza sin el símbolo de aviso, indica una situación que puede provocar daños al tractor y/o al motor. SUPERFICIES CALIENTES indica un peligro que, si no se evita, puede provocar la muerte, lesiones graves y/o danos a la máquina. FUEGO indica un - Husqvarna LTA18538 | Operation Manual - Page 38
para familiarizarse con las ubicaciones de los diversos controles y ajustes. Guarde este manual para referencia en el futuro. H D B G E A C M - Se usa para desembragar y frenar el tractor y para hacer arrancar el motor. (C) PALANCA DEL FRENO DE ESTACIONAMIENTO - Asegura el pedal del embrague/freno - Husqvarna LTA18538 | Operation Manual - Page 39
de apagado "STOP" y remueva la llave al abandonar el tractor para evitar el uso no autorizado. • Nunca use la estrangulación para parar el motor. IMPORTANTE: DEJANDO EL INTERRUPTOR DE LA IGNICIÓN EN CUALQUIER POSICIÓN OTRA QUE "STOP" CAUSAR I QUE LA BATERÍA SE DESCARGUE (MUERTA). AVISO: Bajo ciertas - Husqvarna LTA18538 | Operation Manual - Page 40
Las alturas se miden desde el suelo a la punta de la cuchilla cuando el motor no está funcionando. Estas alturas son aproximadas y pueden variar dependiendo de las DE CORTE DE LA SEGADORA" en la sección de Operación de este manual). 2. Con la segadora a la altura deseada para la posición de corte - Husqvarna LTA18538 | Operation Manual - Page 41
cortar el césped. • Presionar el pedal freno hasta el fondo. • Con el motor en marcha, girar la llave del interruptor de la ignición en el sentido inverso al Utilice la guía de la pendiente proporcionada en la parte posteriora de este manual. • Escoja la velocidad más lenta antes de arrancar hacia - Husqvarna LTA18538 | Operation Manual - Page 42
"Tabla de Viscosidad Del Aceite" en la sección de Mantenimento de este manual.) • Para cambiar el aceite del motor, vea la sección de Mantenimento en este manual. AGREGUE GASOLINA • Llene el tanque de combustible hasta la parte inferior del cuello de relleno. No lo llene de más. Use gasolina normal - Husqvarna LTA18538 | Operation Manual - Page 43
LA SEGADORA" en la sección de Servicio y Ajustes de este manual. • El lado izquierdo de la segadora se debe usar para sped antes de segarlo. • Siempre opere el motor con una aceleración completa cuando siegue para bajo para obtener un rendimiento de corte de parte de su segadora y también la calidad - Husqvarna LTA18538 | Operation Manual - Page 44
el nivel del aceite del motor Cambiar el aceite del motor (Modelos con filtro de aceite) Cambiar el aceite del motor (Modelos sin filtro de aceite operador tiene que mantener la segadora según las instrucciones descritas en este manual. Hay algunos ajustes que se tienen que hacer en forma periódica - Husqvarna LTA18538 | Operation Manual - Page 45
" en el capítulo de Servicio y ajustes de este manual. LLANTAS • Mantenga todos los neumáticos con la presión sello para llantas de su comerciante de partes de repuesto más cercano. Elsello previene potencia en la batería. POSICIÓN ROS "ON" 02828 MOTOR EN POSICIÓN "ON" (OPERACIÓN NORMAL) Fig. 17 - Husqvarna LTA18538 | Operation Manual - Page 46
de ponerse en contacto con un otro centro de servicio cualificado. MOTOR LUBRICACIÓN Use solamente aceite de detergente de alta calidad clasificado con capacidad aproximada vea las "Especificaciones del Producto" sección de este manual. • Use un medidor en la tapa/varilla indicadora del nivel para - Husqvarna LTA18538 | Operation Manual - Page 47
aire más a menudo si se usa en condiciones polvorosas. Vea la manual de la motor. LIMPIEZA DE LA PANTALLA DE AIRE La pantalla de aire está sobre de enganche y las piezas móviles. PEDAL DEL EMBRAGUE/FRENO LIMPIAR PARTE SUPERIOR PLACA DE DIRECCIÓN SISTEMA DE DIRECCIÓN, SALPICADERO, GUARDA-BARROS Y - Husqvarna LTA18538 | Operation Manual - Page 48
y remuévala. • Asegúrese que las cuchillas y que todas las partes movibles se hayan detenido completamente. • Desconecte el alambre de la bujía y a la posición de más abajo. • Ruede la correa de polea del motor (M). • Retire el resorte de sujeción (K), deslice la abrazadera (L) hasta quitarla - Husqvarna LTA18538 | Operation Manual - Page 49
del brazo encima de la clavija (B) que hay en la parte exterior del chasis del tractor, y fíjelo con una resorte del soporte. • Instale la correa pasándola por encima de la polea del motor (M) M C D Fig. 26 • CONECTE LA CONEXION ANTERIOR (E) - manual. M F B Q R A E P K C D L 49 Fig. 29 - Husqvarna LTA18538 | Operation Manual - Page 50
Fig. 32 • Si la punta anterior de la hoja de la cuchilla no está 3,1 a 12,7 mm (1/8" a 1/2") más abajo que la punta posterior, diríjase a la parte de adelante del tractor. • Con una llave inglesa de 11/16" o de calibre regulable, afloje la tuerca A, dándole varias vueltas para despejar la tuerca de - Husqvarna LTA18538 | Operation Manual - Page 51
del tractor (Vea "PARA REMOV- ER LA SEGADORA" de esta sección de este manual). • Haga salir la correa de las poleas del mandril y de las poleas de (D). 5. Retire la correa de la polea del motor moviéndola hacia abajo (E). 6. Deslice la correa hacia la parte de atrás del tractor, retírela de la - Husqvarna LTA18538 | Operation Manual - Page 52
base del asiento. BASE DEL ASIENTO Si su batería está demasiado baja como para hacer arrancar el motor tiene que volverse a cargar. (Vea "Batería" en la sección de Mantenimiento de este manual). Si se usan "cables de empalme" para un arranque de emergencia, siga este procedimiento: IMPORTANTE: SU - Husqvarna LTA18538 | Operation Manual - Page 53
de la bombilla, en forma segura, hacia atrás en el agujero en la parte trasera del enrejado. • Cierre el capota. ENTRECIERRE Y RELÉS El alambrado suelto soltar el cable. Si el ajuste es necesario, vea de manual de motor. PARA AJUSTAR EL CONTROL DE ESTRANGULACIÓN El control de la estrangulaci - Husqvarna LTA18538 | Operation Manual - Page 54
conectado. MOTOR SISTEMA DE COMBUSTIBLE IMPORTANTE: Es important evitar que se forman depositos de goma en partes fundamentales ACEITE DEL MOTOR Drene el aceite (con el motor caliente) y cámbielo con aceite de motor limpio. (Vea "MOTOR" en la sección de "MANTENIMIENTO" de este manual.) CILINDRO(S) - Husqvarna LTA18538 | Operation Manual - Page 55
. 12. Silenciador sucio/taponado. 13. Alambrado suelto o dañado. 14. Válvulas del motor desajustadas. 1. Cuchilla desgastada, doblada o suelta. 2. Mandril de la cuchilla doblado. 3. Parte(s) suelta(s)/dañada(s). 1. Eleve la altura de corte/reduzca la velocidád 2. Ajuste el control de la aceleraci - Husqvarna LTA18538 | Operation Manual - Page 56
de césped, hojas y basura debajo de la segadora. 7. Limpie la parte inferior de la cajade la segadora. 8. La correa de impulsión de la Servicio y Ajustes de este manual. 1. Mueva el control de la aceleración a la posición de velocidad media y máxima (rápida) antes de para el motor. 1. Girar el ROS - Husqvarna LTA18538 | Operation Manual - Page 57
57 GUÍA SUGERIDA PARA MEDIR LAS PENDIENTES CON LA VISTA PARA UNA OPERACIÓN SEGURA PLEESGTAAREAS LUONALAPREGNODIEDNETLEADLEÍN1E5AGPRUANDTOESADA SOLAMENTE ANDE CUESTA ARRIBA O CUESTA ABAJO Y NO ATRAVIESE EL CERRO 15 GRADOS MAX. ADVERTENCIA: Para evitar daños graves, haga funcionar su tractor arriba y - Husqvarna LTA18538 | Operation Manual - Page 58
SERVICE NOTES 58 - Husqvarna LTA18538 | Operation Manual - Page 59
AVISO 59 - Husqvarna LTA18538 | Operation Manual - Page 60
07/22/2015 BD
-
 1
1 -
 2
2 -
 3
3 -
 4
4 -
 5
5 -
 6
6 -
 7
7 -
8
-
9
-
10
-
11
-
12
-
13
-
14
-
15
-
16
-
17
-
18
-
19
-
20
-
21
-
22
-
23
-
24
-
25
-
26
-
27
-
28
-
29
-
30
-
31
-
32
-
33
-
34
-
35
-
36
-
37
-
38
-
39
-
40
-
41
-
42
-
43
-
44
-
45
-
46
-
47
-
48
-
49
-
50
-
51
-
52
-
53
-
54
-
55
-
56
-
57
-
58
-
59
-
60
 |
 |

English/Spanish
115 77 78-49
Operator’s Manual
Manual de Operario
LTA18538
Gasoline containing up to 10% ethanol (E10) is accept-
able for use in this machine.
The use of any gasoline ex-
ceeding 10% ethanol (E10) will void the product warranty.
Esta máquina puede utilizar gasolina con un con-
tenido de hasta el 10% de etanol (E10).
El uso de una
gasolina que supere el 10% de etanol (E10) anulará la
garantía del producto.
Please read the operator's manual carefully and make sure
you understand the instructions before using the machine.
Por favor lea cuidadosamente y comprenda
estas intrucciones antes de usar esta maquina.