Husqvarna W448 Operation Manual - Page 22
Adjusting, Shift Lever Linkage, Replacing Transmission Belt, Belt Replacement 36
 |
View all Husqvarna W448 manuals
Add to My Manuals
Save this manual to your list of manuals |
Page 22 highlights
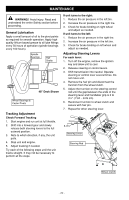
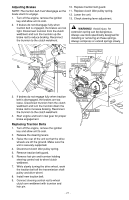
Adjusting Shift Lever Linkage IMPORTANT If the shift lever and the transmission detent are improperly aligned, the transmission may fail prematurely. Align the shift lever and detent as carefully as possible. The .030 (.8 mm) clearance helps prevent premature wear of the detent plate and shift lever. The transmission shift lever is attached to the transmission shift arm with two 5/16-18 bolts. Adjusting: 1. Stop the engine and remove ignition key. Put PTO lever in the OFF position. Put the shift lever in neutral. 2. Loosen the two bolts on shift lever. Replacing Transmission Belt 1. Stop the engine and remove ignition key. Put PTO lever in the OFF position. Put the shift lever in neutral. Trans Sheave Trans Belt Clutch Bracket Belt Idler Clutch Sheave 2. Remove mower drive belt from mower clutch sheave. Shift Lever 3. Loosen idler pulley mounting bolt and slide idler pulley away from the belt. 4. Loosen one and remove one engine mounting bolt and turn the clutch stop away from the clutch. Save the hardware. Adjustment Bolts 5. Remove old transmission belt from mower clutch sheave and transmission sheave. 6. Install new belt in the top groove of the clutch hub and on the transmission sheave. 7. Slide idler pulley to the belt to tension it, and then tighten the mounting bolt to hold the position. 3. Align the shift lever so it is centered in gear Position 2 on the detent plate and is .030 in. (.8 mm) from the V. NOTE: If the shift lever cannot be adjusted to tolerance with the shift lever hardware alone, loosen the hardware holding the detent plate to the frame and adjust the detent plate to tolerance. 8. Reposition clutch stop, replace engine bolt, and torque both engine bolts to 17 lbf-ft (23 N•m). 9. Reinstall mower drive belt on mower clutch sheave. Belt Replacement 36" 1. Turn off the engine, remove the ignition key and allow unit to cool. 2. Remove deck cover. 3. Turn the idler spring adjusting nut to relieve tension from the idler spring. 4. Remove belt from deck sheaves and mower clutch sheave. 5. Install new belt. 6. Tighten the adjusting nut to tension the belt. Tighten the nut until the idler spring compresses to 2 in. ± 1/8 in. (5.1 cm ± .32 cm). See Figure 16. 4. Tighten bolts securely. NOTE: Before starting unit, test the shift 7. Replace deck cover and secure. lever to make sure it engages all gear positions. - 22 -
-
 1
1 -
2
-
3
-
4
-
5
-
6
-
7
-
8
-
9
-
10
-
11
-
12
-
13
-
14
-
15
-
16
-
 17
17 -
 18
18 -
 19
19 -
 20
20 -
 21
21 -
 22
22 -
 23
23 -
 24
24 -
 25
25 -
 26
26 -
 27
27 -
28
-
29
-
30
-
31
-
32
 |
 |
