Husqvarna YT42DXLS Owners Manual
Husqvarna YT42DXLS Manual
 |
View all Husqvarna YT42DXLS manuals
Add to My Manuals
Save this manual to your list of manuals |
Husqvarna YT42DXLS manual content summary:
- Husqvarna YT42DXLS | Owners Manual - Page 1
de etanol (E10) anulará la garantía del producto. 587 92 39-26 Operator's Manual Manual de Operario YT42DXLS Please read the operator's manual carefully and make sure you understand the instructions before using the machine. Por favor lea cuidadosamente y comprenda estas intrucciones antes de usar - Husqvarna YT42DXLS | Owners Manual - Page 2
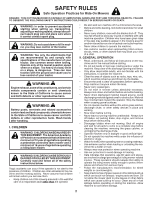
Battery children, even with the blades shut off. They may fall instructions on the machine and in the manual before starting. • Do not put hands or feet near rotating parts parts and burn. Do not allow the mower deck to plow leaves or other debris which can cause build-up to occur. Clean any oil - Husqvarna YT42DXLS | Owners Manual - Page 3
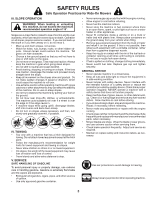
obstacles. • Choose a low ground speed so that Clean oil or parts, when necessary. • Mower blades are sharp. Wrap the blade or wear gloves, and use extreme caution when servicing them. • Check brake operation frequently. Adjust and service as required. • Maintain or replace safety and instruction - Husqvarna YT42DXLS | Owners Manual - Page 4
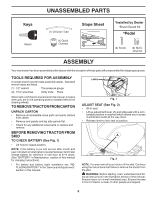
. Should you experience any problem you cannot easily remedy, please contact your nearest authorized service center/department. We have competent, well-trained technicians and the proper tools to service or repair this tractor. Please read and retain this manual. The instructions will enable you to - Husqvarna YT42DXLS | Owners Manual - Page 5
for minimum of one hour at 6-10 amps. (See "BATTERY" in Maintenance section of this manual for charging instructions). • For battery and battery cable installation see "REPLACING BATTERY" in the "Service and Adjustments" section in this manual. LABEL Fig. 1 ADJUST SEAT (See Fig. 2) • Sit in seat - Husqvarna YT42DXLS | Owners Manual - Page 6
DECK LEVELNESS For best cutting results, mower housing should be properly leveled. See "TO LEVEL MOWER HOUSING" in the Service and Adjustments section of this manual. CHECK FOR PROPER POSITION OF ALL BELTS See the figures that are shown for replacing motion and mower blade drive belts in the Service - Husqvarna YT42DXLS | Owners Manual - Page 7
NEUTRAL HIGH LOW CHOKE FAST SLOW IGNITION SWITCH ENGINE OFF ENGINE START ENGINE ON DIFFERENTIAL LOCK CLUTCH/ BRAKE PEDAL PARKING BRAKE MOWER HEIGHT MOWER LIFT REVERSE REVERSE FORWARD OPERATION SYSTEM (ROS) CRUISE CONTROL LIGHTS ON FUEL BATTERY EAR PROTECTION RECOMMENDED - Husqvarna YT42DXLS | Owners Manual - Page 8
various controls and adjustments. Save this manual for future reference. H D N Used to engage the mower blades or other attachments mounted to (M) FREEWHEEL CONTROL - Disengages transmission for pushing or slowly towing (S) BATTERY INDICATOR/CHARGING PLUG - Indicates the status of the battery. - Husqvarna YT42DXLS | Owners Manual - Page 9
secure. B C Fig. 4 STOPPING (See Fig. 5) MOWER BLADES • To stop mower blades, place attachment clutch control in the "DISENGAGED" position ( ). THE IGNITION SWITCH IN ANY POSITION OTHER THAN "STOP" WILL CAUSE THE BATTERY TO DISCHARGE AND GO DEAD. NOTE: Under certain conditions when tractor is - Husqvarna YT42DXLS | Owners Manual - Page 10
ground to the blade tip with the deck in proper position to help prevent scalping in most terrain conditions. NOTE: Adjust gauge wheels with tractor on a flat level surface. • Adjust mower to desired cutting height (See "TO AD- JUST MOWER CUTTING HEIGHT" in this section of manual). • With mower - Husqvarna YT42DXLS | Owners Manual - Page 11
MOWER BLADES Disengage attachment clutch control. CAUTION: Do not operate the mower without either the entire grass catcher, on mowers so longer needed, turn the ignition key clockwise to engine "ON" position. TRANSMISSION DISENGAGED Fig. 12 NOTE: To protect hood from damage when transporting your - Husqvarna YT42DXLS | Owners Manual - Page 12
shows the total number of hours the engine has run. To service engine and mower, see the Maintenance section of this manual. BATTERY INDICATOR/CHARGING PLUG (See Fig. 13) The Battery Indicator displays the status of the battery. There are three different indicator lights: 1. RED Charge necessary - Husqvarna YT42DXLS | Owners Manual - Page 13
the engine to accept small changes in speed and load, transmission which may have developed during shipping of your tractor. IMPORTANT: SHOULD YOUR TRANSMISSION REQUIRE REMOVAL FOR SERVICE transmission by placing freewheel control in engaged position. (See "TO TRANSPORT" in this section of manual - Husqvarna YT42DXLS | Owners Manual - Page 14
mower housing is attached to tractor. • Mower should be properly leveled for best mowing performance. See "TO LEVEL MOWER HOUSING" in the Service and Adjustments section of this manual. • The left hand side of mower speed by selecting a low enough gear to give the mower cutting performance as well - Husqvarna YT42DXLS | Owners Manual - Page 15
Replace Mower Blades C Lubrication Chart T Check Battery Level O Clean Battery and Terminals R Clean Debris off Steering Plate Check Transaxle Cooling Check Mower Levelness Check V-Belts Check Engine Oil Level Change Engine Oil (models with oil filter) Change Engine Oil (models without oil filter - Husqvarna YT42DXLS | Owners Manual - Page 16
remove battery from tractor. • Rinse the battery with plain water and dry. • Clean terminals and battery cable ends with wire brush until bright. • Coat terminals with grease or petroleum jelly. • Reinstall battery. (See "REPLACING BATTERY" in the Service and Adjustments section of this manual.) 16 - Husqvarna YT42DXLS | Owners Manual - Page 17
cap onto the tube securely when finished. ENGINE OIL FILTER Replace the engine oil filter every season or every other oil change if the tractor is used more than 100 hours in one year. NOTE: If needed, remove lower dash covers using steps from "Lower dash cover removal" section of this manual. 17 - Husqvarna YT42DXLS | Owners Manual - Page 18
manual. IN-LINE FUEL FILTER (See Fig. 20) The fuel filter should be replaced once each season. If fuel filter becomes belt slip and loss of drive. See Fig. 21. CAUTION: Avoid all pinch points and movable parts. CLUTCH/BRAKE PEDAL CLEAN TOP SIDE STEERING PLATE STEERING SYSTEM, DASH, FENDER AND MOWER - Husqvarna YT42DXLS | Owners Manual - Page 19
deck is equipped with a washout port as part of its deck parked cars, etc. Remove bagger chute or mulch cover if attached. 2. Manual) onto the end of your garden hose. 4. Pull back the lock collar of the nozzle adapter and push the adapter onto the deck washout port at the left end of the mower deck - Husqvarna YT42DXLS | Owners Manual - Page 20
from electric clutch pulley (M). See Mower Drive Belt Removal in "TO REPLACE MOWER BLADE DRIVE BELT" in this section. CAUTION: After rear lift links are disconnected, the attachment lift lever will be spring loaded. Have a tight grip on lift lever when changing position of the lever. • Go to either - Husqvarna YT42DXLS | Owners Manual - Page 21
electric clutch pulley (M). M Fig. 27 IMPORTANT: CHECK BELT FOR PROPER ROUTING IN ALL MOWER PULLEY GROOVES. • Raise attachment lift lever to highest position. See Mower Drive Belt Installation in "TO REPLACE MOWER BLADE DRIVE BELT" in this section of the manual. A C D C D Fig. 28 21 M E H B - Husqvarna YT42DXLS | Owners Manual - Page 22
forward. Measure distance (B) to the ground at front and rear tip of the blade. A TURN NUT RIGHT TO RAISE MOWER TURN NUT LEFT TO LOWER MOWER Fig. 29 NOTE: Each full turn of adjustment nut will change mower height about 3/16" (4,7 mm). • Test your adjustment by mowing some uncut grass and - Husqvarna YT42DXLS | Owners Manual - Page 23
parking brake. 2. Disengage transmission by placing freewheel control in "transmission disengaged" position. Pull manually push the tractor forward. If the rear wheels rotate, then the brake needs to be serviced. Contact a qualified service center. TO REPLACE MOWER BLADE DRIVE BELT MOWER DRIVE BELT - Husqvarna YT42DXLS | Owners Manual - Page 24
SERVICE AND ADJUSTMENTS TO REPLACE MOTION DRIVE BELT (See Fig. 36) Park the tractor on level surface. Engage parking brake. For assistance, there is a belt installation guide decal on bottom side of left footrest. BELT REMOVAL 1. Remove mower. (See "TO REMOVE MOWER" section in this manual.) NOTE: - Husqvarna YT42DXLS | Owners Manual - Page 25
terminals at the same time. Before connecting battery, remove metal bracelets, wristwatch bands, rings, transmission require removal for service or replacement, it should be purged after reinstallation and before operating the tractor. See "PURGE TRANSMISSION" in the Operation section of this manual - Husqvarna YT42DXLS | Owners Manual - Page 26
and replace belts, if necessary. (See belt replacement instructions in the Service and Adjustments section of this manual.) • Lubricate as shown in the Maintenance section of this manual. • Be sure that all nuts, bolts and screws are securely fastened. Inspect moving parts for damage, breakage - Husqvarna YT42DXLS | Owners Manual - Page 27
, trash under mower. 3. Clean underside of mower housing. 4. Dirty air filter. 4. Clean/replace air filter. 5. Low oil level/dirty oil. 5. Check oil level/change oil. 6. Faulty spark plug. 6. Clean and regap or change spark plug. 7. Dirty fuel filter. 7. Replace fuel filter. 8. Stale or - Husqvarna YT42DXLS | Owners Manual - Page 28
, trash under mower. 7. Clean underside of mower housing. 8. Mower drive belt worn. 8. Replace mower drive belt. 9. Blades improperly installed. 9. Reinstall blades sharp edge down. 10. Improper blades used. 10. Replace with blades listed in parts manual. 11. Clogged mower deck vent holes - Husqvarna YT42DXLS | Owners Manual - Page 29
29 SUGGESTED GUIDE FOR SIGHTING SLOPES FOR SAFE OPERATION TFHOISLDISAALO15NDGEDGORTETEESDLLOINPEE degrees. Make turns gradually to prevent tipping or loss of control. Exercise extreme caution when changing direction on slopes. 1. Fold this page along dotted line indicated above. 2. Hold page - Husqvarna YT42DXLS | Owners Manual - Page 30
niños. II. FUNCIONAMIENTO GENERAL • Leer, entender y seguir todas las instrucciones sobre la máquina y en el manual antes de empezar. • No poner las manos o los pies cerca de partes giratorias o debajo de la máquina. Mantener siempre limpia la abertura de descarga. • Permitir el funcionamiento de la - Husqvarna YT42DXLS | Owners Manual - Page 31
ón Seguras para las Segadoras Conducibles • Mantener la máquina libre de hierba, hojas u otros escombros que pueden tocar el tubo de escape / partes del motor calientes y quemarse. No permitir que el puente del cortacésped cargue hojas u otros residuos que pueden causar acumulaciones. Limpiar toda - Husqvarna YT42DXLS | Owners Manual - Page 32
y competentes y con las herramientas adecuadas para darle servicio o para reparar este tractor. Haga el favor de leer y de guardar este manual. Estas instrucciones le permitirán montar y mantener su unidad en forma adecuada. Siempre observe las "REGLAS DE SEGURIDAD." RESPONSABILIDADES DEL CLIENTE - Husqvarna YT42DXLS | Owners Manual - Page 33
ha sido montado en la fábrica con la excepción de aquellas partes que no se han montado por razones de envío. HERRAMIENTAS NECESARIAS PARA a 6-10 amps. (Vea "BATERÍA" en la sección de Mantenimento de este manual). • Para instale la batería, y cable de la batería, realice el procedimiento descrito - Husqvarna YT42DXLS | Owners Manual - Page 34
PARA NIVELAR LA CAJA" en la sección de Servicio y Ajustes de este manual. REVISIÓN DE LA POSICIÓN ADECUADA DE TODAS LAS CORREAS Vea las figuras CONTINUACION: ✓ Se han completado todas las instrucciones de montaje. ✓ No quedan partes sueltas en la caja de cartón. ✓ La batería está preparada y cargada - Husqvarna YT42DXLS | Owners Manual - Page 35
OPERACIÓN Estos símbolos pueden aparecer sobre su tractor o en la literatura proporcionada con el producto. Aprenda y comprenda sus significados. MARCHA ATRÁS NEUTRO ALTO BAJO ESTRANGULACIÓN RÁPIDO LENTO INTERRUPTOR DE IGNICIÓN MOTOR APAGADO MOTOR EN MARCHA MOTOR ENCENDIDO EL CIERRE - Husqvarna YT42DXLS | Owners Manual - Page 36
Compare las ilustraciones con su tractor para familiarizarse con las ubicaciones de los diversos controles y ajustes. Guarde este manual para referencia en el futuro. H D N B A M Q C P Z S G E F K J L Fig. 3 Nuestros tractores cumplen con los estándares de seguridad del American National - Husqvarna YT42DXLS | Owners Manual - Page 37
OPERACIÓN La operación de cualquier tractor puede hacer que salten objetos extraños dentro de sus ojos, lo que puede producir daños graves en éstos. Siempre use anteojos de seguridad o protecciones para los ojos mientras opere su tractor o cuando haga ajustes o reparaciones. Recomendamos gafas de - Husqvarna YT42DXLS | Owners Manual - Page 38
deseada con la manilla de ajuste de altura (Vea "PARA AJUSTAR LA ALTURA DE CORTE DE LA SEGADORA" en la sección de Operación de este manual). 2. Con la segadora a la altura deseada para la posición de corte, se tienen que montar las ruedas calibradoras de modo que queden un poco sobre - Husqvarna YT42DXLS | Owners Manual - Page 39
en cerros con pendientes superiores a 15° y no maneje atravesando ninguna pendiente. Utilice la guía de la pendiente proporcionada en la parte posteriora de este manual. • Escoja la velocidad más lenta antes de arrancar hacia arriba o hacia abajo en cerros. • Evite parar o cambiar la velocidad en - Husqvarna YT42DXLS | Owners Manual - Page 40
"Tabla de Viscosidad Del Aceite" en la sección de Mantenimento de este manual.) • Para cambiar el aceite del motor, vea la sección de Mantenimiento en este manual. AGREGUE GASOLINA • Llene el tanque de combustible hasta la parte inferior del cuello de relleno. No lo llene de más. Use gasolina normal - Husqvarna YT42DXLS | Owners Manual - Page 41
Desenganche la transmisión poniendo el control de rueda libre en la posición de desenganchado. (Vea "PARA EL TRANSPORTE" en esta sección de este manual.) 3. Sentado en el asiento del tractor, empiece el motor. Después que este corriendo el motor, mueva el control de estrangulación a la posición de - Husqvarna YT42DXLS | Owners Manual - Page 42
NIVELAR LA CAJA DE LA SEGADORA" en la sección de Servicio y Ajustes de este manual. • El lado izquierdo de la segadora se debe usar para recorte. • Maneje de modo un cambio lo suficientemente bajo para obtener un rendimiento de corte de parte de su segadora y también la calidad del corte deseada. • - Husqvarna YT42DXLS | Owners Manual - Page 43
negligencia del operador. Para recibir todo el valor de la garantía, el operador tiene que mantener la segadora según las instrucciones descritas en este manual. Hay algunos ajustes que se tienen que hacer en forma periódica para poder mantener su tractor adecuadamente. Al menos una vez cada estaci - Husqvarna YT42DXLS | Owners Manual - Page 44
AJUSTAR EL FRENO" en el capítulo de Servicio y ajustes de este manual. CUIDADO DE LA CUCHILLA Para obtener resultados óptimos, las cuchillas de la ñas fugas, puede comprar el sello para llantas de su comerciante de partes de repuesto más cercano. Elsello previene que las llantas se sequen y tambi - Husqvarna YT42DXLS | Owners Manual - Page 45
nivel para relleno del aceite. Vacíelo lentamente. No lo llene demasiado. Para la capacidad aproximada vea las "Especificaciones del Producto" sección de este manual. PARA CAMBIAR EL ACEITE DEL MOTOR (Vea Figs. 17 - 19) Determine la gama de la temperatura esperada antes de cambiar el aceite. Todo - Husqvarna YT42DXLS | Owners Manual - Page 46
al filtro de aire más a menudo si se usa en condiciones polvorosas. Vea la manual de la motor. LIMPIEZA DE LA PANTALLA DE AIRE La pantalla de aire está sobre el soplador de la toma de aire que se ubica en la parte superior del motor. La pantalla de aire se debe mantener libre de suciedad y - Husqvarna YT42DXLS | Owners Manual - Page 47
22) La plataforma del tractor está equipada con un puerto de lavado como parte del sistema de lavado de la plataforma. Se debe utilizar después de cada el motor. 3. Enrosque el adaptador de la boquilla (empaquetado con el manual del operador del tractor) en el extremo de la manguera del jardín. - Husqvarna YT42DXLS | Owners Manual - Page 48
BRAZOS DE SUSPENSIÓN LATERALES DE LA CORTADORA (A) AL CHASIS - Ubique el orificio del brazo encima de la clavija (B) que hay en la parte exterior del chasis del tractor, y fíjelo con una resorte de contención. • Realice el mismo procedimiento en el otro lado del tractor. A C D C D M E H B Fig - Husqvarna YT42DXLS | Owners Manual - Page 49
de la cortadora de césped (H). E H Fig. 25 • FIJE LAS PIEZAS DE PROPULSIÓN POSTERIORES (C) - Levante la parte posterior de la cortadora, ubique la ranura de la pieza de unión (D) por encima de la clavija que hay en se ilustra en el capítulo de Manejo de este manual. A C D C D Fig. 28 49 M E H B - Husqvarna YT42DXLS | Owners Manual - Page 50
Fig. 31 • Si la punta anterior de la hoja de la cuchilla no está 6,3 a 9,5 mm (1/4" a 3/8") más abajo que la punta posterior, diríjase a la parte de adelante del tractor. • Con una llave inglesa de 11/16" o de calibre regulable, afloje la tuerca A, dándole varias vueltas para despejar la tuerca de - Husqvarna YT42DXLS | Owners Manual - Page 51
SERVICIO Y AJUSTES CONTROLAR Y AJUSTAR EL FRENO Si el tractor exige más de 1,5 m (cinco (5) pies) para pararse a una velocidad más alta en el cambio más alto en una superficie nivelada de hormigón seco o pavimentada, entonces se debe controlar y ajustar el freno. CONTROL DEL FRENO 1. Aparcar el - Husqvarna YT42DXLS | Owners Manual - Page 52
la segadora. (Ver "PARA DESMONTAR La segadora en este capítulo del manual.) NOTE: Observe toda la correa de impulsión de movimiento y la posición correa del piñón central (E). 6. Jale el cable de la correa hacia la parte de atrás del tractor. Con mucho cuidado, retire la correa jalando hacia arriba - Husqvarna YT42DXLS | Owners Manual - Page 53
Vea "PURGAR LA TRANSMISIÓN" en la sección de la Operación de este manual. CABLE ROJO (POSITIVO) Fig. 39 PARA CAMBIAR LA BOMBILLA DE LA LUZ DELANTERA el capota. • Tire el sujetador de la bombilla fuera del agujero en la parte trasera del enrejado. • Cambie la bombilla en el sujetador y empuje el - Husqvarna YT42DXLS | Owners Manual - Page 54
.) • Lubríquelo, según se muestra en la sección de Mantenimiento de este manual. • Asegúrese que todas las tuercas, los pernos y los tornillos estén sujetados en forma segura. Inspeccione las partes movibles para verificar si hay daño, rotura o desgaste. Cámbielas si es necesario. • Retoque todas - Husqvarna YT42DXLS | Owners Manual - Page 55
sucio/taponado. 13. Alambrado suelto o dañado. 14. Válvulas del motor desajustadas. 1. Cuchilla desgastada, doblada o suelta. 2. Mandril de la cuchilla doblado. 3. Parte(s) suelta(s)/dañada(s). 1. Eleve la altura de corte/reduzca la velocidád 2. Ajuste el control de la aceleración. 3. Limpie la - Husqvarna YT42DXLS | Owners Manual - Page 56
perno de la cuchilla. 2. Nivele el conjunto segador. 3. Limpie la parte inferior de la cajade la segadora. 4. Cambie la mandril de la 5. Vea "PARA REMOVER LAS RUEDAS" en la sección de Servicio y Ajustes de este manual. 1. Mueva el control de la aceleración a la posición de velocidad media y máxima - Husqvarna YT42DXLS | Owners Manual - Page 57
57 GUÍA SUGERIDA PARA MEDIR LAS PENDIENTES CON LA VISTA PARA UNA OPERACIÓN SEGURA PLEESGTAAREAS LUONALAPREGNODIEDNETLEADLEÍN1E5AGPRUANDTOESADA SOLAMENTE ANDE CUESTA ARRIBA O CUESTA ABAJO Y NO ATRAVIESE EL CERRO 15 GRADOS MAX. ADVERTENCIA: Para evitar daños graves, haga funcionar su tractor arriba y - Husqvarna YT42DXLS | Owners Manual - Page 58
SERVICE NOTES / AVISO 58 - Husqvarna YT42DXLS | Owners Manual - Page 59
SERVICE NOTES / AVISO 59 - Husqvarna YT42DXLS | Owners Manual - Page 60
11/11/2014 TH
-
 1
1 -
 2
2 -
 3
3 -
 4
4 -
 5
5 -
 6
6 -
 7
7 -
8
-
9
-
10
-
11
-
12
-
13
-
14
-
15
-
16
-
17
-
18
-
19
-
20
-
21
-
22
-
23
-
24
-
25
-
26
-
27
-
28
-
29
-
30
-
31
-
32
-
33
-
34
-
35
-
36
-
37
-
38
-
39
-
40
-
41
-
42
-
43
-
44
-
45
-
46
-
47
-
48
-
49
-
50
-
51
-
52
-
53
-
54
-
55
-
56
-
57
-
58
-
59
-
60
 |
 |

English/Spanish
587 92 39-26
Operator’s Manual
Manual de Operario
YT42DXLS
Gasoline containing up to 10% ethanol (E10) is accept-
able for use in this machine.
The use of any gasoline ex-
ceeding 10% ethanol (E10) will void the product warranty.
Esta máquina puede utilizar gasolina con un con-
tenido de hasta el 10% de etanol (E10).
El uso de una
gasolina que supere el 10% de etanol (E10) anulará la
garantía del producto.
Please read the operator's manual carefully and make sure
you understand the instructions before using the machine.
Por favor lea cuidadosamente y comprenda
estas intrucciones antes de usar esta maquina.