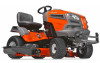
Husqvarna YT54LS Owners Manual
Husqvarna YT54LS Manual
 |
View all Husqvarna YT54LS manuals
Add to My Manuals
Save this manual to your list of manuals |
Husqvarna YT54LS manual content summary:
- Husqvarna YT54LS | Owners Manual - Page 1
) anulará la garantía del producto. the product warranty. 581 62 33-96 Operator's Manual Manual de Operario YT54LS Please read the operator's manual carefully and make sure you understand the instructions before using the machine. Por favor lea cuidadosamente y comprenda estas intrucciones antes de - Husqvarna YT54LS | Owners Manual - Page 2
CUTTING MACHINE IS CAPABLE OF AMPUTATING HANDS AND FEET AND THROWING OBJECTS. FAILURE TO OBSERVE THE FOLLOWING SAFETY INSTRUCTIONS tractor instructions on the machine and in the manual before starting. • Do not put hands or feet near rotating parts ob- jects. Uneven terrain could overturn the blades and - Husqvarna YT54LS | Owners Manual - Page 3
and replace with manufacturer's recommended parts, when necessary. • Mower blades are sharp. Wrap the blade or wear gloves, and use extra caution when servicing them. • Check brake operation frequently. Adjust and service as required. • Maintain or replace safety and instruction labels, as necessary - Husqvarna YT54LS | Owners Manual - Page 4
. Should you experience any problem you cannot easily remedy, please contact your nearest authorized service center/department. We have competent, well-trained technicians and the proper tools to service or repair this tractor. Please read and retain this manual. The instructions will enable you to - Husqvarna YT54LS | Owners Manual - Page 5
UNASSEMBLED PARTS Mower Mower Front Wheel (5) 1-3/16 O.D. Washers (2) Rear Lift Link Assemblies (1) Small Retainer Springs (5) Large Retainer Springs (1) Front Lift Link Assembly (1) Shoulder Bolt (1) 1-1/4 O.D. Washer (1) Wheel (1) 3/8-16 - Husqvarna YT54LS | Owners Manual - Page 6
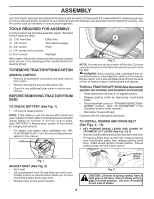
clutch/brake pedal. • Place freewheel control in "TRANSMISSION DISENGAGED" position. (See "TO TRANSPORT" in the Operation section of this manual.) • Roll tractor forward off skid. Continue with the instructions that follow. TO INSTALL MOWER AND DRIVE BELT (See Figs. 3 - 15) 1. SET PARKING BRAKE - Husqvarna YT54LS | Owners Manual - Page 7
with deflector shield (Q) to the right. FRONT Q ENGINE TRANSAXLE 02965 BACK Fig. 6 Q. DEFLECTOR SHIELD 4. SLIDE MOWER UNDER TRACTOR (See Fig. 8) • Bring belt forward and check belt for proper routing in all mower pulley grooves. NOTE: Be sure mower side suspension arms (A) are pointing forward - Husqvarna YT54LS | Owners Manual - Page 8
13) • Insert rod end of rear lift link (C) into hole (U) in tractor lift shaft suspension arm and pivot link down to mower. • Lift rear corner of secure with large washer and large retainer spring. • Repeat on opposite side of tractor. U C S T S. ANTI-SWAY BAR T. TRANSAXLE BRACKET Fig. 10 NOTE - Husqvarna YT54LS | Owners Manual - Page 9
described in "TO REPLACE MOWER BLADE DRIVE BELT " in the "Service and Adjustments" section of this manual. CHECK TIRE PRESSURE The tires on your tractor were overinflated at the factory for shipping purposes. Correct tire pressure is important for best cutting performance. • Reduce tire pressure to - Husqvarna YT54LS | Owners Manual - Page 10
RULES SECTION) FREE WHEEL (Automatic Models only) Failure to follow instructions could result in serious injury or death. The safety alert symbol the alert symbol, indicates a situation that could result in damage to the tractor and/or engine. HOT SURFACES indicates a hazard which, if not avoided, - Husqvarna YT54LS | Owners Manual - Page 11
the mower blades or other attachments mounted to your tractor. (F) tractor. (M) FREEWHEEL CONTROL - Disengages transmission for pushing or slowly towing the tractor with the engine off. (N) CHOKE CONTROL - Used when starting a cold engine. (P) SERVICE REMINDER / HOUR METER - Indicates when service - Husqvarna YT54LS | Owners Manual - Page 12
brake lever. Pedal should remain in brake position. Make sure parking brake will hold tractor secure. B C Fig. 17 STOPPING (See Fig. 18) MOWER BLADES • To stop mower blades, place attachment clutch control in the "DISENGAGED" position ( ). ENGINE - • Move throttle control (D) between half - Husqvarna YT54LS | Owners Manual - Page 13
in most terrain conditions. NOTE: Adjust gauge wheels with tractor on a flat level surface. • Adjust mower to desired cutting height (See "TO AD- JUST MOWER CUTTING HEIGHT" in this section of manual). • With mower in desired height of cut position, gauge wheels should be assembled so they are - Husqvarna YT54LS | Owners Manual - Page 14
BLADES Disengage attachment clutch control. CAUTION: Do not operate the mower without either the entire grass catcher, on mowers so equipped, or the deflector chute in place (See Fig. 23). Fig. 23 REVERSE OPERATION SYSTEM (ROS) Your tractor your tractor, be sure to disengage transmission by placing - Husqvarna YT54LS | Owners Manual - Page 15
service engine and mower, see the Maintenance section of this manual. Note: Service tractor has been shipped from the factory already filled with summer weight oil. • Check engine oil with tractor . To avoid engine problems, the fuel system season. See Storage Instructions for additional information - Husqvarna YT54LS | Owners Manual - Page 16
- that is clear and open - with engine off and parking brake set. 2. Disengage transmission by placing freewheel control in disengaged position (See "TO TRANSPORT" in this section of manual). 3. Sitting in the tractor seat, start engine. After the engine is running, move throttle control to slow - Husqvarna YT54LS | Owners Manual - Page 17
. See "TO LEVEL MOWER HOUSING" in the Service and Adjustments section of this manual. • The left hand side of mower should be used for trimming. • Drive so that clippings are discharged onto the area that has been cut. Have the cut area to the right of the tractor. This will result in a more even - Husqvarna YT54LS | Owners Manual - Page 18
properly maintain your tractor. At least once a season, check to see if you should make any of the adjustments described in the Service and Adjustments section of this manual. • At least once a year you should replace the spark plug, clean or replace air filter, and check blades and belts for wear - Husqvarna YT54LS | Owners Manual - Page 19
blades. BRAKE OPERATION If tractor requires more than five (5) feet to stop at highest speed in highest gear on a level, dry concrete or paved surface, then brake must be checked and adjusted. (See "TO CHECK BRAKE" in the Service and Adjustments section of this manual your local parts dealer. Tire - Husqvarna YT54LS | Owners Manual - Page 20
belts are not adjustable. Replace belts if they begin to slip from wear. TRANSAXLE MAINTENANCE The transmission transmission. • Inspect cooling fan to be sure fan blades meet API service classification SG-SL. • Be sure tractor is on PRODUCT SPECIFICATIONS" section of this manual. • Use gauge on oil - Husqvarna YT54LS | Owners Manual - Page 21
air filter. Service air cleaner section of this manual. IN-LINE FUEL belt slip and loss of drive. CAUTION: Avoid all pinch points and movable parts tractor unless the engine and transmission are covered to keep water out. Water in engine or transmission will shorten the useful life of your tractor - Husqvarna YT54LS | Owners Manual - Page 22
tractor's deck is equipped with a washout port as part of its deck wash system. It should be utilized after each use. 1. Drive the tractor tractor's Operator's Manual) tractor away. WARNING: A broken or missing washout fitting could expose you or others to thrown objects from contact with the blade - Husqvarna YT54LS | Owners Manual - Page 23
. TO INSTALL MOWER Follow procedure described in "INSTALL MOWER AND DRIVE BELT" in the Assembly section of this manual. L K B M A F E H TO REPLACE MOWER BLADE DRIVE BELT (See Fig. 36) MOWER DRIVE BELT REMOVAL • Park tractor on a level surface. Engage parking brake. • Lower attachment lift to its - Husqvarna YT54LS | Owners Manual - Page 24
SERVICE lawn appears unevenly cut, determine which side of mower is cutting lower. see steps in Visual Adjustment instructions above. • Recheck measurements, tractor on level ground or driveway. Fig. 39 • If front tip of blade is not 1/8" to 1/2" lower than the rear tip, go to the front of tractor - Husqvarna YT54LS | Owners Manual - Page 25
belt slack toward rear of tractor. Carefully remove belt upwards from transmission input pulley and over cooling fan blades (F). 7. Remove belt downward from engine pulley and around electric clutch (G). 8. Slide belt toward rear of tractor, off the steering plate (H) and remove from tractor. BELT - Husqvarna YT54LS | Owners Manual - Page 26
weak to start the engine, it should be recharged. (See "BATTERY" in the MAINTENANCE section of this manual). If "jumper cables" are used for emergency starting, follow this procedure: IMPORTANT: YOUR TRACTOR IS EQUIPPED WITH A 12 VOLT SYSTEM. THE OTHER VEHICLE MUST ALSO BE A 12 VOLT SYSTEM. DO NOT - Husqvarna YT54LS | Owners Manual - Page 27
WIRE CONNECTOR 07002 Fig. 45 TRANSMISSION REMOVAL/REPLACEMENT Should your transmission require removal for service or replacement, it should be purged after reinstallation and before operating the tractor. See "PURGE TRANSMISSION" in the Operation section of this manual. ENGINE TO ADJUST THROTTLE - Husqvarna YT54LS | Owners Manual - Page 28
tractor (See "CLEANING" in the Maintenance section of this manual). • Inspect and replace belts, if necessary (See belt replacement instructions in the Service and Adjustments section of this manual GUM DEPOSITS FROM FORMING IN ESSENTIAL FUEL SYSTEM PARTS SUCH AS CARBURETOR, FUEL FILTER, FUEL HOSE, - Husqvarna YT54LS | Owners Manual - Page 29
TROUBLESHOOTING PROBLEM Will not start CAUSE 1. Out of service center/department. Excessive vibration 1. Worn, bent or loose blade. 2. Bent blade mandrel. 3. Loose/damaged part(s). 1. Replace blade. Tighten blade bolt. 2. Replace blade mandrel. 3. Tighten loose part(s). Replace damaged parts - Husqvarna YT54LS | Owners Manual - Page 30
wiring, switches and connections. If not corrected, contact an authorized service center/ department. CAUTION: DO NOT operate machine until problem is corrected. Poor cut - uneven Mower blades will not rotate 1. Worn, bent or loose blade. 2. Mower deck not level. 3. Buildup of grass, leaves, trash - Husqvarna YT54LS | Owners Manual - Page 31
31 SUGGESTED GUIDE FOR SIGHTING SLOPES FOR SAFE OPERATION TFHOISLDISAALO15NDGEDGORTETEESDLLOINPEE ONLY RIDE UP AND DOWN HILL, NOT ACROSS HILL 15 DEGREES MAX. WARNING: To avoid serious injury, operate your tractor up and down the face of slopes, never across the face. Do not mow slopes greater than - Husqvarna YT54LS | Owners Manual - Page 32
, such as throttle cable, belt guides adjustments; and c. Preventative maintenance as outlined in the operator's manual. In addition, you must cease using the product immediately upon any failure or damage. The product should be taken to an authorized Husqvarna servicing dealer prior to any further - Husqvarna YT54LS | Owners Manual - Page 33
initial operational problem or failure occurs. 9. Reinforced Stamped (Armor Protected) 10 Year Limited & Fabricated Limited Lifetime, Deck Warranties. These Limited Warranties are for the deck shell only - mechanical components/parts such as belts, pulleys, spindle housings, bearings, blades, rods - Husqvarna YT54LS | Owners Manual - Page 34
producing use, Product/Component other than Rental Use) Riding Lawn Tractors: Frame, Chassis, Front Axle 5 Years No Warranty Engine* * * Transmission (if made by Husqvarna/Peerless) 3 Years No Warranty Transmission (if third party)** * * * * XLS Models only - stamped deck shell - Husqvarna YT54LS | Owners Manual - Page 35
grass catcher, bumper guard accessories, etc. 1 Year No Warranty No Warranty Parts (e.g., belts, blades, etc.) 90 days No Warranty No Warranty Parts & Accessories (if replaced in Warranty Service) Replacement parts and/or accessories provided under this Limited Warranty are warranted only - Husqvarna YT54LS | Owners Manual - Page 36
la tracción con el suelo y hacerle perder el control de su tractor. ADVERTENCIA El tubo de escape del motor, algunos de sus constituyentes y instrucciones sobre la máquina y en el manual antes de empezar. • No poner las manos o los pies cerca de partes giratorias o debajo de la máquina. Mantener - Husqvarna YT54LS | Owners Manual - Page 37
Academy of Pediatrics) recomienda que sólo se permita a niños con una edad mínima de 12 años manejar máquinas cortacésped manuales, y al menos de 16 años para manejar tractores cortacésped. Si el operador no pone atención a la presencia de los niños pueden ocurrir accidentes trágicos. Los niños - Husqvarna YT54LS | Owners Manual - Page 38
. Cuenta con técnicos bien capacitados y competentes y con las herramientas adecuadas para darle servicio o para reparar este tractor. Haga el favor de leer y de guardar este manual. Estas instrucciones le permitirán montar y mantener su unidad en forma adecuada. Siempre observe las "REGLAS DE - Husqvarna YT54LS | Owners Manual - Page 39
PEDAZOS PARA LA MONTAJE Segadora (5) 1-3/16" Arandela (2) Conjunto de eslabones de levantamiento traseros (1) Abrazadera pequeño de retención (1) Eslabones de levantamiento (5) Abrazadera delanteros grande de retención Rueda Delantera De La Segadora (1) Perno (1) 1-1/4" Arandela (1) - Husqvarna YT54LS | Owners Manual - Page 40
los paneles laterales. • Revise si hay partes sueltas adicionales o cartón y remué- valas. ANTES DE REMOVER EL TRACTOR DE LA CORREDERA VERIFIQUE LA BATERÍA (Vea TRANSPORTAR" en la sección de Operación de este manual.) • Haga rodar el tractor hacia delante fuera de la corredera. Continuar con las - Husqvarna YT54LS | Owners Manual - Page 41
la cortadora de césped en el lado derecho del tractor con el blindaje deflector (Q) a la derecha. PARTE DELANTERA Q MOTOR TRANSEJE 02965 PARTE TRASERA Fig. 6 Q. BLINDAJE DEFLECTOR 4. DESLICE LA CORTADORA DE CÉSPED DEBAJO DEL TRACTOR (Vea Fig. 8) • Lleve la correa hacia adelante y verifique que - Husqvarna YT54LS | Owners Manual - Page 42
. 13 8. INSTALE EL ESLABÓN DELANTERO (E) (Vea Fig. 14) • Gire el volante hasta ubicar las ruedas derechas en posición de avance. • Desde la parte delantera del tractor, inserte el extremo de varilla del eslabón delantero (E) a través del agujero delantero de la escuadra de suspensión delantera del - Husqvarna YT54LS | Owners Manual - Page 43
TRACTOR NUEVO, LE DESEAMOS QUE RECIBA EL MEJOR RENDIMIENTO Y LA MAYOR SATISFACCION DE ESTE PRODUCTO DE CALIDAD. HAGA EL FAVOR DE REVISAR LA LISTA A CONTINUACION: ✓ Se han completado todas las instrucciones de montaje. ✓ No quedan partes manual). AL MISMO TIEMPO QUE APRENDE A COMO USAR SU TRACTOR, - Husqvarna YT54LS | Owners Manual - Page 44
MANOS Y LOS PIES LEJOS PRECAUCIÓN cuando se utiliza sin el símbolo de aviso, indica una situación que puede provocar daños al tractor y/o al motor. No seguir las siguientes instrucciones puede provocar heridas o muerte. Los símbolos de aviso de seguridadse utilizan para identificar informaciones - Husqvarna YT54LS | Owners Manual - Page 45
para familiarizarse con las ubicaciones de los diversos controles y ajustes. Guarde este manual para referencia en el futuro. P D B A M N Q C Z H G S E F K J L Fig. 16 Nuestros tractores cumplen con los estándares de seguridad del American National Standard Institute. (A) PALANCA DE - Husqvarna YT54LS | Owners Manual - Page 46
palanca del freno de mano. El pedal tiene que quedar en la posición de freno. Asegúrese que el freno de estacionamiento va a sujetar el tractor en forma segura. B C MOTOR - • Mueva el control de la aceleración (D) a la posición de lento. AVISO: Si no se mueve el control de la aceleración a la - Husqvarna YT54LS | Owners Manual - Page 47
en casi todos los terrenos. AVISO: Ajuste las ruedas calibradoras con el tractor en una superficie nivelada plana. 1. Ajuste la segadora a la altura de LA ALTURA DE CORTE DE LA SEGADORA" en la sección de Operación de este manual). 2. Con la segadora a la altura deseada para la posición de corte, se - Husqvarna YT54LS | Owners Manual - Page 48
Utilice la guía de la pendiente proporcionada en la parte posteriora de este manual. • Escoja la velocidad más lenta antes de arrancar hacia de marcha de rueda libre esta situado en la barra de tracción trasera del tractor. • Levante la palanca de levantamiento del accesorio a su posición más alta. - Husqvarna YT54LS | Owners Manual - Page 49
de peso para verano. • Revise el aceite del motor con el tractor en terreno nivelado. • Destornille y remueva la tapa/varilla indicadora de manual.) • Para cambiar el aceite del motor, vea la sección de Mantenimiento en este manual. AGREGUE GASOLINA • Llene el tanque de combustible hasta la parte - Husqvarna YT54LS | Owners Manual - Page 50
transmisión poniendo el control de rueda libre en la posición de desenganchado (Vea "PARA EL TRANSPORTE" en esta sección de este manual). 3. Sentado en el asiento del tractor, empiece el motor. Después que este corriendo el motor, mueva el control de estrangulación a la posición de lento. Quitar el - Husqvarna YT54LS | Owners Manual - Page 51
" en la sección de Servicio y Ajustes de este manual. • El lado izquierdo de la segadora se debe usar sido cortada. Mantenga el área de corte a la derecha del tractor. Esto producirá una distribución más pareja de los recortes y un obtener un rendimiento de corte de parte de su segadora y también la - Husqvarna YT54LS | Owners Manual - Page 52
si equipado con una batería libre de mantenimiento. 5- Vea "LIMPIEZA" en la sección de Mantenimento de este manual. RECOMENDACIONES GENERALES TABLA DE LUBRICACIÓN La garantía de este tractor no cubre los artículos que han estado sujetos al abuso o a la negligencia del operador. Para recibir todo - Husqvarna YT54LS | Owners Manual - Page 53
" en el capítulo de Servicio y ajustes de este manual. LLANTAS • Mantenga todos los neumáticos con la presión sello para llantas de su comerciante de partes de repuesto más cercano. Elsello previene PERNO HEXAGONAL Fig. 28 CUCHILLA BATERÍA Su tractor cuenta con un sistema de carga de la bater - Husqvarna YT54LS | Owners Manual - Page 54
la capacidad aproximada vea las "Especificaciones del Producto" sección de este manual. • Use un medidor en la tapa/varilla indicadora del nivel para aceite del motor cada temporada o vez por medio que cambie el aceite, si el tractor se usa más de 100 horas en un año. NOTA: Si es necesario, retire - Husqvarna YT54LS | Owners Manual - Page 55
de la abertura aparecen en "ESPECIFICACIONES DEL PRODUCTO" sección de este manual. FILTRO DE COMBUSTIBLE EN LINEA (Vea Fig. 32) El filtro de una manguera de jardín ni el lavado a presión para limpiar la parte externa de su tractor, a menos que el motor y la transmisión estén cubiertos para - Husqvarna YT54LS | Owners Manual - Page 56
tractor está equipada con un puerto de lavado como parte del sistema de lavado de la plataforma. Se debe utilizar después de cada uso. 1. Lleve el tractor . 3. Enrosque el adaptador de la boquilla (empaquetado con el manual del operador del tractor) en el extremo de la manguera del jardín. 4. Eche - Husqvarna YT54LS | Owners Manual - Page 57
• Asegúrese que las cuchillas y que todas las partes movibles se hayan detenido completamente. • Desconecte el alambre de manual. L B M F K A E H PARA REEMPLAZAR LA CORREA DE LA CUCHILLA DE LA SEGADORA (See Fig. 36) DESMONTAJE DE LA CORREA DE TRANSMISIÓN DE LA SEGADORA • Estacione el tractor - Husqvarna YT54LS | Owners Manual - Page 58
ambas cosas. • Si la punta anterior de la hoja de la cuchilla no está 1/8" a 1/2" más abajo que la punta posterior, diríjase a la parte de adelante del tractor. • Con una llave inglesa de 11/16" o de calibre regulable, afloje la tuerca A, dándole varias vueltas para despejar la tuerca de ajuste - Husqvarna YT54LS | Owners Manual - Page 59
la segadora. (Ver "PARA DESMONTAR La segadora en este capítulo del manual.) NOTE: Observe toda la correa de impulsión de movimiento y la posición piñón central (E). 6. Jale el cable de la correa hacia la parte de atrás del tractor. Con mucho cuidado, retire la correa jalando hacia arriba desde la - Husqvarna YT54LS | Owners Manual - Page 60
de este manual). Si se usan "cables de empalme" para un arranque de emergencia, siga este procedimiento: IMPORTANTE: SU TRACTOR ESTA EQUIPADO CON capota. • Tire el sujetador de la bombilla fuera del agujero en la parte trasera del enrejado. • Cambie la bombilla en el sujetador y empuje el - Husqvarna YT54LS | Owners Manual - Page 61
debe ser removida para servicio o reemplazo, debe ser purgada después de la reinstalación y antes de operar el tractor. Vea "PURGAR LA TRANSMISIÓN" en la sección de la Operación de este manual. MOTOR PARA AJUSTAR EL CABLE DE CONTROL DE LA ACELERACIÓN El control de la aceleración ha sido preajustado - Husqvarna YT54LS | Owners Manual - Page 62
rdela en una área limpia y seca. • Limpie todo el tractor (vea "LIMPIEZA" en la sección de Mantenimiento en este manual). • Inspeccione y cambie las correas, si es necesario (vea important evitar que se forman depositos de goma en partes fundamentales del sistema de combus-tible tales como el - Husqvarna YT54LS | Owners Manual - Page 63
sucio/taponado. 13. Alambrado suelto o dañado. 14. Válvulas del motor desajustadas. 1. Cuchilla desgastada, doblada o suelta. 2. Mandril de la cuchilla doblado. 3. Parte(s) suelta(s)/dañada(s). 1. Eleve la altura de corte/reduzca la velocidád 2. Ajuste el control de la aceleración. 3. Limpie la - Husqvarna YT54LS | Owners Manual - Page 64
ón de césped, hojas y basura debajo de la segadora. 7. Limpie la parte inferior de la cajade la segadora. 8. La correa de impulsión de la la sección de Servicio y Ajustes de este manual. El motor tiene "contraexplosiones" cuando se "APAGA" El tractor se ponen marcha atrás 1. El control de - Husqvarna YT54LS | Owners Manual - Page 65
SOLAMENTE ANDE CUESTA ARRIBA O CUESTA ABAJO Y NO ATRAVIESE EL CERRO 15 GRADOS MAX. ADVERTENCIA: Para evitar daños graves, haga funcionar su tractor arriba y abajo de las pendientes, nunca transversalmente con respecto a las pendientes. No cortar pendientes mayores de 15 grados. Haga los virajes - Husqvarna YT54LS | Owners Manual - Page 66
la mayoría de los casos, estos elementos NO han sido fabricados por Husqvarna, en cuyo caso pueden estar cubiertos por separado por la garantía de las correas; y c. El mantenimiento preventivo según se describe en el manual del operador. Además, debe dejar de utilizar el producto de inmediato si se - Husqvarna YT54LS | Owners Manual - Page 67
) está aprobado. La proporción de mezcla prescrita de gasolina y aceite es de 50:1, está estipulada en la etiqueta de aceite de Husqvarna y se indica en el manual del operador. (h) Uso de éter o de cualquier otro líquido para el arranque. (i) Limpieza del producto con presión o vapor. (j) Uso de buj - Husqvarna YT54LS | Owners Manual - Page 68
agrícola o que genere ingresos, que no Producto/Componente sea para alquiler) Tractores cortacésped: Bastidor, chasis, eje delantero 5 años Sin garantía Motor* * * Transmisión (si es fabricada por Husqvarna/Peerless) 3 años Sin garantía Transmisión (si es de terceros)** * * * * Solo - Husqvarna YT54LS | Owners Manual - Page 69
al consumidor, piezas y mano de obra, con red de distribuidores Hydro-Gear. EZ - Un (1) año de garantía comercial, piezas y mano de obra, con Husqvarna. Dos (2) años de garantía al consumidor, piezas y mano de obra, con red de distribuidores Hydro-Gear. MZ - (Transmisión ZT3100) Un (1) año de garant - Husqvarna YT54LS | Owners Manual - Page 70
SERVICE NOTES/AVISO 70 - Husqvarna YT54LS | Owners Manual - Page 71
SERVICE NOTES/AVISO 71 - Husqvarna YT54LS | Owners Manual - Page 72
02/04/2013 CL
-
 1
1 -
 2
2 -
 3
3 -
 4
4 -
 5
5 -
 6
6 -
 7
7 -
8
-
9
-
10
-
11
-
12
-
13
-
14
-
15
-
16
-
17
-
18
-
19
-
20
-
21
-
22
-
23
-
24
-
25
-
26
-
27
-
28
-
29
-
30
-
31
-
32
-
33
-
34
-
35
-
36
-
37
-
38
-
39
-
40
-
41
-
42
-
43
-
44
-
45
-
46
-
47
-
48
-
49
-
50
-
51
-
52
-
53
-
54
-
55
-
56
-
57
-
58
-
59
-
60
-
61
-
62
-
63
-
64
-
65
-
66
-
67
-
68
-
69
-
70
-
71
-
72
 |
 |

English/Spanish
581 62 33-96
Operator’s Manual
Manual de Operario
YT54LS
Gasoline containing up to 10% ethanol (E10) is accept-
able for use in this machine.
The use of any gasoline ex-
ceeding 10% ethanol (E10) will void the product warranty.
Esta máquina puede utilizar gasolina con un contenido
de hasta el 10% de etanol (E10).
El uso de una gasolina
que supere el 10% de etanol (E10) anulará la garantía
del producto. the product warranty.
Please read the operator's manual carefully and make sure
you understand the instructions before using the machine.
Por favor lea cuidadosamente y comprenda
estas intrucciones antes de usar esta maquina.