Image Fitness 10.0 Treadmill English Manual - Page 6
Assembly - walks
 |
View all Image Fitness 10.0 Treadmill manuals
Add to My Manuals
Save this manual to your list of manuals |
Page 6 highlights
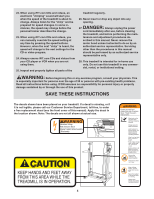
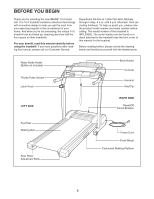
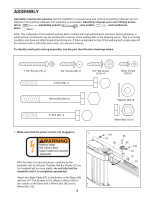
ASSEMBLY Assembly requires two persons. Set the treadmill in a cleared area and remove all packing materials. Do not dispose of the packing materials until assembly is completed. Assembly requires your own Phillips screw- driver , adjustable wrench , wire cutters , and needlenose pliers . Note: The underside of the treadmill walking belt is coated with high-performance lubricant. During shipping, a small amount of lubricant may be transferred to the top of the walking belt or the shipping carton. This is a normal condition and does not affect treadmill performance. If there is lubricant on top of the walking belt, simply wipe off the lubricant with a soft cloth and a mild, non-abrasive cleaner. To identify small parts during assembly, use the part identification drawings below. 1 1/2" Screw (79)-4 3/4" Screw (68)-2 4" Bolt (89)-4 3/4" Tek Screw (101)-4 Silver Screw (107)-1 Wheel Bolt (86)-2 Washer (29)-8 3" Bolt (47)-4 1. Make sure that the power cord is not plugged in. 1 With the help of a second person, carefully tip the treadmill onto its left side. Partially fold the Frame (12) so the treadmill will be more stable; do not fully fold the treadmill until it is completely assembled. Attach two Base Pads (97) to the bottom of the Base (82) with two 3/4" Tek Screws (101). Attach a Wheel (95) to the outside of the Base with a Wheel Bolt (86) and a Wheel Nut (15). 6 Wheel Nut (15)-2 101 97 82 86 95 101 97 15 12
-
 1
1 -
 2
2 -
 3
3 -
 4
4 -
 5
5 -
 6
6 -
 7
7 -
 8
8 -
 9
9 -
 10
10 -
 11
11 -
 12
12 -
13
-
14
-
15
-
16
-
17
-
18
-
19
-
20
-
21
-
22
-
23
-
24
-
25
-
26
-
27
-
28
-
29
-
30
 |
 |
