Insignia NS-42D240A13 User Manual (English) - Page 9
TV components
 |
View all Insignia NS-42D240A13 manuals
Add to My Manuals
Save this manual to your list of manuals |
Page 9 highlights
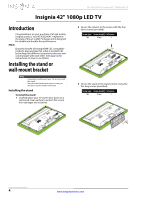
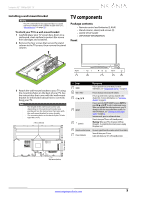
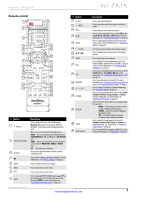
Insignia 42" 1080p LED TV Installing a wall-mount bracket Warning This TV is intended to be supported by a UL Listed wall mount bracket with suitable weight/load. (See "Miscellaneous" on page 50.) To attach your TV to a wall-mount bracket: 1 Carefully place your TV screen face-down on a cushioned, clean surface to protect the screen from damages and scratches. 2 Remove the four screws that secure the stand column to the TV screen, then remove the stand column. TV components Package contents • Remote control and batteries (2 AAA) • Stand column, stand, and screws (9) • QUICK SETUP GUIDE • IMPORTANT INFORMATION Front 1 2 7 6 3 4 5 3 Attach the wall-mount bracket to your TV using the mounting holes on the back of your TV. See the instructions that came with the wall-mount bracket for information about how to correctly hang your TV. Note • The length of the wall-mount screws vary depending on the wall-mount bracket you purchased. See the instructions that came with the wall-mount bracket for screw lengths. • The mounting holes on the back of your TV take type M6 screws. 7.84 in. (200 mm) # Item Description 1 MENU Press to open the on-screen menu. For more information, see "Navigating the menus" on page 23. 2 VOL+/VOL- 3 CH S/CH T 4 INPUT 5 (power) Press to increase or decrease the volume. Press to go to the next or previous channel in the channel list. For more information, see "Selecting a channel" on page 23. Press to open the INPUT SOURCE list, press INPUT or press CH S or CH T to select a video input source. When you highlight the video input source, your TV changes to the new source after three seconds. For more information, see "Selecting the video input source" on page 22. In menu mode, press to confirm selections. Press to turn your TV on or off (standby mode). Warning: When your TV is off, power still flows through it. To completely disconnect power, unplug the power cord. 6 Remote control sensor Receives signals from the remote control. Do not block. 7 Power indicator Turns off when your TV is on. Lights red when your TV is off (standby mode). 7.84 in. (200 mm) Wall-mount brackets www.insigniaproducts.com 5
-
 1
1 -
2
-
3
-
 4
4 -
 5
5 -
 6
6 -
 7
7 -
 8
8 -
 9
9 -
 10
10 -
 11
11 -
 12
12 -
 13
13 -
 14
14 -
15
-
16
-
17
-
18
-
19
-
20
-
21
-
22
-
23
-
24
-
25
-
26
-
27
-
28
-
29
-
30
-
31
-
32
-
33
-
34
-
35
-
36
-
37
-
38
-
39
-
40
-
41
-
42
-
43
-
44
-
45
-
46
-
47
-
48
-
49
-
50
-
51
-
52
-
53
-
54
-
55
-
56
-
57
 |
 |
