Insignia NS-DS9PDVD15 Quick Setup Guide (English) - Page 1
Insignia NS-DS9PDVD15 Manual
 |
View all Insignia NS-DS9PDVD15 manuals
Add to My Manuals
Save this manual to your list of manuals |
Page 1 highlights
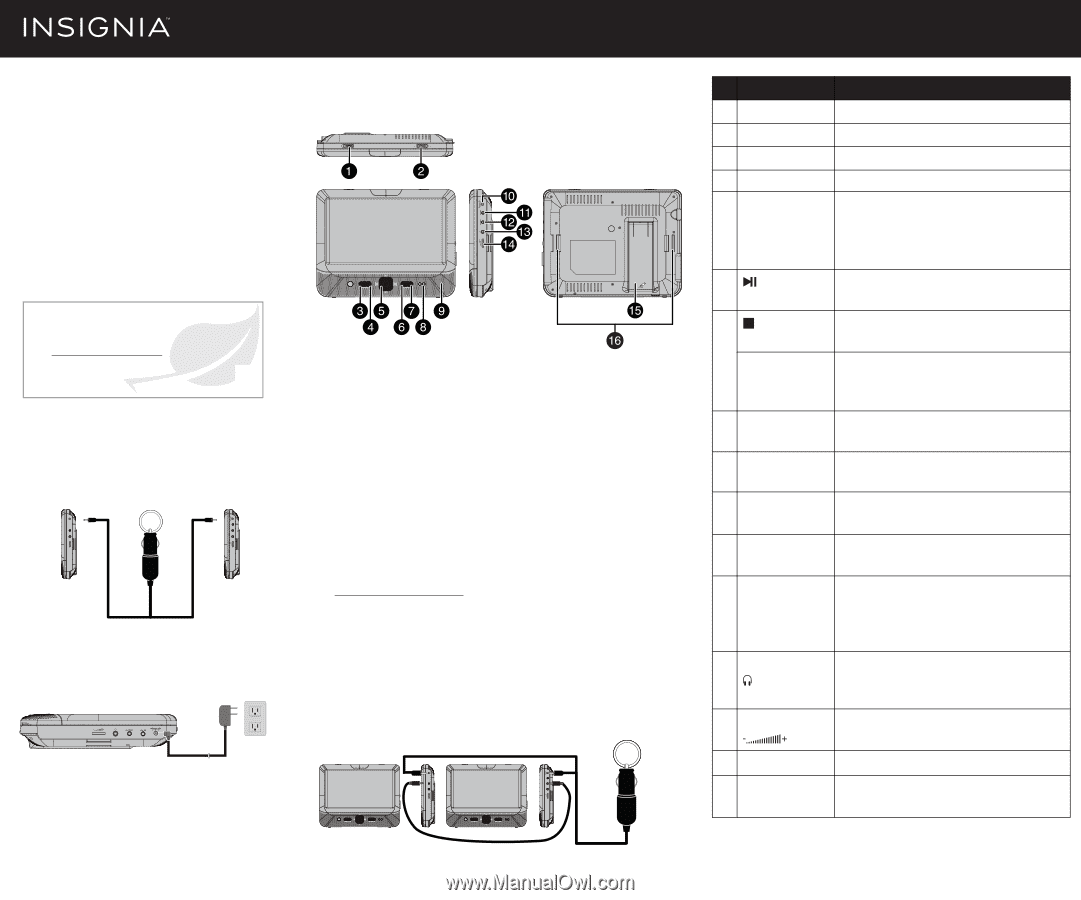
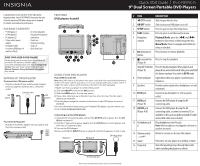
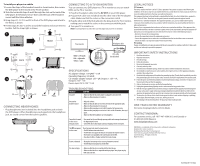
Quick Start Guide | NS-DS9PDVD15 9" Dual Screen Portable DVD Players Congratulations on your purchase of this high-quality Insignia product. Your NS-DS9PDVD15 represents the state of the art in personal DVD player design and is designed for reliable and trouble-free performance. PACKAGE CONTENTS • 9" DVD player A • AV connecting cable • 9" DVD player B (for player A to player B • AC adapters (2) connection) • Y-type vehicle power • Travel case adapter • Headrest mounting • AV adapter cables straps (2) (to connect DVD players A • Quick Start Guide and B to a TV)(2) FEATURES DVD players A and B FIND YOUR USER GUIDE ONLINE! We are going green so a copy of your User Guide is not provided in the box but is available online. Go to www.insigniaproducts.com, then click Support & Service. Enter your model number in the box under Manual, Firmware, Drivers & Product Information, then click ►. SETTING UP YOUR PLAYER To connect to a 12V power outlet • Plug the included Y-type vehicle power adapter into your player(s) and then into a 12V power outlet. DVD player A 12V power outlet DVD player B USING YOUR DVD PLAYER Play a DVD or audio CD Note: Most DVDs and your DVD player have region codes that help control illegal distribution of DVDs. The region code for your player is 1. You can only play DVDs with a region code of 1 or ALL. The region code for a DVD is printed on the DVD or the DVD packaging. 1 Make sure that your player is connected to power. 2 Slide the ON/OFF switch to the ON position. 3 Slide the OPEN switch. The disc tray opens. 4 Place a disc, label side up, in the disc tray, then close the tray. The disc starts playing automatically. 5 Use the player navigation controls and buttons on the DVD player to control playback. For more information about using your Portable DVD player, see your online User Guide at www.insigniaproducts.com. To connect to AC power • Plug the included AC adapter into your player and then into a power outlet. Connecting your two DVD players 1 Using the AV connecting cable, connect the AV OUT jack on player A to the AV IN jack on player B. 2 Plug the Y-type vehicle power adapter into the DC IN jacks on both players and then into a 12V power outlet. 3 Turn on the DVD players. 4 Press and hold the INPUT button on player B until A/V IN appears on the screen. DVD player A DVD player B 12V vehicle charger # ITEM DESCRIPTION 1 OPEN switch Slide to open the disc tray. 2 ON/OFF switch Slide to turn your DVD player on or off. 3 SETUP button 4 FUNC. button 5 Navigation controls Press to open or close the Setup menu. Press to enter or exit the Function menu. Playback Mode: press the () and () buttons to fast reverse or fast forward the disc. Menu Mode: Press to navigate and confirm an entry or selection. 6 (play/pause) Press to pause or resume playback. button 7 (stop) button Press to stop disc playback. (Player A) Stop/AV IN button Press to stop disc playback. When player A and (Player B) player B are connected to each other, press and hold this button on player B to switch to AV IN mode. 8 Power indicator Lights blue when your player is powered and turned on. 9 Speakers Provides audio output when headphones are not connected. 10 DC IN jack Connect to an AC adapter or 12V car power outlet. 11 AV IN jack (Player B) Connect the DVD player A using the AV connecting cable. 12 AV OUT jack (Player A/B) Connect the DVD player B using the AV connecting cable, or connect a monitor, TV, or amplifier to this jack using the included AV cable and an RCA cable (not included). 13 Headphone jack Plug headphones into this jack. Note: When headphones are plugged in, the built-in speakers are muted. 14 Volume control Rotate to increase or decrease the volume. 15 Stand 16 Strap slots Pull out to set your player on a desktop or table. Slide the mounting straps through these slots when installing the player in a vehicle. AV connecting cable Before using your new product, please read these instructions to prevent any damage.
-
 1
1 -
 2
2
 |
 |