Insignia NS-DSC10B User Manual (English) - Page 8
Installing the wrist strap, Understanding camera memory, Navigating the menus - video
 |
UPC - 600603123153
View all Insignia NS-DSC10B manuals
Add to My Manuals
Save this manual to your list of manuals |
Page 8 highlights
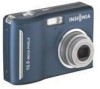
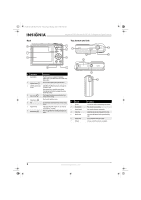
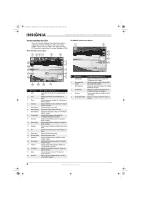
NS-DSC10A-10B_09-0323_MAN_V2.book Page 4 Monday, April 27, 2009 8:42 AM Insignia NS-DSC10A and NS-DSC10B 10 Megapixel Digital Cameras Installing the wrist strap To install the wrist strap: 1 Insert the short loop of the strap in the strap eyelet. 3 Insert the memory card with the metallic part facing the back of the camera until it clicks into place. Tip To remove the memory card, push the card in slightly to release it, then pull the card out of the card slot. 2 Thread the larger loop of the strap though the short loop and pull tight. Understanding camera memory Internal memory This camera is equipped with 32 MB of internal memory and approximately 20 MB of that memory is available for photo/video storage. If no memory card is inserted in the camera, all images and movie clips recorded by the camera will be stored in the internal memory. External memory Your camera supports SD cards up to 4GB and SDHC cards up to 16GB. If there is a storage card inserted in the memory slot, the camera automatically saves all images and videos to the storage card. The icon indicates that your camera is using a memory card. Installing the memory card You can use an SD or SDHC memory card with this camera. The memory card slot is inside the battery cover, adjacent to the battery compartment. Caution • • The memory card may be damaged if it is removed while the camera is on. Do not touch the contacts on the back of the memory card. To install the memory card: 1 Turn off the camera. 2 Open the battery cover by sliding it in the direction indicated in the illustration. 4 Close the battery cover. Navigating the menus The 4-way navigation control and the OK/DISP button let you access the various menus available from the On Screen Display (OSD). You can configure a wide range of settings to ensure optimal results from your photos and videos. Face tracking/up button OK/DISP button Macro/left button Flash/right button Self-timer/down button Further functions of these buttons are as follows: Button Functions OK / DISP • Press to confirm a selection when using the OSD menus. • In Playback and Record mode, press to change the LCD screen display to show or hide OSD icons. Note: The OK/DISP button is disabled during video playback. Flash/right ( • In Record mode, press to scroll through the flash mode options. (Auto, Red-eye Reduction, Forced On, Slow Sync and Off) Note: Flash modes are only available for still images. ) • In Playback mode, press to view the next image, video clip. • In Playback Video mode, press to fast forward video playback. • In Menu mode, press to enter submenus or to navigate through menu selections. 4 www.insigniaproducts.com
-
 1
1 -
2
-
 3
3 -
 4
4 -
 5
5 -
 6
6 -
 7
7 -
 8
8 -
 9
9 -
 10
10 -
 11
11 -
 12
12 -
 13
13 -
14
-
15
-
16
-
17
-
18
-
19
-
20
-
21
-
22
-
23
-
24
 |
 |
