Intel D850EMV2L Product Guide - Page 24
Installing a Processor
 |
UPC - 735858153959
View all Intel D850EMV2L manuals
Add to My Manuals
Save this manual to your list of manuals |
Page 24 highlights
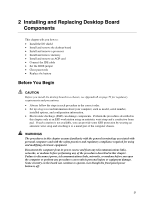
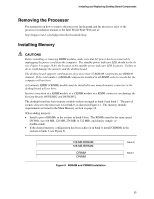
Intel Desktop Boards D850EMD2 and D850EMV2 Product Guide Installing a Processor CAUTION Before installing or removing the processor, make sure that AC power has been removed by unplugging the power cord from the computer; the standby power LED should not be lit (see Figure 3 on page 18). Failure to do so could damage the processor and the desktop board. To install a processor, follow these instructions: 1. Observe the precautions in "Before You Begin" on page 21. 2. Locate the processor socket and raise the socket lever completely. 3. Install the processor so that the corner with the triangle marking (A) is aligned with the corner of the socket where the lever connects to the socket (see Figure 7). 4. Lower the lever to its original position. mPGA478B mPGA478B mPGA478B A OM12078 Figure 7. Installing a Processor 5. For instructions on how to install the processor fan heatsink, refer to the boxed processor manual or the Intel World Wide Web site at: http://support.intel.com/support/processors/pentium4/intnotes478.htm 6. Connect the processor fan cable to the processor fan connector (see Figure 8). OM13637 Figure 8. Connecting the Processor Fan Cable to the Processor Fan Connector 24
-
 1
1 -
2
-
3
-
4
-
5
-
6
-
7
-
8
-
9
-
10
-
11
-
12
-
13
-
14
-
15
-
16
-
17
-
18
-
 19
19 -
 20
20 -
 21
21 -
 22
22 -
 23
23 -
 24
24 -
 25
25 -
 26
26 -
 27
27 -
 28
28 -
 29
29 -
30
-
31
-
32
-
33
-
34
-
35
-
36
-
37
-
38
-
39
-
40
-
41
-
42
-
43
-
44
-
45
-
46
-
47
-
48
-
49
-
50
-
51
-
52
-
53
-
54
-
55
-
56
-
57
-
58
-
59
-
60
-
61
-
62
-
63
-
64
-
65
-
66
-
67
-
68
-
69
-
70
-
71
-
72
-
73
-
74
-
75
-
76
-
77
-
78
 |
 |