Intel DQ965GF Product Guide - Page 37
Installing DIMMs, Three DIMMs
 |
UPC - 735858180993
View all Intel DQ965GF manuals
Add to My Manuals
Save this manual to your list of manuals |
Page 37 highlights
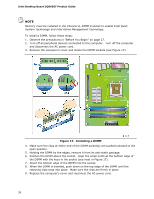
Installing and Replacing Desktop Board Components Three DIMMs Install a matched pair of DIMMs equal in speed and size in DIMM 0 (blue) and DIMM 1 (black) of channel A. Install a DIMM equal in speed and total size of the DIMMs installed in channel A in either DIMM 0 or DIMM 1 of channel B (see Figure 15). Figure 15. Dual Channel Memory Configuration Example 3 NOTE All other memory configurations will result in single channel memory operation. Installing DIMMs To make sure you have the correct DIMM, place it on the illustration of the DDR2 DIMM in Figure 16. All the notches should match with the DDR2 DIMM. Figure 16. Use DDR2 DIMMs 37
-
 1
1 -
2
-
3
-
4
-
5
-
6
-
7
-
8
-
9
-
10
-
11
-
12
-
13
-
14
-
15
-
16
-
17
-
18
-
19
-
20
-
21
-
22
-
23
-
24
-
25
-
26
-
27
-
28
-
29
-
30
-
31
-
 32
32 -
 33
33 -
 34
34 -
 35
35 -
 36
36 -
 37
37 -
 38
38 -
 39
39 -
 40
40 -
 41
41 -
 42
42 -
43
-
44
-
45
-
46
-
47
-
48
-
49
-
50
-
51
-
52
-
53
-
54
-
55
-
56
-
57
-
58
-
59
-
60
-
61
-
62
-
63
-
64
-
65
-
66
-
67
-
68
-
69
-
70
-
71
-
72
-
73
-
74
-
75
-
76
-
77
-
78
-
79
-
80
 |
 |

Installing and Replacing Desktop Board Components
37
Three DIMMs
Install a matched pair of DIMMs equal in speed and size in DIMM 0 (blue) and DIMM 1
(black) of channel A.
Install a DIMM equal in speed and total size of the DIMMs
installed in channel A in either DIMM 0 or DIMM 1 of channel B (see Figure 15).
Figure 15.
Dual Channel Memory Configuration Example 3
NOTE
All other memory configurations will result in single channel memory operation.
Installing DIMMs
To make sure you have the correct DIMM, place it on the illustration of the DDR2
DIMM in Figure 16.
All the notches should match with the DDR2 DIMM.
Figure 16.
Use DDR2 DIMMs