Intel DX58SO2 English Product Guide - Page 40
Removing the Processor, Installing and Removing Memory
 |
View all Intel DX58SO2 manuals
Add to My Manuals
Save this manual to your list of manuals |
Page 40 highlights
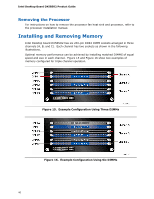
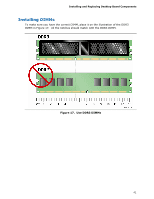
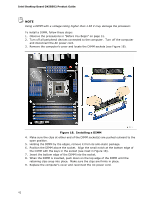
Intel Desktop Board DX58SO2 Product Guide Removing the Processor For instructions on how to remove the processor fan heat sink and processor, refer to the processor installation manual. Installing and Removing Memory Intel Desktop board DX58SO2 has six 240-pin DDR3 DIMM sockets arranged in three channels (A, B, and C). Each channel has two sockets as shown in the following illustrations. Optimal memory performance can be achieved by installing matched DIMMS of equal speed and size in each channel. Figure 15 and Figure 16 show two examples of memory configured for triple channel operation. Figure 15. Example Configuration Using Three DIMMs Figure 16. Example Configuration Using Six DIMMs 40
-
 1
1 -
2
-
3
-
4
-
5
-
6
-
7
-
8
-
9
-
10
-
11
-
12
-
13
-
14
-
15
-
16
-
17
-
18
-
19
-
20
-
21
-
22
-
23
-
24
-
25
-
26
-
27
-
28
-
29
-
30
-
31
-
32
-
33
-
34
-
 35
35 -
 36
36 -
 37
37 -
 38
38 -
 39
39 -
 40
40 -
 41
41 -
 42
42 -
 43
43 -
 44
44 -
 45
45 -
46
-
47
-
48
-
49
-
50
-
51
-
52
-
53
-
54
-
55
-
56
-
57
-
58
-
59
-
60
-
61
-
62
-
63
-
64
-
65
-
66
-
67
-
68
-
69
-
70
-
71
-
72
-
73
-
74
-
75
-
76
-
77
-
78
-
79
-
80
-
81
-
82
-
83
-
84
-
85
-
86
-
87
-
88
-
89
-
90
 |
 |

Intel Desktop Board DX58SO2 Product Guide
40
Removing the Processor
For instructions on how to remove the processor fan heat sink and processor, refer to
the processor installation manual.
Installing and Removing Memory
Intel Desktop board DX58SO2 has six 240-pin DDR3 DIMM sockets arranged in three
channels (A, B, and C).
Each channel has two sockets as shown in the following
illustrations.
Optimal memory performance can be achieved by installing matched DIMMS of equal
speed and size in each channel.
Figure 15 and Figure 16 show two examples of
memory configured for triple channel operation.
Figure 15.
Example Configuration Using Three DIMMs
Figure 16.
Example Configuration Using Six DIMMs