Intel SASWT4I Hardware User Guide - Page 17
Attaching cables to the Intel, RAID Controller SASWT4I - raid 5
 |
View all Intel SASWT4I manuals
Add to My Manuals
Save this manual to your list of manuals |
Page 17 highlights
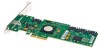
Figure 2. Attaching cables to the Intel® RAID Controller SASWT4I Note: System throughput problems can occur if non-standard SAS cables are used. To minimize the potential for problems: ✧ Use cables no longer than ten meters for SAS and one meter for SATA. It is better to use the shortest possible cables. The cable length should be reduced by about one foot (.33 meters) if using a backplane. ✧ You may connect one device per SATA/SAS cable either as a device or as an expander. ✧ Route SAS cables carefully. ✧ Use only "straight" SAS cables, not "cross-over" SAS cables. 6. Replace components you needed to remove to access the PCI Express* add-in card slot. For instructions, see your server chassis documentation. 7. Reinstall the chassis cover and reconnect the power cord(s). For instructions, see your server chassis documentation for instructions. 8. Reconnect any peripheral items you needed to disconnect. 9. Turn the power on to the server and hard drives. As the server powers up, listen to be sure that the SAS and SATA devices are powered up before or at the same time as the computer boots. Intel® RAID Controller SASWT4I Hardware User's Guide 7
-
 1
1 -
2
-
3
-
4
-
5
-
6
-
7
-
8
-
9
-
10
-
11
-
 12
12 -
 13
13 -
 14
14 -
 15
15 -
 16
16 -
 17
17 -
 18
18 -
 19
19 -
 20
20 -
 21
21 -
 22
22 -
23
-
24
-
25
-
26
 |
 |
