Intel SE7230NH1 User Guide - Page 35
Installing the Passive Heat Sink
 |
View all Intel SE7230NH1 manuals
Add to My Manuals
Save this manual to your list of manuals |
Page 35 highlights
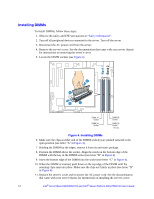
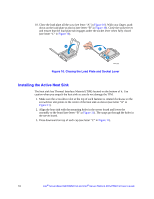
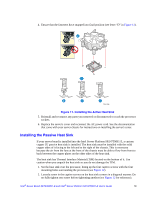
4. Ensure that the fasteners have snapped into final position (see letter "D" in Figure 11). Figure 11. Installing the Active Heat Sink 5. Reinstall and reconnect any parts you removed or disconnected to reach the processor sockets. 6. Replace the server's cover and reconnect the AC power cord. See the documentation that came with your server chassis for instructions on installing the server's cover. Installing the Passive Heat Sink If your server board is installed into the Intel Server Platform SR1475NH1-E, a custom copper 1U passive heat sink is installed. The heat sink must be installed with the solid copper sides of it facing to the left and to the right of the chassis. This is necessary because the air from the fans at the front of the chassis must be able to flow from front to back between the copper plates on the other sides of the heat sink. The heat sink has Thermal Interface Material (TIM) located on the bottom of it. Use caution when you unpack the heat sink so you do not damage the TIM. 1. Set the heat sink over the processor, lining up the four captive screws with the four mounting holes surrounding the processor (see Figure 12). 2. Loosely screw in the captive screws on the heat sink corners in a diagonal manner. Do no fully tighten one screw before tightening another (see Figure 12 for reference). Intel® Server Board SE7230NH1-E and Intel® Server Platform SR1475NH1-E User's Guide 19
-
 1
1 -
2
-
3
-
4
-
5
-
6
-
7
-
8
-
9
-
10
-
11
-
12
-
13
-
14
-
15
-
16
-
17
-
18
-
19
-
20
-
21
-
22
-
23
-
24
-
25
-
26
-
27
-
28
-
29
-
 30
30 -
 31
31 -
 32
32 -
 33
33 -
 34
34 -
 35
35 -
 36
36 -
 37
37 -
 38
38 -
 39
39 -
 40
40 -
41
-
42
-
43
-
44
-
45
-
46
-
47
-
48
-
49
-
50
-
51
-
52
-
53
-
54
-
55
-
56
-
57
-
58
-
59
-
60
-
61
-
62
-
63
-
64
-
65
-
66
-
67
-
68
-
69
-
70
-
71
-
72
-
73
-
74
-
75
-
76
-
77
-
78
-
79
-
80
-
81
-
82
-
83
-
84
-
85
-
86
-
87
-
88
-
89
-
90
 |
 |
