Intel SE7501CW2 Product Guide
Intel SE7501CW2 - E7501 DUAL PGA604 XEON 533MHZ Manual
 |
UPC - 735858160308
View all Intel SE7501CW2 manuals
Add to My Manuals
Save this manual to your list of manuals |
Intel SE7501CW2 manual content summary:
- Intel SE7501CW2 | Product Guide - Page 1
Intel® Server Board SE7501CW2 Product Guide A Guide for Technically Qualified Assemblers of Intel® Identified Subassemblies/Products Order Number: C29938-002 - Intel SE7501CW2 | Product Guide - Page 2
a situation where personal injury or death may occur. Intel may make changes to specifications and product descriptions at any time, without notice. Intel, Intel Xeon, and EtherExpress are trademarks or registered trademarks of Intel Corporation or its subsidiaries in the United States and other - Intel SE7501CW2 | Product Guide - Page 3
8 Server Board Connector and Component Locations 9 Processor ...10 Intel® E7501 Chipset 11 Super I/O ...12 Memory ...13 PCI Subsystem ...14 Video Controller...15 Network Interface Controllers (NICs 15 ACPI ...17 Wakeup Events ...18 Security ...18 2 Configuration Software and Utilities 21 Power - Intel SE7501CW2 | Product Guide - Page 4
50 Installing Chassis Standoffs 52 Installing the Server Board 54 Installing or Replacing Memory 56 Installing or Replacing the Processor(s 57 Replacing the Backup Battery 64 Making Connections to the Server Board 66 Routing Cables...67 Finishing Up ...69 4 Solving Problems 71 Resetting - Intel SE7501CW2 | Product Guide - Page 5
the Server Board 55 Figure 11. Installing Memory 56 Figure 12. Opening Socket Lever and Attaching Processor 58 Figure 13. Attaching Retention Mechanism 59 Figure 14. Applying Thermal Grease 59 Figure 15. Attaching the Heat Sink and Retention Clip 60 Figure 16. Attaching the Fan Case to - Intel SE7501CW2 | Product Guide - Page 6
Monitor Submenu 37 Security Menu 38 Power Menu 39 Boot Menu ...40 System Menu 41 Exit Menu...42 Monitored Headers and Sensors 46 Configuration Jumper (J32 85 Front Panel Header Connection Descriptions 86 Product Certification Markings 88 vi Intel Server Board SE7501CW2 Product Guide - Intel SE7501CW2 | Product Guide - Page 7
control for dual processors and PC/AT*-compatible operation. Table 1. Server Board Features Feature Description Processor Dual Intel Xeon processors for the Intel socket 604 that use the Flip Chip Pin Grid Array (FC-PGA) package Chipset Memory Video Intel E7501 chipset: • Supports 533 MHz - Intel SE7501CW2 | Product Guide - Page 8
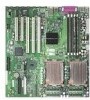
Main Power Aux. Pwr DIMM Memory Con DIMM Memory Con DIMM Memory Con DIMM Memory Con USB E AB C DF G A. USB 1, 2, 3 B. Keyboard/mouse C. Serial port A D. Video E. Parallel F. NIC1 (10/100 Mbit) G. NIC2 (1 Gb) Figure 1. Back Panel Connectors TP00094 8 Intel Server Board SE7501CW2 Product Guide - Intel SE7501CW2 | Product Guide - Page 9
B. Auxiliary signal connector P. Battery C. CPU power connector Q. Floppy drive connector D. CPU1 fan header R. Front USB header E. DIMM sockets S. Serial port B header F. Primary processor socket (CPU1) T. Chassis Intrusion header G. Secondary processor socket (CPU2) U. PCI 32/33 slots - Intel SE7501CW2 | Product Guide - Page 10
be in the socket labeled CPU1. For a complete list of supported processors, see: http://support.intel.com/support/motherboards/server/SE7501CW2 Dual Processor Operation The Intel Xeon interface is dual processor (DP) ready. Each processor contains a local Intel® Advanced Programmable Interrupt - Intel SE7501CW2 | Product Guide - Page 11
Intel® E7501 Chipset The Server Board SE7501CW2 includes the Intel E7501 chipset (MCH, ICH3-S, P64H2), which provides an integrated I/O bridge and memory controller, and a flexible I/O subsystem core (PCI). MCH The E7501 MCH North Bridge in the E7501 chipset integrates three main functions: • An - Intel SE7501CW2 | Product Guide - Page 12
floppy disk drive from the floppy disk controller. Keyboard and Mouse Connectors The separate keyboard and mouse connectors, found on the back panel of the server board, are PS/2-compatible. The keyboard and mouse connectors are interchangeable. 12 Intel Server Board SE7501CW2 Product Guide - Intel SE7501CW2 | Product Guide - Page 13
-pin DIMM sockets and provides up to 8 GB of memory. Memory is partitioned as two banks of DDR DIMMs, each of which provides 144 bits of two-way interleaved memory. The Server Board SE7501CW2 supports up to four ECC DDR DIMMs that are compliant with the JEDEC DDR200 / 266 specification. A range of - Intel SE7501CW2 | Product Guide - Page 14
PCI-X segment includes one 3.3 V keyed PCI expansion slot (slot 1) that can support PCI-X add-in cards up to 133 MHz and are backward compatible to 64 bit connectors, the bus speed for both connectors will be lowered to the speed of the slowest adapter. 14 Intel Server Board SE7501CW2 Product Guide - Intel SE7501CW2 | Product Guide - Page 15
• Bus speed up to 33 MHz • 5 V signaling environment • Burst transfers up to a peak of 132 MB/s • 8-, 16-, or 32-bit data transfers • Plug and Play ready • Parity enabled Video Controller The Server Board SE7501CW2 includes an ATI Rage XL video controller, 8 MB video SDRAM, and support circuitry for - Intel SE7501CW2 | Product Guide - Page 16
the 100Base-TX connector interface. A flash device stores the network ID • Support for Wake on LAN (WOL) • Advanced Networking Service Features (Teaming, Load balancing) NIC Connector and Status LEDs The Intel® Server Board SE7501CW2 supports two RJ45 connectors, one for the 10/100-Megabit Fast - Intel SE7501CW2 | Product Guide - Page 17
is halted. In this state the power supply is still on and the processors still dissipate some power, so the power supply fan and processor fans are still running. ✏ NOTE ACPI requires an operating system that supports this feature. The Server Board SE7501CW2 supports sleep states S0, S4, and S5 - Intel SE7501CW2 | Product Guide - Page 18
no mouse or keyboard input is accepted. Exit Criteria User password followed by [Enter] After Exit Power and Reset switches are enabled. Keyboard and mouse inputs are accepted. The system boots normally. Boot sequence is determined by setup options. 18 Intel Server Board SE7501CW2 Product Guide - Intel SE7501CW2 | Product Guide - Page 19
is allowed only after the correct password(s) has been entered. Both user and supervisor passwords are supported by the BIOS. The user password cannot be set unless a supervisor password has been set. When set, is located on jumper block J32 pins [1-2] on the Server Board SE7501CW2. Description 19 - Intel SE7501CW2 | Product Guide - Page 20
20 Intel Server Board SE7501CW2 Product Guide - Intel SE7501CW2 | Product Guide - Page 21
jumper on the server board from the default setting (Protect CMOS memory) to the Clear setting; this position will allow most server configurations to boot. Then use the recovery disk to recover. BIOS Upgrade Utility Use to upgrade the BIOS. Page 22 43 Power-On Self-Test (POST) Each time you - Intel SE7501CW2 | Product Guide - Page 22
), the feature's value field becomes inaccessible. The bottom portion of the BIOS Setup screen provides a list of commands that are used for navigating the Setup utility. Table 6 describes the keyboard commands you can use in the BIOS Setup menus. 22 Intel Server Board SE7501CW2 Product Guide - Intel SE7501CW2 | Product Guide - Page 23
list without displaying the full list. On 106-key Japanese keyboards, the plus key has a different scan code than the plus key on the other keyboard, but it has the same effect. Execute Command - The were before F10 was pressed without affecting any existing values. Server Board Installation 23 - Intel SE7501CW2 | Product Guide - Page 24
Boot System Allows Selects boot system to options and disable ACPI power supply reboot and controls disable power button Information on vendor, processor, memory, peripherals, and BIOS Exit Saves or discards changes to Setup program options 24 Intel Server Board SE7501CW2 Product Guide - Intel SE7501CW2 | Product Guide - Page 25
of the screen. Main Advanced Primary Master Primary Slave Secondary Master Secondary Slave Security Power Boot System Exit Table 9 lists the options available on the Main menu. This selection. Displays IDE device selection. Displays IDE device selection. Server Board Installation 25 - Intel SE7501CW2 | Product Guide - Page 26
to be configured. Main Advanced Primary Master Primary Slave Secondary Master Secondary Slave Security Power Boot System Exit There are four IDE submenus: primary master, primary slave, secondary DMA Mode No options Enables Ultra DMA mode. 26 Intel Server Board SE7501CW2 Product Guide - Intel SE7501CW2 | Product Guide - Page 27
Advanced Security Power I/O Device Configuration On Board Device PCI Configuration Server Menu Console server features. Provides additional options to configure the console. Displays the event logs. Displays voltages, temperatures, and fan speeds service packs. continued Server Board Installation 27 - Intel SE7501CW2 | Product Guide - Page 28
Allows Intel Xeon processors to run in hyperthreading mode. Enabling this setting will improve throughput significantly on certain applications. Allows the system to skip the memory test while booting. This decreases the time needed to boot the system. 28 Intel Server Board SE7501CW2 Product Guide - Intel SE7501CW2 | Product Guide - Page 29
on the menu bar at the top of the screen and then I/O Device Configuration. Main Advanced Security Power I/O Device Configuration On Board Device PCI Configuration Server Menu Console Redirection DMI Event Logging Hardware Monitor Boot System Exit Table 12 lists the options available through - Intel SE7501CW2 | Product Guide - Page 30
high-speed bidirectional mode. Selection based on what EPP version the printer supports. Only choose a mode that the parallel port device (such as a printer) supports. • Disabled Enables or disables the onboard diskette controller. • Enabled (default) 30 Intel Server Board SE7501CW2 Product Guide - Intel SE7501CW2 | Product Guide - Page 31
the onboard PCI Intel 82550PM Controller (Device 4). • Enabled (default) Onboard NIC 2 • Disabled Enables the onboard PCI Intel 82540EM Controller (Device 5). • Enabled (default) Onboard USB • Disabled Enables the ICH3-S USB controllers. • Enabled (default) Server Board Installation 31 - Intel SE7501CW2 | Product Guide - Page 32
submenu Configures the specific PCI device expansion ROM. Slot 4 PCI 32/33 Select to display submenu Configures the specific PCI device expansion ROM. Slot 5 PCI 32/33 Select to display submenu Configures the specific PCI device expansion ROM. 32 Intel Server Board SE7501CW2 Product Guide - Intel SE7501CW2 | Product Guide - Page 33
until after the system is restarted. Onboard NIC2 PXE • Disabled (default) • Enabled Enable support for the onboard Intel 82540EM NIC PXE Note: Once PXE boot is enabled, it will not be selectable in Enabled (default) Initializes the device expansion ROM. • Disabled Server Board Installation 33 - Intel SE7501CW2 | Product Guide - Page 34
at the top of the screen and then Server Menu. Main Advanced Security Power I/O Device Configuration On Board Device PCI Configuration Server Menu Console Redirection DMI Event Logging Hardware Monitor NMI on system errors on the PCI bus (SERRs). 34 Intel Server Board SE7501CW2 Product Guide - Intel SE7501CW2 | Product Guide - Page 35
Advanced Security Power I/O Device Configuration On Board Device PCI Configuration Server Menu Console console redirection uses the I/O port specified. All keyboard/mouse and video will be directed to this port. This setting is for use only BIOS Data Area) memory space. Server Board Installation 35 - Intel SE7501CW2 | Product Guide - Page 36
Main Advanced Security Power I/O Device Configuration On Board Device PCI Configuration Server Menu Console Redirection SBE) and Multi Bit Error (MBE) events on the memory bus are supported. No Winbond 83627HF Super I/0 information is available. Event Intel Server Board SE7501CW2 Product Guide - Intel SE7501CW2 | Product Guide - Page 37
RPM System FAN 3 speed No options Value fluxuates. Example: 4560 RPM System FAN 4 speed No options Value fluxuates. Example: 4560 RPM CPU FAN 1 speed No options Value fluxuates. Example: 4560 RPM CPU FAN 2 speed No options Value fluxuates. Example: 4560 RPM Server Board Installation 37 - Intel SE7501CW2 | Product Guide - Page 38
the top of the screen. Main Advanced Security Power Boot System Exit Table 21 lists the options available password provides full access to all BIOS Setup utility menus. The supervisor password controls access to the BIOS Setup utility. When the Intel Server Board SE7501CW2 Product Guide - Intel SE7501CW2 | Product Guide - Page 39
returns to after AC power is lost. Stay Off leaves the server power disabled and ACPI does not function to reboot the server in the event of a power failure. Last State reboots the system according to ACPI standards. Enables or disables the power button functionality. Server Board Installation 39 - Intel SE7501CW2 | Product Guide - Page 40
the top of the screen. Main Advanced Security Power Boot System Exit Table 23 lists the options available entry appears if there is a bootable CD-ROM that is in a BIOS Boot Specification (BBS)-compliant SCSI CD-ROM. • Network Boot: If the network card Intel Server Board SE7501CW2 Product Guide - Intel SE7501CW2 | Product Guide - Page 41
Vendor CPU Memory Description Provides basic information on the machine vendor: • Manufacturer: Intel Corporation • Product: SE7501CW2 • Version: 1.00 • Serial Number: 12345678 Provides basic information on the processor Boot Strap Processor: • Installed Speed: 2.4 GHz - Intel SE7501CW2 | Product Guide - Page 42
all Setup item values to CMOS. Loads custom default values for all setup items. Saves all Setup item values to NVRAM as a custom default. 42 Intel Server Board SE7501CW2 Product Guide - Intel SE7501CW2 | Product Guide - Page 43
utility through your computer supplier or from the Intel Customer Support Web site: http://support.intel.com/support/motherboards/server/SE7501CW2 ✏ NOTE Please review the instructions distributed with the upgrade utility before attempting a BIOS upgrade. Review also any release notes in the file - Intel SE7501CW2 | Product Guide - Page 44
on your hard drive. The image is available from http://support.intel.com/support/motherboards/server/SE7501CW2 2. Insert the bootable diskette you created in the steps above into the diskette drive. 3. Type BIOS.EXE a: to extract the update files from the image file and place them onto the bootable - Intel SE7501CW2 | Product Guide - Page 45
of the BIOS update process, see Recovering the BIOS on page 78 for instructions on performing a BIOS recovery. You can obtain the Crisdisk.exe file needed to create the crisis disk from the Intel Customer Support Web site: http://support.intel.com/support/motherboards/server/SE7501CW2 Creating the - Intel SE7501CW2 | Product Guide - Page 46
Monitors chassis fan speed through chassis fan header 3 only. (Total four chassis fans available) Temperature CPU2 Monitors primary processor temperature CPU1 Monitors secondary processor temperature CHASSIS Monitors chassis ambient temperature 46 Intel Server Board SE7501CW2 Product Guide - Intel SE7501CW2 | Product Guide - Page 47
Server Board Installations and Upgrades Tools and Supplies your local Intel Representative. See chassis does not result in a Class B device. Safety Cautions CAUTIONS System power on/off: The power button DOES NOT turn off the system AC power. To remove power from system, you must unplug the AC power - Intel SE7501CW2 | Product Guide - Page 48
higher) and operating at the same (or higher) speed as the microprocessor used on this server board. Server board diagram label provided: Place the label inside the chassis in an easy-to-see location, preferably oriented similarly to the server board. 48 Intel Server Board SE7501CW2 Product Guide - Intel SE7501CW2 | Product Guide - Page 49
and possible board damage, your system must meet the following minimum requirements. For a list of qualified memory and chassis components see: http://support.intel.com/support/motherboards/server/SE7501CW2 Processor A minimum of one 1.8 GHz Intel Xeon processor with 512KB cache support is required - Intel SE7501CW2 | Product Guide - Page 50
the shield from inside the chassis. Attaching the Gasket to the I/O Shield 1. Remove the two backing strips from the gasket. 2. Press the gasket onto the inside face of the I/O shield as shown. OM14074 Figure 3. Attaching the Gasket to the I/O Shield 50 Intel Server Board SE7501CW2 Product Guide - Intel SE7501CW2 | Product Guide - Page 51
the chassis wall, and the lip of the shield rests on the inner chassis wall. 2. Hold the shield in place, and push it into the opening until it is seated. Make sure the I/O shield snaps into place all the way around. 1 2 Figure 5. Installing the I/O Shield OM14427 Server Board Installation - Intel SE7501CW2 | Product Guide - Page 52
with standoffs pre-installed in positions 1, 4, 6, 20, 23, and 26. Install standoffs in positions (7, 18, 19, P, and S). 1 4 6 7 20 P P P P P P P P 18 23 S 19 26 OM14221 Figure 6. Installing Chassis Standoffs in the SC5200 52 Intel Server Board SE7501CW2 Product Guide - Intel SE7501CW2 | Product Guide - Page 53
Intel® Server Chassis SC5250-E The Intel® Server Chassis SC5250-E comes with standoffs pre-installed in positions K, F, A, N, I, and D. Install standoffs in N P1 P1 P1 P1 P2 P2 P2 P2 H I E C D TP00101 Figure 7. Installing Chassis Standoffs in the SC5250-E Server Board Installation 53 - Intel SE7501CW2 | Product Guide - Page 54
board into the SC5250-E chassis, insert the front of the board first, then slide the board back so that the I/O connectors protrude through the I/O shield at the rear of the chassis. TP00102 Figure 9. Placing the Server Board in the SC5250-E Chassis 54 Intel Server Board SE7501CW2 Product Guide - Intel SE7501CW2 | Product Guide - Page 55
Using the screws that came with your chassis, mount the board to the chassis at the locations shown by the figure below. ✏ NOTE The Intel® Server Chassis SC5250 (all versions) and the Intel Server Chassis SC5250-E use different screws to attach the server board to t he chassis. Be sure to use the - Intel SE7501CW2 | Product Guide - Page 56
supported memory, visit the Intel Support Web site: http://support.intel.com/support/motherboards/server/SE7501CW2 3 2 3 1 1 TP00089 Figure 11. Installing Memory 4 DDR200-compliant ECC DIMMs can be used only if 400 MHz processors are installed. 56 Intel Server Board SE7501CW2 Product Guide - Intel SE7501CW2 | Product Guide - Page 57
the Intel Customer Support website: http://support.intel.com/support/motherboards/server/SE7501CW2 ESD and handling processors: Reduce the risk of electrostatic discharge (ESD) damage to the processor by doing the following: (1) Touch the metal chassis before touching the processor or server board - Intel SE7501CW2 | Product Guide - Page 58
✏ NOTE Make sure the alignment triangle mark and the alignment triangle cutout align correctly. See Figure 12. A B OM15042 Figure 12. Opening Socket Lever and Attaching Processor 58 Intel Server Board SE7501CW2 Product Guide - Intel SE7501CW2 | Product Guide - Page 59
the PWT retention mechanism over the top of the processor with the screws provided, as shown in Figure 13. ✏ NOTE The SC5200 chassis and the SC5250-E chassis use different fasteners to connect the PWT retention mechanism to the server board. The fasteners look nearly identical, but the SC5250 - Intel SE7501CW2 | Product Guide - Page 60
the clips that came with your processor. For both the 400 MHz clips and the 533 MHz clips, make sure the center tab on the clip engages in the heat sink base. A C B C E 1 3 D 2 4 TP00099 Figure 15. Attaching the Heat Sink and Retention Clip 60 Intel Server Board SE7501CW2 Product Guide - Intel SE7501CW2 | Product Guide - Page 61
, note that when you are looking at the fan with the wind tunnel assembly behind it, the cable must extend from the left side for CPU2 (Figure 17, 3) and from the right side for CPU1 (Figure 17, 4). 2 3 1 4 TP00042 Figure 17. Attaching the Heat Sink Fan to the PWT Server Board Installation 61 - Intel SE7501CW2 | Product Guide - Page 62
3b). 4. Attach CPU Fan 1 cable to the server board at location J16 and/or attach CPU Fan 2 cable at location fan is toward the front of the chassis and the airflow is toward the I/O shield. If two processors are installed, the fans must be side by side. 62 Intel Server Board SE7501CW2 Product Guide - Intel SE7501CW2 | Product Guide - Page 63
socket. 7. Remove the processor from the socket. 8. Align the pins of the replacement processor with the socket, and insert the processor into the socket. Lower the socket lever completely. ✏ NOTE Make sure the alignment triangle mark and the alignment triangle cutout align correctly. Server Board - Intel SE7501CW2 | Product Guide - Page 64
CPU fan Replacing the Backup Battery The lithium battery on the server board powers the RTC for up to 10 years in the absence of power. When the battery starts to weaken, it loses voltage, and the server settings stored in CMOS RAM ohjeiden mukaisesti. 64 Intel Server Board SE7501CW2 Product Guide - Intel SE7501CW2 | Product Guide - Page 65
according to local ordinance. 6. Remove the new lithium battery from its package, and, being careful to observe the correct polarity, insert it in the battery socket. 7. Close the chassis. 8. Run Setup to restore the configuration settings to the RTC. Server Board Installation 65 - Intel SE7501CW2 | Product Guide - Page 66
G. Hot-swap backplane header H. Secondary IDE connector (top, white connector) M. Serial B header N. Chassis intrusion header O. I2C header P. System fan 3 header (top) System fan 4 header (bottom) Figure 21. Making Connections to the Server Board 66 Intel Server Board SE7501CW2 Product Guide - Intel SE7501CW2 | Product Guide - Page 67
in Figure 22. 3. Replace the top half of the EPAC. B A A. Ribbon Cable(s) B. Lower Device Bay Figure 22. Routing IDE Cables OM14196 For the SC5250-E chassis, route the cables along the sides of the chassis, being careful to avoid blocking the airflow from the fans. Server Board Installation 67 - Intel SE7501CW2 | Product Guide - Page 68
SC5200, route the floppy drive cable as shown in Figure 23, A. A OM14421 Figure 23. Routing the Floppy Drive Cable For the SC5250-E chassis, route the cables along the sides of the chassis, being careful to avoid blocking the airflow from the fans. 68 Intel Server Board SE7501CW2 Product Guide - Intel SE7501CW2 | Product Guide - Page 69
back panel and to an AC outlet. A C E D B G F I H A. AC Power B. USB 1, 2, and 3 C. Mouse D. Parallel port E. Serial port B OM14424 F. Keyboard G. Serial port A H. Video I. Network NIC1 (10/100 Mb left) NIC2 (1 Gb right) Figure 24. Making Back Panel Connections Server Board Installation 69 - Intel SE7501CW2 | Product Guide - Page 70
70 Intel Server Board SE7501CW2 Product Guide - Intel SE7501CW2 | Product Guide - Page 71
available at the wall outlet? Are the power supplies plugged in? Check the AC cable on the back of the chassis and at the AC source. Are all cables correctly connected and secured? Are the processors fully seated in their sockets on the server board? Are all standoffs in the proper location and - Intel SE7501CW2 | Product Guide - Page 72
corrupted by voltage spikes on your power line. If you are experiencing any of the above symptoms that might indicate voltage spikes on the power line, you may want to install a surge suppressor between the power outlet and the system power cord. 72 Intel Server Board SE7501CW2 Product Guide - Intel SE7501CW2 | Product Guide - Page 73
power cord is plugged into a properly grounded AC outlet. 3. Make sure your video display monitor and keyboard are correctly connected to the system. Turn on the video monitor. Set its brightness and contrast controls to at least two thirds of their maximum ranges (see the documentation supplied - Intel SE7501CW2 | Product Guide - Page 74
information is useful for your service representative. 5. If you do not receive a beep code and characters do not appear, the video display monitor or video controller may have failed. Contact your service representative or authorized dealer for help. 74 Intel Server Board SE7501CW2 Product Guide - Intel SE7501CW2 | Product Guide - Page 75
power supply cables properly connected to the server board? Are there any shorted wires caused by pinched-cables or power connector plugs forced into power connector sockets the wrong way? If the switches and connections are correct and AC power is available at the wall outlet, contact your service - Intel SE7501CW2 | Product Guide - Page 76
through an opening at the system back panel. Problems with Network The server hangs when the drivers are loaded. Change the PCI BIOS interrupts. Try the "PCI Installation Tips" below activity light is not connected to the Server Board SE7501CW2. 76 Intel Server Board SE7501CW2 Product Guide - Intel SE7501CW2 | Product Guide - Page 77
installation and operation documentation for instructions on setting up and using the software. Try a different copy of the software to see if the problem is with the copy you are using. Make sure all cables are installed correctly. Verify that the server board jumpers are set correctly. See - Intel SE7501CW2 | Product Guide - Page 78
system will continue to beep throughout the recovery process. The recovery process is complete when the beeping stops. 3. Remove the diskette and power down the system. 4. Power the system up to restart it and confirm that the recovery was successful. 78 Intel Server Board SE7501CW2 Product Guide - Intel SE7501CW2 | Product Guide - Page 79
initiated. This option would be used only when the BIOS is corrupt, but the ROM checksum error does not occur during POST. To manually initiate a BIOS recovery, use the following steps: 1. Power down and uplug the system from the AC power source. 2. Move the recovery jumper at J32 from the spare - Intel SE7501CW2 | Product Guide - Page 80
26. Password Recovery Jumper TP00097 4. Reconnect the AC power, power up the system. 5. Power down the system and disconnect the AC power. 6. Return the Password Clear jumper to the spare location, covering pins 9 and 10. 7. Close the server chassis. 80 Intel Server Board SE7501CW2 Product Guide - Intel SE7501CW2 | Product Guide - Page 81
are not able to access the BIOS setup screens, the CMOS Clear jumper will need to be used to reset the configuration RAM. The CMOS Clear jumper is located on jumper block J32 on the SE7501CW2 board. 1. Power down the system and disconnect the AC power. 2. Open the server. 3. Move the jumper from the - Intel SE7501CW2 | Product Guide - Page 82
82 Intel Server Board SE7501CW2 Product Guide - Intel SE7501CW2 | Product Guide - Page 83
support.intel.com/support/motherboards/server/SE7501CW2 Telephone All calls are billed US $25.00 per incident, levied in local currency at the applicable credit card exchange rate plus applicable taxes. (Intel &T) For an updated support contact list, see http://www.intel.com/support/9089.htm/ 83 - Intel SE7501CW2 | Product Guide - Page 84
84 Intel Server Board SE7501CW2 Product Guide - Intel SE7501CW2 | Product Guide - Page 85
. NOTE: This jumper should remain in place for normal BIOS operational code updates. CMOS Clear 5-6 If these pins are jumpered, the CMOS all times unless you are instructed to perform a BIOS Boot Block update. At this time, remove the jumper, run the BIOS update, and then replace the jumper when - Intel SE7501CW2 | Product Guide - Page 86
power on 7 & 9 LED shows hard drive activity 11 & 13 Pressing the power switch removes all by standby power from the board 15 & 17 Pressing the reset button restarts the boot process 23 Pressing the NMI button causes a non-maskable interrupt 86 Intel Server Board SE7501CW2 Product Guide - Intel SE7501CW2 | Product Guide - Page 87
(Nordics) • GOST R 50377-92 (Russia) Product EMC Compliance The Server Board SE7501CW2 has been has been tested and verified to comply with the following electromagnetic compatibility (EMC) regulations when installed a compatible Intel® host system. For information on compatible host system(s) refer - Intel SE7501CW2 | Product Guide - Page 88
must accept any interference received, including interference that may cause undesired operation. For questions related to the EMC performance of this product, contact: Intel Corporation 5200 N.E. Elam Young Parkway Hillsboro, OR 97124 1-800-628-8686 88 Intel Server Board SE7501CW2 Product Guide - Intel SE7501CW2 | Product Guide - Page 89
. This equipment generates, uses, and can radiate radio frequency energy and, if not installed and used in accordance with the instructions, may cause harmful interference to radio communications. However, there is no guarantee that interference will not occur in a particular installation - Intel SE7501CW2 | Product Guide - Page 90
Recipient: Intel 4. Date of Manufacturer: Marked on Product 5. Manufacturer / Nation : Intel Australia / New Zealand This product has been tested and complies with AS/NZS 3548. The product has been marked with the C-Tick mark to illustrate compliance. 90 Intel Server Board SE7501CW2 Product Guide - Intel SE7501CW2 | Product Guide - Page 91
, 64 installing, 65 removing, 64 beep codes, 21 BIOS, 12, 16, 18 changing the language, 46 upgrading, 43, 44 bootable media required by POST, 21 booting cold, 71 Bridge, 7 C cable CPU fan, 62, 63 Caution avoid damaging jumpers when changing, 48 avoid touching processor pins, 57 selecting correct - Intel SE7501CW2 | Product Guide - Page 92
drive light, 75 hard drive light, 76 initial system startup, 71 network, 76 no characters on screen, 74 PCI installation tips, 77 power light, 74 preparing system for diagnostic testing, 73 random error in data files, 72 screen characters incorrect, 75 Intel Server Board SE7501CW2 Product Guide - Intel SE7501CW2 | Product Guide - Page 93
retention device, 59, 63 Processor Wind Tunnel fan installation, 61 processor(s) what type to install, 7, 10, 57 PWT, 57 R real time clock running SCU to configure settings, 65 reset system, 71 RTC, 17 S SDRAM, 13 Sensor Event, 18 Serial, 12 server board component locations, figure, 9 configurations
-
 1
1 -
 2
2 -
 3
3 -
 4
4 -
 5
5 -
 6
6 -
 7
7 -
8
-
9
-
10
-
11
-
12
-
13
-
14
-
15
-
16
-
17
-
18
-
19
-
20
-
21
-
22
-
23
-
24
-
25
-
26
-
27
-
28
-
29
-
30
-
31
-
32
-
33
-
34
-
35
-
36
-
37
-
38
-
39
-
40
-
41
-
42
-
43
-
44
-
45
-
46
-
47
-
48
-
49
-
50
-
51
-
52
-
53
-
54
-
55
-
56
-
57
-
58
-
59
-
60
-
61
-
62
-
63
-
64
-
65
-
66
-
67
-
68
-
69
-
70
-
71
-
72
-
73
-
74
-
75
-
76
-
77
-
78
-
79
-
80
-
81
-
82
-
83
-
84
-
85
-
86
-
87
-
88
-
89
-
90
-
91
-
92
-
93
 |
 |

Intel
®
Server Board SE7501CW2
Product Guide
A Guide for Technically Qualified Assemblers of Intel
®
Identified
Subassemblies/Products
Order Number:
C29938-002