Invacare 7740A Owners Manual - Page 2
Setup - trapeze
 |
View all Invacare 7740A manuals
Add to My Manuals
Save this manual to your list of manuals |
Page 2 highlights
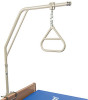
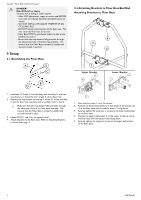
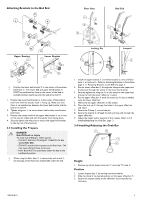
Invacare® Floor Base and Fixed Trapeze DANGER! Risk Of Death or Injury To avoid risk of falling or other injuries: - After ANY adjustments, repair or service and BEFORE use, make sure that all attaching component parts are secure. - DO NOT INSTALL OR ADJUST TRAPEZE OF AN OCCUPIED BED. - DO NOT attach swivel trapezes to the floor base. This may cause the floor base to tip over. - Floor Base MUST be positioned under the bed at the headboard position. - Ensure that the snap buttons fully protrude through the adjustment hole of the floor leg assembly. This ensures that the Floor Base is properly installed and securely locked in position. 3 Setup 3.1 Assembling the Floor Base 3.2 Attaching Brackets to Floor Base/Bed End Attaching Brackets to Floor Base Upper Bracket Lower Bracket 1. Install the "A" frame A into the floor base assembly B with the snap buttons C facing the short length D of the floor base. 2. Depress the snap button on one leg E of the "A" frame and slide it into the floor base assembly until an audible "click" is heard. Make sure that the snap button fully protrudes through the adjustment hole of the floor base assembly. This ensures that the Floor Base is properly installed and securely locked in place. 3. Repeat STEPS 1 and 2 for the opposite side. 4. Attach brackets to the floor base. Refer to Attaching Brackets to Floor Base, page 2 . 1. Place the floor base F on a flat surface. 2. Position the lower bed bracket G in the center of the bottom rail H of the floor base with the tubular hook I facing down. 3. Securely tighten the wing nuts J to secure the lower bed bracket to the floor base. 4. Position the upper bed bracket K in the center of the top rail of the floor base with the tubular hook facing down. 5. Securely tighten the wing nuts to secure the upper bed bracket to the floor base. 2 1180736-B-01
-
 1
1 -
 2
2 -
 3
3 -
 4
4
 |
 |
