Iomega 34571 Quick Start Guide - Page 2
Quick Install, Using Your Home Media Network Hard Drive
 |
UPC - 742709345715
View all Iomega 34571 manuals
Add to My Manuals
Save this manual to your list of manuals |
Page 2 highlights
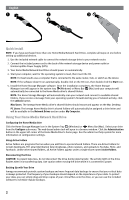
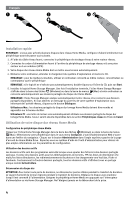
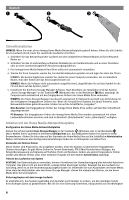
1 2 3 Quick Install NOTE: If you have purchased more than one Home Media Network Hard Drive, complete all steps on one before setting up additional devices. 1. Use the included network cable to connect the network storage drive to your network router. 2. Connect the included power cord to the back of the network storage device and power outlet or Uninterruptible Power Supply (UPS). 3. Your Home Media Network Hard Drive should power on automatically. 4. Start your computer, wait for the operating system to load, then insert the CD. NOTE: For best results use a computer that is connected to the same router, hub, or switch as the device NOTE: If the software doesn't run automatically, double click on the CD icon, then double click the Start icon. 5. Install the Home Storage Manager software. Once the installation completes, the Home Storage Manager icon will appear in the system tray (Windows) or Menu Bar (Mac) and your computer will automatically be connected to the Home Media drive's shared folders. NOTE: The Home Storage Manager will automatically scan your network and connect to available shared folders. If you receive a message from your operating system's firewall alerting you of network activity, click the unblock button. Mac Users: The Iomega Home Media drive's shared folders should mount and appear on the Mac Desktop. PC Users: The Iomega Home Media drive's shared folders will automatically be assigned a drive letter and will be available in the Network Drives section under My Computer. Using Your Home Media Network Hard Drive Configuring the Home Media drive Click the Home Storage Manager icon in the System Tray (Windows) or Menu Bar (Mac). Select your drive from the Configure sub-menu. The web-based admin tool will open in a browser window. Click the Administration button in the upper left corner of the Home Media Drive's home page. See the admin tool help system for more information on configuration settings. Using Active Folders Active Folders are programs that run when you add files to special shared folders. There are Active Folders for torrent downloads, FTP, email distribution lists/dropboxes, photo resizers, and uploads to YouTube, Flickr, and Facebook. Unlike other shared folders, all Active Folders appear under a single share named ActiveFolders. Disconnecting the Drive CAUTION: To prevent data loss, do not disconnect the drive during data transfer. The activity light on the drive flashes when it is transferring data. Use caution when moving the drive while it is connected to power. Backing Up with Your Drive Iomega recommends periodic system backups and more frequent data backups to ensure that your critical data is always protected. The frequency of your backups should depend on the importance of your data. To protect your data, you can simply drag and drop copies of your critical files onto the drive, or you can use the included software to schedule regular backups. 2
-
 1
1 -
 2
2 -
 3
3 -
 4
4 -
 5
5 -
 6
6 -
 7
7 -
 8
8 -
9
-
10
-
11
-
12
-
13
-
14
-
15
-
16
-
17
-
18
-
19
-
20
-
21
-
22
-
23
-
24
-
25
-
26
-
27
-
28
-
29
-
30
-
31
-
32
-
33
-
34
-
35
-
36
-
37
-
38
-
39
-
40
 |
 |
