JVC DLA-NZ7 Operation Manual - Page 90
Others, External Control, RS-232C Specifications, TCP/IP Connection
 |
View all JVC DLA-NZ7 manuals
Add to My Manuals
Save this manual to your list of manuals |
Page 90 highlights
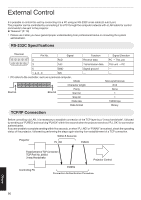
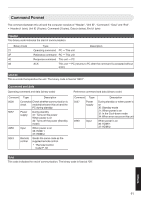
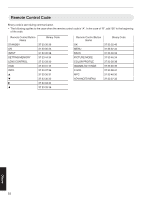
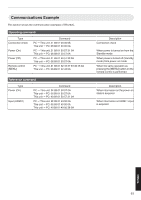
External Control It is possible to control this unit by connecting it to a PC using an RS-232C cross cable (D-sub 9-pin). The projector can be controlled by connecting it to a PC through the computer network with a LAN cable for control commands to be sent to the projector. Æ "Network" (P. 79) 0 Please use it after you have gained proper understanding from professional books or consulting the system administrator. RS-232C Specifications This Unit 1 5 2 Pin No. Signal RxD Function Receive data Signal Direction PC " This unit 6 9 3 TxD Transmission data This unit " PC 5 GND Signal ground - 1, 4, 6 - 9 N/C - - 0 PC refers to the controller, such as a personal computer. Mode Non-synchronous D0 D1 D2 D3 D4 D5 D6 D7 Character length 8 bit Start bit Stop bit Parity Start bit None 1 Stop bit 1 Data rate 19200 bps Data format Binary TCP/IP Connection Before controlling via LAN, it is necessary to establish connection of the TCP layer by a "3-way handshake", followed by sending out "PJREQ" and receiving "PJACK" within five seconds after the projector sends out "PJ_OK" for connection authentication. If you are unable to complete sending within five seconds, or when "PJ_NG" or "PJNAK" is received, check the operating status of the projector, followed by performing the steps again starting from establishment of a TCP connection. Projector Within 5 Seconds PJ_OK PJACK Establishment of TCP Connection TCP Port No. 20554 3-way Handshake Projector Control Controlling PC PJREQ Connection Authentication Procedure Others 90
-
 1
1 -
2
-
3
-
4
-
5
-
6
-
7
-
8
-
9
-
10
-
11
-
12
-
13
-
14
-
15
-
16
-
17
-
18
-
19
-
20
-
21
-
22
-
23
-
24
-
25
-
26
-
27
-
28
-
29
-
30
-
31
-
32
-
33
-
34
-
35
-
36
-
37
-
38
-
39
-
40
-
41
-
42
-
43
-
44
-
45
-
46
-
47
-
48
-
49
-
50
-
51
-
52
-
53
-
54
-
55
-
56
-
57
-
58
-
59
-
60
-
61
-
62
-
63
-
64
-
65
-
66
-
67
-
68
-
69
-
70
-
71
-
72
-
73
-
74
-
75
-
76
-
77
-
78
-
79
-
80
-
81
-
82
-
83
-
84
-
 85
85 -
 86
86 -
 87
87 -
 88
88 -
 89
89 -
 90
90 -
 91
91 -
 92
92 -
 93
93 -
 94
94 -
 95
95 -
96
-
97
-
98
-
99
-
100
-
101
-
102
-
103
-
104
-
105
-
106
-
107
-
108
-
109
-
110
 |
 |
