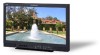
JVC DT-E21L4U Operation manual for DT-E17L4/DT-E21L4G Monitor (32 pages) - Page 24
External Control cont
 |
View all JVC DT-E21L4U manuals
Add to My Manuals
Save this manual to your list of manuals |
Page 24 highlights
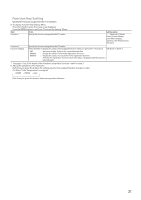
External Control (cont.) All commands consist of the following segments. Header Monitor ID Function Data On Header "!" : Operation commands from the personal computer, etc. (☞ below table). "?" : Reference commands from the personal computer, etc. "@" : Status returns from the monitor To start communication, send the connection command from the personal computer etc. To terminate the communication, send the termination command from the personal computer etc. Example of communication procedures 1 Starting the communication: connection command (!00BCN1Cr) 2 Monitor's status (@00BOKCr) Monitor PC, etc. 3 Selecting "SDI 1" input (!00BINACr) 4 Monitor's status (@00BOKCr) 5 Terminating the communication: termination command (!00BCN0Cr) 6 Monitor's status (@00BOKCr) Cr (0Dh) No. Commands Functions 1! *1 B C N 1 Cr Starts communication (connection) 2! *1 B C N 0 Cr Terminates communication (termination) 3! *1 B I D S E T x x*2 Cr Assigns the control ID 4! *1 B I D R E T Cr Initializes the control ID 5! *1 B I D D S P x x*2 Cr Displays/hides the ID 6! *1 B M E N U Cr Displays the Main Menu/Quits the menu operation 7! *1 B U P Cr Moves the cursor upward ( ) 8! *1 B D O W N Cr Moves the cursor downward ( ) 9! *1 B A D J R Cr Makes setting/adjustment ( ) 10 ! *1 B A D J L Cr Makes setting/adjustment ( ) 11 ! *1 B S E T U P Cr Displays the Set-Up Menu 12 ! *1 B P W 1 Cr Turns on the monitor 13 ! *1 B P W 0 Cr Turns off the monitor (on standby) 14 ! *1 B I N A Cr Selects "SDI 1" input 15 ! *1 B I N B Cr Selects "SDI 2" input 16 ! *1 B I N C Cr Selects "HDMI" input 17 ! *1 B I N D Cr Selects "COMPO./RGB" input 18 ! *1 B I N E Cr Selects "VIDEO" input 19 ! *1 B D I S P Cr Displays the status*3 20 ! *1 B A M U T E x x*2 Cr Turns muting on/off 21 ! *1 B A S P x x*2 Cr Changes the aspect ratio 22 ! *1 B V P L S Cr Increases the volume 23 ! *1 B V M N S Cr Reduces the volume 24 ! *1 B V O L x x*2 Cr Sets the volume Data No data No data 01 - 99 No data 00: Hide, 01: Display No data No data No data No data No data No data No data No data No data No data No data No data No data No data 00: Off, 01: On 00: 4:3, 01: 16:9 No data No data 00-30 ● "Cr" is 0Dh. ● The commands for starting communication (connection) (No. 1), terminating communication (termination) (No. 2), and turning on the monitor (No. 13) can be used while the monitor is off (on standby). *1 Enter the monitor's ID for " **." The initial setting of the monitor's ID is "00." When connecting several monitors, "00" is a command for controlling all monitors at once. *2 Enter the appropriate data to "xx." *3 Displays the information shown when the INPUT SELECT button currently lit is pressed (☞ "On the Status Display" on page 12). 24
-
 1
1 -
2
-
3
-
4
-
5
-
6
-
7
-
8
-
9
-
10
-
11
-
12
-
13
-
14
-
15
-
16
-
17
-
18
-
 19
19 -
 20
20 -
 21
21 -
 22
22 -
 23
23 -
 24
24 -
 25
25 -
 26
26 -
 27
27 -
 28
28 -
 29
29 -
30
-
31
-
32
 |
 |
