JVC DVP9 Instruction Manual
JVC DVP9 - Digital Ultra Compact Camcorder Manual
 |
UPC - 046838161100
View all JVC DVP9 manuals
Add to My Manuals
Save this manual to your list of manuals |
JVC DVP9 manual content summary:
- JVC DVP9 | Instruction Manual - Page 1
ENGLISH 9 DIGITAL VIDEO CAMERA GR-DVP9 GETTING STARTED 10 Please visit our Homepage on the World Wide Web for Digital Video Camera: http://www.jvc-victor.co.jp/english/cyber/ VIDEO RECORDING & PLAYBACK 17 For Accessories: http://www.jvc-victor.co.jp/english/accessory/ DIGITAL - JVC DVP9 | Instruction Manual - Page 2
This Instruction Manual ● camcorder or AC Power Adapter/Charger under these conditions could lead to fire or electric shock. Contact your JVC dealer. Do not attempt to repair the malfunction yourself. ● To prevent shock, do not open the cabinet. No user serviceable parts inside. Refer servicing - JVC DVP9 | Instruction Manual - Page 3
possible anywhere. ● Use the JVC BN-V107U/V114U battery packs and, to recharge them or to supply power to the camcorder from an AC outlet, use When discarding batteries, environmental problems must be considered and the local rules or laws governing the disposal of these batteries must be followed - JVC DVP9 | Instruction Manual - Page 4
, as tripping on the cables will cause the camcorder to fall, resulting in damage. Attach only the optional JVC VL-V3U Video Light, VL-F3U Flash, MZ-V3U Stereo Zoom Microphone or MZ-V5U Stereo Microphone to the camcorder's Info-Shoe. Ⅲ This camcorder is designed exclusively for the digital video - JVC DVP9 | Instruction Manual - Page 5
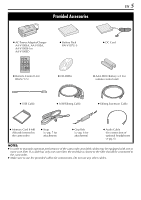
DC Cord ● Remote Control Unit RM-V717U ● CD-ROM ● AAA (R03) Battery x 2 (for remote control unit) ● USB Cable ● S/AV/Editing Cable ● Editing Extension Cable ● Memory Card 8 MB (Already inserted in the camcorder) ● Strap (੬ pg. 7 for attachment) ● Grip Belt (੬ pg. 6 for attachment) ● Audio - JVC DVP9 | Instruction Manual - Page 6
Cable When using optional headphones, connect to the provided Audio cable (with a core filter attached), then connect the Audio cable to the camcorder. The core filter reduces interference. 3) Repeat the same procedure to attach the strap h to the other eyelet. Headphones Audio cable (provided - JVC DVP9 | Instruction Manual - Page 7
with the adjuster. ● Because the screw may cause damage to the camcorder, make sure to attach the screw to the tripod mounting socket when carrying the camcorder. ● Use the strap only with this camcorder. ● Do not grip the camcorder too firmly when the screw is attached. Doing so may cause damage - JVC DVP9 | Instruction Manual - Page 8
Sound Effects 56 Insert Editing 57 Random Assemble Editing [R.A.Edit 58 SYSTEM CONNECTIONS 62 Connection To A Personal Computer 62 Using The Camcorder As A WebCam 63 REFERENCE 64 DETAILS 64 TROUBLESHOOTING 65 CAUTIONS 70 USER MAINTENANCE 73 SPECIFICATIONS 74 INDEX 76 TERMS 82 - JVC DVP9 | Instruction Manual - Page 9
temporarily. If no operation is performed for more than 3 minute after that, the demonstration will resume. Ⅲ "DEMO MODE" remains "ON" even if the camcorder power is turned off. To cancel Automatic Demonstration 1 Set the Power Switch to "M" while pressing down the Lock Button located on the switch - JVC DVP9 | Instruction Manual - Page 10
lets you choose the most appropriate source of power. Do not use provided power supply units with other equipment. Charging The Battery Pack 1 Make sure you unplug the camcorder's DC cord from the AC Power Adapter/Charger. 2 Plug the AC Power Adapter/Charger's power cord into an AC outlet. The - JVC DVP9 | Instruction Manual - Page 11
AA-V80 AC Power Adapter/Charger Read the kit's instruction manual before using. Also, by using the optional JVC VC-VBN856U DC Cord, it will be possible to connect BN-V840U or BN-V856U battery packs to the camcorder and supply power directly to the camcorder. Using AC Power To AC outlet Power cord - JVC DVP9 | Instruction Manual - Page 12
Power Zoom (SHUTTLE SEARCH) Ring. Be sure to tighten the belt to your preference. Tripod Mounting Align the screw on the tripod with the camcorder's mounting socket. Then tighten the screw. ● Some tripods are not equipped with studs. Viewfinder Adjustment 1 Set the Power Switch to "A" or "M" while - JVC DVP9 | Instruction Manual - Page 13
on the display. M (Manual Recording): Allows you to set various recording functions using the Menus. (੬ pg. 31) If you want more creative capabilities than Full Auto Recording, try this mode. There is no indication on the display. OFF: Allows you to switch off the camcorder. P: ● Allows you to - JVC DVP9 | Instruction Manual - Page 14
AC outlet using the AC Power Adapter/Charger for over 24 hours to charge the clock's rechargeable lithium battery. Then perform the date/time setting before using the camcorder. Note that the camcorder can be used without setting the date/time. NOTE: Even if you select "CLOCK ADJ.", if the parameter - JVC DVP9 | Instruction Manual - Page 15
it recedes completely before closing the cassette holder cover. ● When the battery pack's charge is low, you may not be able to close the cassette holder cover and try again. If the cassette holder still does not open, turn the camcorder off then on again. ● If the tape does not load properly, open the - JVC DVP9 | Instruction Manual - Page 16
erase protection tab Card Cover Clipped edge Memory card Label 1 Make sure the camcorder's power is off. 2 Open the card cover. 3 To load a memory a memory card, push it once. After the memory card comes out of the camcorder, pull it out. ● Do not touch the terminal on the reverse side of - JVC DVP9 | Instruction Manual - Page 17
's power shuts off automatically. To turn the camcorder on again, push back and pull out the viewfinder again or close and re-open the LCD monitor. ● LCD monitor/viewfinder indications: • When power is supplied from a battery: the " " battery indicator is displayed. (੬ pg. 80) • When power is - JVC DVP9 | Instruction Manual - Page 18
this case, set the zoom while in RecordStandby, lock the focus by using the manual focus (੬ pg. 43), then zoom in or out in Record mode. ● Zooming situations, different shooting angles may provide more dramatic results. Hold the camcorder in the desired position and tilt the LCD monitor in the most - JVC DVP9 | Instruction Manual - Page 19
code starts counting up again from "00:00:00". This means the camcorder may record the same time codes as those existing in a previously recorded Of A Tape 1) Play back a tape or use Blank Search (੬ pg. 21) to find the spot at which you want to start recording, then engage the Still Playback mode. - JVC DVP9 | Instruction Manual - Page 20
playback. • Blocks of noise appear during playback. For details, ੬ pg. 72. ● If Stop mode continues for 5 minutes when power is supplied from a battery, the camcorder shuts off automatically. To turn on again, set the Power Switch to "OFF", then to "P". ● The playback picture can be viewed in the - JVC DVP9 | Instruction Manual - Page 21
visible, particularly on the left side of the screen. Blank Search Helps you find where you should start recording in the middle of a tape to avoid time beginning or end of the tape is reached during Blank Search, the camcorder stops automatically. ● A blank portion which is shorter than 5 - JVC DVP9 | Instruction Manual - Page 22
Connect the VCR output to the TV input, referring to your VCR's instruction manual. 4 Turn on the camcorder, the VCR and the TV. 5 Set the VCR to its AUX the battery pack. (੬ pg. 11) ● To monitor the picture and sound from the camcorder without inserting a tape or memory card, set the camcorder's - JVC DVP9 | Instruction Manual - Page 23
blinks. ● If shooting is not performed for approx. 5 minutes when the Power Switch is set to "A" or "M" and power is supplied from the battery pack, the camcorder shuts off automatically to save power. To perform shooting again, push back and pull out the viewfinder again or close and re-open the - JVC DVP9 | Instruction Manual - Page 24
images. These thumbnail images cannot be transferred to a PC. ● Images shot with devices (such as JVC GR-DVX70) that are not compatible with DCF cannot be viewed with this camcorder; "UNSUPPORTED FILE!" will be displayed. Playback Zoom Available only with the remote control (provided). (੬ pg - JVC DVP9 | Instruction Manual - Page 25
EN 25 RECORDING & PLAYBACK Playback Of Video Clips You can view video clips (੬ pg. 48) stored in the memory card. 1 Load a memory card. (੬ pg. 16) 2 Set the VIDEO/MEMORY Switch to "MEMORY". 3 Set the Power Switch to "P" while pressing down the Lock Button located on the switch. 4 Open the - JVC DVP9 | Instruction Manual - Page 26
/ SELECT. The Sub Menu appears. 4 Press + or - to select "OFF", and press SET/ SELECT. The operation mode indicator, folder/file number and battery indicator ( ) disappear. ● To display the indicators again, select "ON". Operation mode indicator Folder/file number 100-0013 MENU D I SPLAY OFF ON - JVC DVP9 | Instruction Manual - Page 27
RECORDING & PLAYBACK Protecting Files The Protect mode helps prevent the accidental erasure of files. VIDEO/MEMORY Switch Power Switch Lock Button SHUTTLE SEARCH Ring (3/5) MENU Button SET/SELECT Button +, - Button 1 Load a memory card. (੬ pg. 16) 2 Set the VIDEO/MEMORY Switch to "MEMORY". 3 - JVC DVP9 | Instruction Manual - Page 28
SET/SELECT. 7 Press MENU. The Menu Screen appears. CAUTION: Do not remove the memory card or perform any other operation (such as turning off the camcorder) during deletion. Also, be sure to use the provided AC Power Adapter/Charger, as the memory card may be corrupted if the - JVC DVP9 | Instruction Manual - Page 29
made and the file name will start again from DVC00001. Setting Print Information (DPOF Setting) This camcorder is compatible with the DPOF (Digital Print Order Format) standard in order to support future systems such as automatic printing. You can select one of the 2 print information settings for - JVC DVP9 | Instruction Manual - Page 30
CAUTION: Do not perform any other operation (such as turning off the camcorder) during initialisation. Also, be sure to use the provided AC Power Adapter/ Charger, as the memory card may be corrupted if the battery becomes exhausted during initialisation. If the memory card becomes corrupted - JVC DVP9 | Instruction Manual - Page 31
to-use, onscreen menu system that simplifies many of the more detailed camcorder settings. (੬ pg. 32 - 41) VIDEO/MEMORY Switch Power Switch W I PE-DOOR W I PE- SCROLL WI PE-SHUTTER Menus with Sub Menus - m CAMERA, q MANUAL, s SYSTEM, n CAMERA DISPLAY, o DSC, t VIDEO, n VIDEO DISPLAY 1) Press + or - - JVC DVP9 | Instruction Manual - Page 32
32 EN MENUS FOR DETAILED ADJUSTMENT (cont.) RECORDING MENUS 4) Press SET/SELECT. The Menu Screen returns. ● Repeat the procedure if you wish to set other function menus. 5) Press SET/SELECT again. The Menu Screen closes. WI PE / FADER OF F FADER-WH I TE FADER-B LACK FADER-B .W W I PE-CORNER W I - JVC DVP9 | Instruction Manual - Page 33
Some modes of "Program AE With Special Effects". • "GAIN UP" in CAMERA Menu. (੬ pg. 35) • "DIS" in MANUAL Menu. (੬ pg. 36) EN 33 ● During Night-Scope, it may be difficult to bring the camcorder into focus. To prevent this, use of a tripod is recommended. SHUTTER 1/50: The shutter speed is fixed at - JVC DVP9 | Instruction Manual - Page 34
AUTO: White balance is adjusted automatically. MWB: Adjust the white balance manually when shooting under various types of lighting. FINE: Outdoors on a sunny the LP mode on this camcorder be played back on this camcorder. ● During playback of a tape recorded on another camcorder, blocks of noise may - JVC DVP9 | Instruction Manual - Page 35
. The overall appearance may be grainy. While the shutter speed is being automatically adjusted, " " is displayed. Navigation time NAVIGATION (Factory-preset: MANUAL) 5SEC / 15SEC / 30SEC / 60SEC: The captured image is stored in the memory card as a thumbnail image when the recording time is - JVC DVP9 | Instruction Manual - Page 36
36 EN Manual Menu MANUAL Digital Image Stabilisation To compensate for unstable images caused by camera- step 2, select the desired Snapshot mode in CAMERA Menu (੬ pg. 35), then press SNAPSHOT. The camcorder records a 5-second still. When "5S" is set to "Anim.", this function is not available. - JVC DVP9 | Instruction Manual - Page 37
the top and bottom of the screen are cut and the screen ratio becomes 16:9. When using this mode, refer to your wide-screen TV's instruction manual. During playback/recording on 4:3 TVs/LCD monitor/viewfinder, black bands are inserted at the top and bottom of the screen and the image appears like - JVC DVP9 | Instruction Manual - Page 38
will not be available. After viewing demo, set to "OFF". Sound input SOUND IN (Factory-preset: MIC/AUX) MIC/AUX: Enables sound input from camcorder's stereo microphone, when Audio Dubbing (੬ pg. 56) is executed. "MIC" or "AUX" appears on the Audio Dubbing screen depending on the sound input you - JVC DVP9 | Instruction Manual - Page 39
EN 39 ADVANCED FEATURES DSC Menu DSC Picture quality The Picture Quality mode can be selected to best match your needs. Two Picture Quality modes are available: FINE ( ) and STANDARD ( ) (in order of quality). QUALITY FINE / STANDARD (Factory-preset: FINE) NOTE: The number of storable images - JVC DVP9 | Instruction Manual - Page 40
use "REC MODE" in VIDEO Menu when using this camcorder as a recorder during dubbing. (੬ pg. 50, / TAPE SEL. / ALL / RETURN Blank search Helps find a blank portion of tape when you want to record OFF) OFF: Enables audio and video signal input from DV IN/OUT connector. (੬ pg. 52) A/V.IN: Enables - JVC DVP9 | Instruction Manual - Page 41
settings) are the same as in the description on page 38. ON SCREEN (Factory-preset: LCD) OFF / LCD / LCD/TV When set to "OFF", the camcorder's display disappears. DATE/TIME (Factory-preset: OFF) OFF / AUTO / ON When set to "AUTO", the date/time are displayed in the following cases: • When - JVC DVP9 | Instruction Manual - Page 42
the tally lamp changes as shown: Self-Timer Once the camcorder is set, the camcorder operator can become part of the scene in a more natural yourself while self-recording with the viewfinder pushed back. 3 Set "SELF-TIMER" to MANUAL "ON ". (੬ pg. 31, 36) 4 To engage the Self-Timer SEL F - JVC DVP9 | Instruction Manual - Page 43
. (੬ pg. 18) If zoomed-in in the auto focus mode, the camcorder may automatically zoom out depending on the distance between the camcorder and the subject. This will not occur when "TELE MACRO" is set to "ON". (੬ pg. 36) Manual Focus NOTE: If you are using the viewfinder, you should already have - JVC DVP9 | Instruction Manual - Page 44
is complete. To return to automatic exposure control... Set "p" to "AUTO". (੬ pg. 31, 34) Or, set the Power Switch to "A". NOTES: ● You cannot use the manual exposure control at the same time when "r" is set to "SPOTLIGHT" or "SNOW" (੬ pg. 33), or with the backlight compensation. (੬ pg. 45) ● If the - JVC DVP9 | Instruction Manual - Page 45
Manual White Balance Adjustment Adjust the white balance manually camcorder operators control this function manually manually when shooting under various types of lighting. (੬ "Manual closes and the Manual White Balance adjust focus manually. (੬ pg manually, the setting is retained even if the power is - JVC DVP9 | Instruction Manual - Page 46
from your PC to the memory card using a USB cable to create more sound effects. http://www.jvc-victor.co.jp/english/download/ d-sound/index.html ● You can also use the instruction manual of the provided software. However, some sound (effects) created on a PC cannot be played back with this camcorder. - JVC DVP9 | Instruction Manual - Page 47
" is set to "5S" or "Anim." in MANUAL Menu, the NAVIGATION function will not work properly. EN 47 To find scenes on tape using thumbnail images (NAVIGATION Search) 1 ● The "NAVIGATION SEARCH" indication appears blinking and the camcorder starts searching the tape for the relevant point of the - JVC DVP9 | Instruction Manual - Page 48
Adapter/Charger, as the memory card may be corrupted if the battery becomes exhausted during deletion. If the memory card becomes corrupted, memory card together as they were during recording; otherwise, the camcorder cannot recognise Tape and Memory Card IDs to perform NAVIGATION function - JVC DVP9 | Instruction Manual - Page 49
Recording. 9 Press SNAPSHOT to stop E-Mail Clip Recording. ● "COMPLETED" is displayed, then the camcorder re-enters the E-Mail Clip RecordStandby mode. 10 Press E-MAIL to end E-Mail Clip Recording. ® Media Player version 6.4 or later. Refer to the instructions of PC and software. ADVANCED FEATURES - JVC DVP9 | Instruction Manual - Page 50
VCR's AUX and Record-Pause modes. ● Refer to the instruction manual for the VCR. 8 Press 4/9 on the camcorder to start playback of the source tape. 9 At the Adapter/ Charger as the power supply instead of the battery pack. (੬ pg. 11) ● As the camcorder starts to play your footage, it will appear on - JVC DVP9 | Instruction Manual - Page 51
additional editing. Stop the video unit and camcorder. NOTES: ● It is recommended to use the AC Power Adapter/ Charger as the power supply instead of the battery pack. (੬ pg. 11) ● If the remote control is used when both the player and recorder are JVC video units, both units will perform the same - JVC DVP9 | Instruction Manual - Page 52
for additional editing. Stop the video unit and camcorder. NOTES: ● It is recommended to use the AC Power Adapter/ Charger as the power supply instead of the battery pack. (੬ pg. 11) ● If no MODE" setting. (੬ pg. 34) ● When using a DV cable, be sure to use the optional JVC VC-VDV204U DV cable. - JVC DVP9 | Instruction Manual - Page 53
Dubbing Still Images Recorded On A Tape To A Memory Card Still images can be dubbed from a tape to a memory card. VIDEO/MEMORY Switch Play/Pause Button (4/9) Power Switch SNAPSHOT Button Lock Button SET/SELECT MENU Button Button +, - Button EN 53 1 Load a cassette. (੬ pg. 15) 2 Load a - JVC DVP9 | Instruction Manual - Page 54
Full-Function Remote Control Unit can operate this camcorder from a distance as well as the basic operations (Playback, Stop, Pause, Fast-Forward and Rewind) of your VCR. It also makes additional playback functions possible. (੬ pg. 55) Installing The Batteries The remote control uses two "AAA (R03 - JVC DVP9 | Instruction Manual - Page 55
to zoom in, press the Zoom Button (T). ● To zoom out, press the Zoom Button (W). 3) You can move the image on the screen around to find a particular portion of the picture. While holding down SHIFT, press L (Left), F (Right), U (Up) and E (Down). ● To end zoom, press and hold W until magnification - JVC DVP9 | Instruction Manual - Page 56
recorded areas. ● If feedback or howling occurs during TV playback, move the camcorder's microphone away from the TV, or turn down the TV's volume. pg. 22) ● To perform Audio Dubbing with a video unit connected to the camcorder's S/AV connector, first set "S/AV INPUT" to "A/V.IN" in VIDEO Menu. (੬ - JVC DVP9 | Instruction Manual - Page 57
PAUSE (9). The "9I" indicator and the Time Code (min.:sec.) appear and the camcorder enters Insert-Pause mode. 4 Press START/STOP to begin editing. ● Confirm the insert " is set to other than "MANUAL", a NAVIGATION thumbnail image is stored in the memory card. (੬ pg. 47) ADVANCED FEATURES - JVC DVP9 | Instruction Manual - Page 58
easily using your camcorder as the source this case, turn the power on manually and try step 2. ● If the remote battery with a new one to reset the VCR brand. VCR CODE LIST VCR BRAND CODE NAME AKAI FB FD GG BLAUPUNKT A C DAEWOO AH FERGUSON IG IH CB GRUNDIG AD CD HITACHI FF FC JVC - JVC DVP9 | Instruction Manual - Page 59
camcorder. 3 Set the VIDEO/MEMORY Switch to "VIDEO". 4 Set the Power Switch to "P" while pressing down the Lock Button located on the switch. 5 Turn the VCR power on, insert a recordable tape and engage the AUX mode. ● Refer to the VCR's instructions with a DV input connector, an optional DV cable - JVC DVP9 | Instruction Manual - Page 60
may not match the total program time exactly. ● Turning off the camcorder's power erases all registered Edit-In and Edit-Out points. ● If effects and Program AE with special effects during Random Assemble Editing using a DV cable. Picture Wipe And Dissolve Menu (available only for Random Assemble - JVC DVP9 | Instruction Manual - Page 61
tape in the camcorder to the beginning of the scene you want to edit and press PAUSE (9). 14 Press VCR REC STBY (79), or manually engage the VCR's if you begin editing for the camcorder and the VCR at exactly the same time, you may lose scenes you wanted, or find that you have recorded scenes you - JVC DVP9 | Instruction Manual - Page 62
the bundled software and drivers. ● The software operation manual is provided as PDF file on the CD-ROM. ● It is recommended to use the AC Power Adapter/ Charger as the power supply instead of the battery pack. (੬ pg. 11) ● Never connect the USB cable and the DV cable simultaneously to the camcorder - JVC DVP9 | Instruction Manual - Page 63
camcorder. Disconnect the USB cable from the camcorder and PC. NOTES: ● It is recommended to use the AC Power Adapter/ Charger as the power supply instead of the battery pack. (੬ pg. 11) ● Use the provided software instruction manuals of the PC and provided Software. ADVANCED FEATURES USB-equipped PC - JVC DVP9 | Instruction Manual - Page 64
are for a fully discharged battery pack. ● Charging time varies according to the ambient temperature and the status of the battery pack. ● To avoid actual recording starts. The "T" indicator starts rotating when the camcorder actually starts recording. ● The time required to calculate and - JVC DVP9 | Instruction Manual - Page 65
TROUBLESHOOTING EN 65 If, after following the steps in the chart below, the problem still exists, please consult your nearest JVC dealer. The camcorder Adapter/Charger securely. • The battery is dead. (੬ pg. 11) • The LCD monitor is not open • Replace the dead battery fully or the viewfinder is - JVC DVP9 | Instruction Manual - Page 66
66 EN TROUBLESHOOTING (cont.) 7. The LCD monitor or viewfinder indications blink. 8. Digital Zoom does not work. 7. • Certain Wipe/Fader effects, 7. • Re-read the sections covering certain modes of - JVC DVP9 | Instruction Manual - Page 67
"Anim." in MANUAL Menu. Menu. (੬ pg. 31, 36) 15. Snapshot mode cannot be used. 15. • The Squeeze mode (SQUEEZE) is selected. 15. • Disengage the Squeeze (SQUEEZE) mode. (੬ pg. 31, 37) 16. The colour of Snapshot looks strange. 16. • The light source or the 16. • Find a white subject and - JVC DVP9 | Instruction Manual - Page 68
68 EN Other problems TROUBLESHOOTING (cont.) SYMPTOM POSSIBLE CAUSES CORRECTIVE ACTION 24. The CHARGE indicator on the 24. • The temperature of the 24. • To protect the battery, it is AC Power Adapter/Charger battery is extremely high/low. recommended to charge it in does not light. • - JVC DVP9 | Instruction Manual - Page 69
. LCD monitor is pressed. 35. The cassette will not load properly. 35. • The battery's charge is low. 35. • Install a fully charged battery. (੬ pg. 10, 11) 36. The memory card cannot be 36. removed from the camcorder. - 36. • Push in the memory card a few more times. (੬ pg. 16) 37. Picture - JVC DVP9 | Instruction Manual - Page 70
service life. ... fully charge and then fully discharge the battery every 6 months when storing the battery for the battery pack to be warm after charging, or after use. Temperature Range Specifications Charging........10 make sure the cassette bears the Mini DV mark. ... be aware that recording onto - JVC DVP9 | Instruction Manual - Page 71
strongly or apply any shocks. ... place the camcorder with the LCD monitor on the bottom. 2. To prolong service life... ... avoid rubbing it with coarse cloth NOT... ... open the camcorder's chassis. ... disassemble or modify the unit. ... short-circuit the terminals of the battery pack. Keep it away - JVC DVP9 | Instruction Manual - Page 72
to the video heads may result. After the camcorder plays back for about 20 seconds, it stops automatically. Also refer to the cleaning cassette's instructions. If, after using the cleaning cassette, the problems still exist, consult your nearest JVC dealer. Mechanical moving parts used to move the - JVC DVP9 | Instruction Manual - Page 73
recedes completely before closing the cassette holder cover. 4 Slide down BATT.RELEASE 1 and remove the battery pack 2 3. Cassette holder cover Cassette holder Remove. PUSH HERE OPEN/EJECT Switch Cleaning The Camcorder 1 To clean the exterior, wipe gently with a soft cloth. Put the cloth in diluted - JVC DVP9 | Instruction Manual - Page 74
74 EN SPECIFICATIONS Camcorder For General pushed back in) Approx. 350 g (without grip belt, battery and cassette) Approx. 420 g (incl. grip belt, battery and cassette) 0°C to 40°C 35% to 80% -20 channel (12-bit), 48 kHz 2-channel (16-bit) : Mini DV cassette : SP: 18.8 mm/s LP: 12.5 mm/s : SP - JVC DVP9 | Instruction Manual - Page 75
S-Video input S-Video output Video input Video output Audio input Audio output Edit Headphone output DV Input/output USB : Y: 0.8 V to 1.2 V (p-p), 75 Ω, analogue C: 0.2 V to 0.4 7.2 V G, 1.2 A : DC 6.3 V G, 1.8 A Specifications shown are for SP mode unless otherwise indicated. E & O.E. Design and - JVC DVP9 | Instruction Manual - Page 76
76 EN INDEX Controls, Connectors And Indicators 123 4 5 PLAY OFF A M 8 9 0 qw e 67 r t y u i INDEX - JVC DVP9 | Instruction Manual - Page 77
DV IN/OUT] (i.Link pg. 51, 52, 62 * i.Link refers to the IEEE1394-1995 industry specification and extensions thereof. The logo is used for products compliant with the i.Link standard. T USB pg. 12, 18 a Battery Pack Mount pg. 11 b optional JVC VL- power of the camcorder and the video - JVC DVP9 | Instruction Manual - Page 78
(੬ pg. 47) (Appears when "NAVIGATION" is set to other than "MANUAL".) b Selected Wipe/Fader Effect Indicator (੬ pg. 32) c Tape Running Indicator when a memory card is not loaded. : Blinks in yellow while the camcorder is reading the data in the memory card such as titles/frames, NAVIGATION - JVC DVP9 | Instruction Manual - Page 79
pg. 46) •BRIGHT: Brightness Control Indicator (LCD monitor/Viewfinder) (੬ pg. 13) (The level indicator moves.) m Battery Indicator (੬ pg. 80) n Date/Time (੬ pg. 14) o Manual Focus Adjustment Indicator (੬ pg. 43) •9 U : Forward Frame-By-Frame Playback/ Slow-Motion •Y 9 : Reverse Frame-By - JVC DVP9 | Instruction Manual - Page 80
recording or playback. (੬ pg. 64) SET DATE/TIME! ● Appears when the date/time is not set. (੬ pg. 14) ● Appears when the built-in clock (lithium) battery is discharged and the previously set date/time is erased. (੬ pg. 14) LENS COVER Appears for 5 seconds after power is turned on if the lens - JVC DVP9 | Instruction Manual - Page 81
FORMAT Appears when there is a problem with a memory card and its camcorder turns off automatically. Remove the power supply (battery, etc.) and wait a few minutes for the indication to clear. When it does, you can resume using the camcorder. If the indication remains, consult your nearest JVC - JVC DVP9 | Instruction Manual - Page 82
Rechargeable Lithium Battery .....14 C Changing The Menu Settings 31 Channels (Left/Right 40 Charging The Battery Pack 10 Cleaning The Camcorder 73 Shooting 18 L Loading A Cassette 15 Loading A Memory Card 16 M Manual Focus 43 Memory Card 16, 71 Menu Screen CAMERA 34, 35 CAMERA DISPLAY - JVC DVP9 | Instruction Manual - Page 83
-Motion Playback 55 Snapshot 23, 41 Snapshot Mode (SNAP MODE 35 Sound input (SOUND IN 38 Sound Mode (SOUND MODE 34, 40 Speaker Volume 20 Specifications 74, 75 Still Playback 20 S-Video/AV input (S/AV INPUT 40, 50 Synchro adjustment (SYNCHRO 61 EN 83 T Tally Lamp (TALLY 17, 37 Telephoto - JVC DVP9 | Instruction Manual - Page 84
EN GR-DVP9 ®Registered Trademark owned by VICTOR COMPANY OF JAPAN, LTD. AA/AG/AH/AC COPYRIGHT© 2003 VICTOR COMPANY OF JAPAN, LTD. Printed in Japan 0303-FO-ID-VP - JVC DVP9 | Instruction Manual - Page 85
SOFTWARE INSTALLATION AND USB CONNECTION GUIDE ENGLISH LYT1085-001A COPYRIGHT © 2003 VICTOR COMPANY OF JAPAN, LTD. M3D7/D3/D1 Printed in Japan 0103-FO-ID-VP JVC SOFTWARE LICENSE AGREEMENT IMPORTANT TO CUSTOMERS: PLEASE MAKE SURE TO READ THIS CAREFULLY BEFORE INSTALLING OR USING THE SOFTWARE - JVC DVP9 | Instruction Manual - Page 86
or touch its mirror surface. ● Do not store your CD-ROM in a dusty, hot or humid environment. Keep it away from direct sunlight. ● You can find the latest information (in English) on the provided software program at our world wide web server at http://www.jvc-victor.co.jp/english/index-e.html -2- - JVC DVP9 | Instruction Manual - Page 87
or agency in your country about this software (refer to the JVC Worldwide Service Network at http://www.jvc-victor.co.jp/english/worldmap/index-e.html), please fill out the following and have the appropriate information ready. Product Name Model Problem Error Message Manufacturer Model CPU PC OS - JVC DVP9 | Instruction Manual - Page 88
camcorder to the PC with a USB cable. Windows® 98, Windows® 98SE cannot be used when you connect a camcorder to the PC with a IEEE1394 (DV) cable. CPU : For capturing video via a USB cable or IEEE1394 (DV (Refer to "JVC Accessories" on our world web site at: http://www.jvc-victor.co.jp/english/ - JVC DVP9 | Instruction Manual - Page 89
step 3, you can install the following drivers or software. Quit any other software you are using. (Check that there are no other application icons on the status bar.) USB Mass Storage Class driver This driver allows your PC to read and write memory cards in the camcorder. Windows® Me/2000/XP: Since - JVC DVP9 | Instruction Manual - Page 90
[Install] on the right side of the desired software and follow the on screen instructions to complete the installation. The installation of the selected driver or software starts. The procedure differs depending on the driver or the software. The following is the example of Digital Photo Navigator - JVC DVP9 | Instruction Manual - Page 91
with VCD instruction manual is included on the CD-ROM in PDF format. Double-click the [JVC] folder software that is already installed, uninstallation will start. In this case, perform the installation again after uninstallation is finished. ● DirectX is necessary so that USB Video Streaming driver - JVC DVP9 | Instruction Manual - Page 92
following procedure. Installing [USB Mass Storage Class driver] (Windows® 98/98SE only) 1 Use the USB cable to connect the camcorder to the PC. (੬ pg. 9) 2 Select [Start] - [Settings] - [Control Panel]. Double click the [System] icon. 3 Select the [Device Manager] tab. 4 Delete [GR-DVP9*] in [Other - JVC DVP9 | Instruction Manual - Page 93
] tab and click [Device Manager]. 4 Delete [GR-DVP9*] in [Other devices]. * The model name depends on the connected camcorder. 5 Disconnect the USB cable from the camcorder. Restart the PC. 6 Load the provided CD-ROM in the PC. Install [USB Video Streaming driver]. (੬ pg. 5) ● Windows® XP: Refer to - JVC DVP9 | Instruction Manual - Page 94
information" in the ImageMixer instruction manual on the CD-ROM) Viewing the Contents of a Memory Card (Windows®) 1 Install [USB Mass Storage Class driver]. (੬ pg. 5) ● Windows® Me/2000/XP: There is no need to install this driver. Simply connect the camcorder to the PC with a USB cable, and you can - JVC DVP9 | Instruction Manual - Page 95
in a memory card or deleting files or folders from a memory card can cause problems with the operation of the camcorder. When it is necessary to delete a file from a memory card, delete it through the camcorder. ● Never disconnect the USB cable while the message [ACCESSING FILES] is displayed on the - JVC DVP9 | Instruction Manual - Page 96
then try opening the file. The software that is needed in order to play back the file will be downloaded automatically, and then the file step 5. 5 Disconnect the USB cable. ● If any message appears, click [OK]. 6 Set the Power Switch on the camcorder to "OFF". The camcorder turns off. When using - JVC DVP9 | Instruction Manual - Page 97
the device can be safely removed appears, click [OK]. 5 Click [Close], and then disconnect the USB cable. 6 Set the Power Switch on the camcorder to "OFF". The camcorder turns off. Connections (Macintosh) Connect the USB cable to copy still image and video clip files in a memory card to the PC or - JVC DVP9 | Instruction Manual - Page 98
cable. (੬ pg. 13) 2 Make sure that there is a memory card in the camcorder. 3 Set the camcorder to the memory card playback mode. ● Refer to the camcorder's instruction manual for details. [USB MODE] appears on the camcorder's LCD monitor. The memory card icon appears on the desktop. ● The name of - JVC DVP9 | Instruction Manual - Page 99
in a memory card or deleting files or folders from a memory card can cause problems with the operation of the camcorder. When it is necessary to delete a file from a memory card, delete it through the camcorder. ● Never disconnect the USB cable while the message [ACCESSING FILES] is displayed on the - JVC DVP9 | Instruction Manual - Page 100
or later). You can download the Windows Media™ Player for Mac from the Microsoft web site at: http://www.microsoft.com/ Disconnecting the USB cable (Macintosh) Before loading or unloading memory cards or turning off the PC, first disconnect the USB cable and turn off the camcorder. 1 Drop the memory - JVC DVP9 | Instruction Manual - Page 101
Digital Photo Navigator ImageMixer with VCD ENGLISH INSTRUCTIONS LYT1116-001A - JVC DVP9 | Instruction Manual - Page 102
2 EN CONTENTS INTRODUCTION 5 Reading this document 5 Meanings of symbols ...6 Copyrights ...6 ENDLESS POSSIBILITIES 7 Digital Photo Navigator 7 ImageMixer with VCD 8 Loading Still Images (Windows 9 ADDING STILL IMAGES TO AN ALBUM 10 EXITING DIGITAL PHOTO NAVIGATOR 12 Playing Back and - JVC DVP9 | Instruction Manual - Page 103
and Macintosh) ... 27 IMAGEMIXER 28 Capabilities ...28 For more detailed information 29 PIXELA User Support Center 29 CAPTURING VIDEO 30 Capturing video in real time 30 Capturing video from tape FROM A MEMORY CARD THROUGH AN ADAPTER 44 ADDING SOUND EFFECTS 45 TROUBLESHOOTING 46 INDEX ...49 - JVC DVP9 | Instruction Manual - Page 104
not attempt to modify this software. ● Changes or modifications not approved by JVC could void user's authority to operate the equipment. ATTENTION: When connecting a USB cable or a DV cable to PC ... ● Never switch the VIDEO/MEMORY (DSC) mode on the camcorder when the USB cable is connected. It may - JVC DVP9 | Instruction Manual - Page 105
the Software Installation and USB Connection Guide for capturing videos through a USB cable or a DV cable. ImageMixer is camcorder to hold a video conference over the Internet and how to load images into the PC that does not have a USB connector. This appendix also contains troubleshooting - JVC DVP9 | Instruction Manual - Page 106
of symbols The following symbols are used in this document. NOTE: Indicates problems that could occur while using these softwares, phenomena that may appear to be a problem, limitations on the use of these softwares, or other information that is useful to know. ੬ Indicates pages where related - JVC DVP9 | Instruction Manual - Page 107
cassettes and memory cards away because they hold treasured memories. Now you can solve all of these problems with a PC. By using a USB cable to connect a camcorder to a PC, you can copy video clips from the camcorder to the PC. You can then send the files to anyone as an e-mail attachment. Can I do - JVC DVP9 | Instruction Manual - Page 108
Inc. is also necessary. Add a camera to your PC You can transform your camcorder into a peripheral for your PC. For example, when you are shooting a video, Windows® Messenger (Windows® XP only) (or similar software) in combination with this software to hold a video conference over the Internet. (In - JVC DVP9 | Instruction Manual - Page 109
EN 9 Loading Still Images (Windows®) The Digital Photo Navigator software allows you to store and view still images in a photo album format. The icons on the Digital Photo Navigator window have the same functions as - JVC DVP9 | Instruction Manual - Page 110
images as desired by repeating steps 3 - 5. NOTES: ● When loading images from a memory card, never disconnect the USB cable while the message [ACCESSING FILES] is displayed in the camcorder's LCD monitor. ● Digital Photo Navigator can only load still images. Digital Photo Navigator cannot load video - JVC DVP9 | Instruction Manual - Page 111
the file name of the album, and then click [Save]. The album is saved. ● If you save an album for the first time after the software installation, a message appears and asks if you want to register the association of the file extension name "jia". Then, click [Yes]. ● To exit Digital Photo - JVC DVP9 | Instruction Manual - Page 112
12 EN EXITING DIGITAL PHOTO NAVIGATOR 1 Click the [File] menu and then click [Exit]. ● If you have already saved an album, a confirmation message appears. Then, go to step 2. ● If you have not saved an album after loading still images, a confirmation message appears. To save an album, click [Yes - JVC DVP9 | Instruction Manual - Page 113
EN 13 Playing Back and Handling Images (Windows®) This section explains how to handle still images using Digital Photo Navigator. You can send still image files as an e-mail attachment and store an album as a web page. Be sure to read "Loading Still Images (Windows®)" before reading this section. - JVC DVP9 | Instruction Manual - Page 114
14 EN 1 Start Digital Photo Navigator. 2 Click [Import]. 3 Click [Album]. The [Open] dialog box appears. 4 Open the folder where the album was saved. LOADING AN ALBUM 5 Click the desired album file, and then click [Open]. The contents of the album are displayed in the right-hand side of the - JVC DVP9 | Instruction Manual - Page 115
To display a series of images in "slide show" fashion, click the button in the [Image Viewer] window. You can also move through the images manually in either direction by clicking the and buttons. Stop slide show Start slide show First image Previous image Last image Next image To adjust the - JVC DVP9 | Instruction Manual - Page 116
16 EN DISPLAYING STILL IMAGES (cont.) Enlarging and reducing images The following procedure describes how to change the display size of a still image. 1 Drag the corner of the [Image Viewer] window to change the size of the window to the desired display size. 2 Right-click the [Image Viewer] - JVC DVP9 | Instruction Manual - Page 117
ORGANIZING ALBUMS EN 17 Whenever necessary, you can delete or copy still images that you have added to an album. The procedure described below only affects the still image in the album. It does not affect the original file of the still image that was added to the album. Selecting multiple still - JVC DVP9 | Instruction Manual - Page 118
18 EN ORGANIZING ALBUMS (cont.) Deleting unnecessary still images 1 Click the still image that you want to delete, and then click [Delete] in the [Edit] menu. A confirmation message appears. 2 Click [Yes]. The selected still images are deleted. Copying still images 1 Click the still image that - JVC DVP9 | Instruction Manual - Page 119
, and the still image file is registered as an attachment. NOTES: ● Depending on an e-mail software, a new message window may not open when the [E-Mail] button is clicked. ● Depending on an e-mail software, settings such as "Set as MAPI client" or "Used by MAPI application" are necessary. ● The - JVC DVP9 | Instruction Manual - Page 120
20 EN CREATING A WEB PAGE You can save the contents of an album in HTML format. This is useful in the following instances: When creating a web page: You can create a web page that features a collection of photos. When distributing an album: You can create an album in a format that can be displayed - JVC DVP9 | Instruction Manual - Page 121
. Without its folder, an HTML file cannot be viewed by a web browser. NOTES: ● For more details on how to create a home page, consult your Internet service provider's web site or one of the many reference books available. ● Use third-party home page creation - JVC DVP9 | Instruction Manual - Page 122
22 EN CHANGING THE IMAGE SIZE OR PICTURE QUALITY Changing the image size This procedure describes how to change the size of an image that has been loaded into Digital Photo Navigator. This procedure is used to reduce the size of an image that is being attached to an e-mail or saved in an album. 1 - JVC DVP9 | Instruction Manual - Page 123
described in more detail below. [90 degrees Rotation] If you hold the camcorder sideways when recording an image, you can create an image that is . [Counterclockwise]: Rotates the image 90 degrees counterclockwise. [Image Correction (DV)] This setting is not available. [Format] You can select the - JVC DVP9 | Instruction Manual - Page 124
24 EN RETRIEVING STILL IMAGES FROM AN ALBUM You can retrieve still images from an album and save them as a file. 1 Select the still image to be retrieved. ● To select more than one still image, hold down the Shift key or the Ctrl key while clicking the images. ● To select all of the still images, - JVC DVP9 | Instruction Manual - Page 125
CREATING A LIST OF STILL IMAGES You can arrange multiple still images together and save them in a single still image file. 1 Holding down the Shift key or the Ctrl key, select the still images that are to be added to the list. 2 Click [Multi Image]. The [Multi Image] dialog box appears. EN 25 3 - JVC DVP9 | Instruction Manual - Page 126
movie now appears. 7 Click [Yes]. The movie file is played back. NOTES: ● If you change the [Compressor] item, make sure that the playback system supports that type of compressor. ● Depending on the selected type for [Compressor], a movie file cannot be created. ● In some cases, the settings in the - JVC DVP9 | Instruction Manual - Page 127
and creating albums, ImageMixer is used for a variety of other functions, including color and brightness adjustment, and capturing video through a USB cable or a DV cable. Read this section whether you are using a Windows® or a Macintosh operating system. Explanations of mode buttons are displayed - JVC DVP9 | Instruction Manual - Page 128
feature is not available when ... ... the camcorder and a Windows® 98 PC are connected with a USB cable ... the camcorder and a Windows® 98/98SE or Macintosh PC are connected with a DV cable Capturing video in real time Connect the camcorder to the PC with a USB cable. ImageMixer can then record on - JVC DVP9 | Instruction Manual - Page 129
these functions are also useful for classifying and managing images with a camcorder. Create a Video CD ImageMixer can edit your captured and edited video for Macintosh, double-click the "manual.html" file in the [ImageMixer with VCD] folder. PIXELA User Support Center For more details on how to - JVC DVP9 | Instruction Manual - Page 130
pg. 13) in the Software Installation and USB Connection Guide. 2 Set the camcorder to the memory card recording mode. The camcorder is now on. " " appears on the camcorder's LCD monitor. ● If " " does not appear, install [USB Video Streaming driver]. Refer to "Software Installation (Windows®)" (੬ pg - JVC DVP9 | Instruction Manual - Page 131
is not possible to capture videos or still images if the USB Mass Storage Class driver is not installed properly. In this case, refer to "Updating [Device Manager] (Windows®)" (੬ pg. 8) in the Software Installation and USB Connection Guide. ● On the information display panel or the file information - JVC DVP9 | Instruction Manual - Page 132
32 EN CAPTURING VIDEO (cont.) Capturing video from tape When a camcorder is connected to the PC with a USB cable, video can be copied from the camcorder tape to the PC. 1 Set the camcorder to the tape playback mode. The camcorder is now on. 2 Select [Start] - [Programs] - [PIXELA] - [ImageMixer] - - JVC DVP9 | Instruction Manual - Page 133
com/ Play Capture Video Information display panel Disconnecting the USB cable 1 Disconnect the USB cable. 2 Set the Power Switch on the camcorder to "OFF". The camcorder turns off. NOTES: ● If you are using a Windows® PC, you can use a DV cable instead of a USB cable to capture video. In this case - JVC DVP9 | Instruction Manual - Page 134
34 EN MANAGING FILES ImageMixer can group and search for files (still images, video, and audio) registered in an album, according to their purpose. To playback a file, double-click on its thumbnail. Menu Select album Image editing Change display Search Change display Thumbnail - JVC DVP9 | Instruction Manual - Page 135
EDITING VIDEO EN 35 ImageMixer can edit video files registered in an album. ImageMixer can also insert still images and add audio. Select video editing Edit Preview Material selection Create video Thumbnail Arrange thumbnails Apply scene change effects Arrange audio Double-clicking on one of - JVC DVP9 | Instruction Manual - Page 136
36 EN Cropping editing Sound editing EDITING VIDEO (cont.) Cropping OK To check the results of editing, click the Preview button. Once editing is complete, click the Create video button to save the final product. - JVC DVP9 | Instruction Manual - Page 137
CREATING A VIDEO CD EN 37 If your computer is equipped with a CD-R drive, you can use ImageMixer to create a Video CD. Video CD Video CD On the first screen of ImageMixer or ImageMixer screen, click the Video CD button. [IMx VCD] screen appears. Video CD Click [Video CD]. The Menu/Layout screen - JVC DVP9 | Instruction Manual - Page 138
the player which conform with Video CD standard Version 2.0. ● The image quality may be deteriorated when you create Video CD with video captured from the camcorder via a USB cable. - JVC DVP9 | Instruction Manual - Page 139
EN 39 Appendix This appendix explains how to use a camcorder to hold a video conference over the Internet and how to load images into the PC that does not have a USB connector. This appendix also contains troubleshooting and index. - JVC DVP9 | Instruction Manual - Page 140
● You can download the latest version of Windows® NetMeeting® or MSN Messenger Service from Microsoft's web site: http://www.microsoft.com/ 2 Install [USB Video Streaming driver]. ● Refer to "Software Installation (Windows®)" (੬ pg. 5) in the Software Installation and USB Connection Guide. ● If the - JVC DVP9 | Instruction Manual - Page 141
pg. 9) in the Software Installation and USB Connection Guide. 3 Set the camcorder to the memory card recording mode. The camcorder is now on. " " appears on the camcorder's LCD monitor. ● If " " does not appear, install [USB Video Streaming driver]. Refer to "Software Installation (Windows®)" (੬ pg - JVC DVP9 | Instruction Manual - Page 142
pg. 9) in the Software Installation and USB Connection Guide. 5 Set the camcorder to the memory card recording mode. The camcorder is now on. " " appears on the camcorder's LCD monitor. ● If " " does not appear, install [USB Video Streaming driver]. Refer to "Software Installation (Windows®)" (੬ pg - JVC DVP9 | Instruction Manual - Page 143
Software Installation and USB Connection Guide. 3 Set the camcorder to the memory card recording mode. The camcorder is now on. " " appears on the camcorder's LCD monitor. ● If " " does not appear, install [USB Video Streaming driver]. Refer to "Software to the router's instruction manual. ● If you - JVC DVP9 | Instruction Manual - Page 144
files on a camcorder memory card by using an adapter (sold separately). Floppy disk adapter (CU-VFSD50) : For PCs that do not have a USB connector, or to use each specific type of adapter, refer to the instructions provided with that adapter. 1 Remove the memory card from the camcorder. 2 Insert - JVC DVP9 | Instruction Manual - Page 145
with Digital Sound Effect function, these files can not be used. 1 Open a memory card through the PC. ● Connect the camcorder to the PC with a USB cable referring to the Software Installation and USB Connection Guide. Or use an adapter (੬ pg. 44). 2 Load the CD-ROM into the PC. After the moment, the - JVC DVP9 | Instruction Manual - Page 146
connector. Make sure that the Universal Serial Bus controller is enabled on the [System Properties] sheet in the [Control Panel]. Software Installation and USB Connection Guide (੬ pg. 9) Cannot copy or save files. • Make sure that there is enough free space available in the drive where you are - JVC DVP9 | Instruction Manual - Page 147
correctly on the the camcorder. information display panel. REFER TO: - pg. 16 pg. 23 - - - - NOTE: When using a laptop PC, operation may be interrupted by a warning when the battery is nearly exhausted. ● If there is software which monitors the status of the battery running in the [StartUp - JVC DVP9 | Instruction Manual - Page 148
cable is connected securely. memory card in the • Either use a USB hub that has its own power supply, or camcorder. connect the USB cable directly to the PC's USB connector. Software Installation and USB Connection Guide (੬ pg. 13) Cannot copy or save files. • Make sure that there is enough - JVC DVP9 | Instruction Manual - Page 149
INDEX Windows® Adding still images to an album ........ 10 Changing the image size 22 Changing the picture quality, etc. ...... 23 Conducting a video conference over the Internet 40 Copying still images 18 Creating a list of still images 25 Creating a slide show or an animation 26 Creating a - JVC DVP9 | Instruction Manual - Page 150
COPYRIGHT© 2003 VICTOR COMPANY OF JAPAN, LTD. M3D7/D3/D1 1102-FO-ID Digital Photo Navigator ImageMixer with VCD
-
 1
1 -
 2
2 -
 3
3 -
 4
4 -
 5
5 -
 6
6 -
 7
7 -
8
-
9
-
10
-
11
-
12
-
13
-
14
-
15
-
16
-
17
-
18
-
19
-
20
-
21
-
22
-
23
-
24
-
25
-
26
-
27
-
28
-
29
-
30
-
31
-
32
-
33
-
34
-
35
-
36
-
37
-
38
-
39
-
40
-
41
-
42
-
43
-
44
-
45
-
46
-
47
-
48
-
49
-
50
-
51
-
52
-
53
-
54
-
55
-
56
-
57
-
58
-
59
-
60
-
61
-
62
-
63
-
64
-
65
-
66
-
67
-
68
-
69
-
70
-
71
-
72
-
73
-
74
-
75
-
76
-
77
-
78
-
79
-
80
-
81
-
82
-
83
-
84
-
85
-
86
-
87
-
88
-
89
-
90
-
91
-
92
-
93
-
94
-
95
-
96
-
97
-
98
-
99
-
100
-
101
-
102
-
103
-
104
-
105
-
106
-
107
-
108
-
109
-
110
-
111
-
112
-
113
-
114
-
115
-
116
-
117
-
118
-
119
-
120
-
121
-
122
-
123
-
124
-
125
-
126
-
127
-
128
-
129
-
130
-
131
-
132
-
133
-
134
-
135
-
136
-
137
-
138
-
139
-
140
-
141
-
142
-
143
-
144
-
145
-
146
-
147
-
148
-
149
-
150
 |
 |

LYT1147-001A
EN
ENGLISH
GR-DVP9
AUTOMATIC
DEMONSTRATION
9
GETTING STARTED
10
VIDEO RECORDING &
PLAYBACK
17
DIGITAL STILL CAMERA
(D.S.C.) RECORDING &
PLAYBACK
23
ADVANCED FEATURES
31
REFERENCES
64
TERMS
82
Please visit our Homepage on the World Wide
Web for Digital Video Camera:
For Accessories:
INSTRUCTIONS
DIGITAL VIDEO CAMERA