JVC GR-SXM260 Instruction Manual
JVC GR-SXM260 - Camcorder - 16 x Optical Zoom Manual
 |
View all JVC GR-SXM260 manuals
Add to My Manuals
Save this manual to your list of manuals |
JVC GR-SXM260 manual content summary:
- JVC GR-SXM260 | Instruction Manual - Page 1
COMPACT VHS CAMCORDER GR-SXM460A GR-SXM260A GR-SX210A GR-SXM46EA GR-SXM26EA GR-SX21EA VHS PAL 625 ENGLISH CONTENTS SAFETY PRECAUTIONS 2 - 3 MAJOR FEATURES 4 PROVIDED ACCESSORIES 5 GETTING STARTED 6 - 15 RECORDING 16 - 32 Basic Recording 16 Basic Features 18 Advanced Features 22 - JVC GR-SXM260 | Instruction Manual - Page 2
using the camcorder or AC adapter/charger under these conditions could lead to fire or electric shock. Contact your JVC dealer. Do not attempt to repair the malfunction yourself. Ⅲ To prevent shock, do not open the cabinet. No user serviceable parts inside. Refer servicing to qualified personnel - JVC GR-SXM260 | Instruction Manual - Page 3
**/V12U/V20U battery packs and, to recharge them, the provided multi-voltage AC Power Adapter/Charger. (An appropriate conversion adapter may be necessary to accommodate different designs of AC outlets in different countries.) * GR-SXM460A/SXM260A/SXM46EA/SXM26EA only. ** GR-SXM46EA/SXM26EA/SX21EA - JVC GR-SXM260 | Instruction Manual - Page 4
4 EN Integrated Auto Light (GR-SXM460A/SXM260A/ SXM46EA/SXM26EA only) (੬ pg. 20) Programme AE with Special Effects (੬ pg. 23) Ⅲ Electronic Fog Filter Ⅲ ND Effect Ⅲ Sepia Ⅲ Twilight Ⅲ Sports Ⅲ Nega/Posi Ⅲ 1/2000 sec. High Speed Shutter Super VHS-ET (੬ pg. 12) MAJOR FEATURES TBC (Time Base Corrector) - JVC GR-SXM260 | Instruction Manual - Page 5
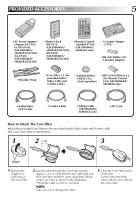
ACCESSORIES 5 EN •AC Power Adapter/ Charger AA-V16A or AA-V16AS (GR-SXM460A/ SXM260A/SX210A), AA-V16EA (GR-SXM46EA/ SXM26EA/SX21EA) •Battery Pack BN-V11U (GR-SXM460A/ SXM260A/SX210A), BN-V20U (GR-SXM46EA/ SXM26EA/SX21EA) •Remote Control Unit RM-V716U (GR-SXM460A/ SXM46EA only) •Cassette Adapter - JVC GR-SXM260 | Instruction Manual - Page 6
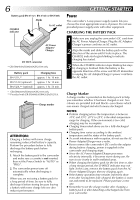
Marks CHARGE indicator To AC outlet AC Power Adapter/ Charger DC OUT connector * GR-SXM460A/SXM260A/SX210A only. Battery pack Charging time BN-V11U* approx. 1 hr. 10 min. BN-V12U (optional) approx. 1 hr. 10 min. BN-V20U** (optional) approx. 1 hr. 50 min. * GR-SXM460A/SXM260A/SX210A only - JVC GR-SXM260 | Instruction Manual - Page 7
Power Adapter/Charger. Read the VU-V856KIT's instruction manuals before using. It is impossible to charge the BN-V856U battery pack using the provided AC Power Adapter/ Charger. Use the optional AA-V80EG or AA-V80EA AC Power Adapter/Charger. 7 EN USING THE BATTERY PACK Hook its end to the camcorder - JVC GR-SXM260 | Instruction Manual - Page 8
power supply unit (battery pack, AC Power Adapter/Battery Charger, etc.). 2 Pull out the battery holder to remove it from the camcorder. 3 Insert the battery in the holder, and be sure to have the "+" mark visible. 4 Slide the holder back into the slot until you hear a click. NOTES: ● See "SAFETY - JVC GR-SXM260 | Instruction Manual - Page 9
DATE / T I ME J L I P I D NO. DEMO MODE OF F OF F ENGL I SH 06 OF F 4RE T URN Date/Time Settings 9 EN 1 Set the Power Switch to "PRO.". The power lamp comes on. 2 Press MENU. The Menu Screen appears. 3 time in the camcorder's display and on a connected TV, see "Date/Time Insert" (੬ pg. 27). - JVC GR-SXM260 | Instruction Manual - Page 10
playback picture will be blurred at the switching point. ● S-VHS/S-VHS ET recording is not possible when the recording mode is set to "LP" (੬ pg. 12, 26). Tape Length Setting Set the tape length according to the length of the tape used. 1 Set the Power Switch to "PRO.", then press MENU. 2 Rotate the - JVC GR-SXM260 | Instruction Manual - Page 11
holder is still open may cause damage to the LCD monitor (GR-SXM460A/SXM260A/SXM46EA/SXM26EA only). ● The cassette holder can't be opened unless a power supply is attached. ● Make sure that the tape is not tape. ● The cassette holder cannot be opened while the camcorder is in the record mode. - JVC GR-SXM260 | Instruction Manual - Page 12
). This is called Super VHS ET (Expansion Technology). OFF : Records in VHS. In the S-VHS Setting Menu, ON : Records in S-VHS on an S-VHS cassette (factory-preset). OFF : Records in VHS on an S-VHS cassette. 4 Press the Select Wheel to close the Menu Screen. •When the S-VHS ET mode is engaged, "S-ET - JVC GR-SXM260 | Instruction Manual - Page 13
back on this camcorder. Ⅲ Tapes recorded in S-VHS or S-VHS ET mode can be played back not only on this camcorder but also on a Super VHS VCR. - Tapes recorded in S-VHS ET mode cannot be played back on some VCRs, including some JVC VCRs. Ⅲ Tapes recorded in S-VHS or S-VHS ET mode cannot be played - JVC GR-SXM260 | Instruction Manual - Page 14
thumb and fingers can easily operate the Recording Start/Stop Button and Power Zoom Lever. Refasten the Velcro strip. Viewfinder Adjustment 1 Set the Power Switch to "CAMERA" ("AUTO" or "PRO."). 2 Adjust the viewfinder manually for best viewability. 3 Turn the Dioptre Adjustment Control until the - JVC GR-SXM260 | Instruction Manual - Page 15
's mounting socket and stud hole. Then tighten the screw. CAUTION: When using a tripod, be sure to open and extend its legs fully to Stabilise the camcorder. To prevent damage to the unit caused by falling over, do not use a small-sized tripod. - JVC GR-SXM260 | Instruction Manual - Page 16
LCD monitor is closed and locked (GR-SXM460A/SXM260A/SXM46EA/SXM26EA only). Turn the LENS COVER Open/Close Ring to open the lens cover. Set the Power Switch to "CAMERA" ("AUTO" or "PRO."). The power lamp lights and the camcorder enters the Record-Standby mode. "PAUSE" is displayed in the viewfinder - JVC GR-SXM260 | Instruction Manual - Page 17
pack remaining power indicator and tape length indicator (੬ pg. 56, 57). NOTE: Even if the indications are off, the tape remaining time appears blinking when the tape is near its end, and the battery pack remaining power indicator appears blinking when the power is almost gone. * GR-SXM460A/SXM260A - JVC GR-SXM260 | Instruction Manual - Page 18
Power Zoom Lever, the quicker the zoom action. NOTES: ● Focusing may become unstable during Zooming. In this case, set the zoom while in Record-Standby, lock the focus by using the manual focus (੬ pg. 31), then zoom in or out in Record mode when recording with the camcorder on a tripod. ● The " - JVC GR-SXM260 | Instruction Manual - Page 19
mode indicator (GR-SXM260A/SX210A/SXM26EA/SX21EA only) EN19 FEATURE: Quick Review PURPOSE: To check the end of the last recording. OPERATION: 1) Set the Power , and after 5-second recording is finished, the camcorder reenters the Record-Standby mode automatically. Ⅲ To cancel the 5Sec. Rec function - JVC GR-SXM260 | Instruction Manual - Page 20
nearest JVC dealer for replacing the video light. RECORDING Basic Features (cont.) FEATURE: Video Light (GR-SXM460A/ SXM260A/SXM46EA/ it off to save battery power. NOTES: ● Even if the battery indicator ( ) does not blink if the battery pack's charge is low, the camcorder may turn off automatically - JVC GR-SXM260 | Instruction Manual - Page 21
, or several of them in succession. 1 Set the Power Switch to "AUTO" or "PRO.". 2 Press SNAPSHOT. If you press during Record-Standby . . . .... a still image will be recorded for approx. 6 seconds, then the camcorder re-enters the Record-Standby mode. If you press during Recording . . . .... a still - JVC GR-SXM260 | Instruction Manual - Page 22
. Fade- or wipe-in works at recording start, and fade- or wipe-out works at recording end. 1 Set the Power Switch to "PRO.". 2 3 Press EFFECT repeatedly until the desired mode's name and indication appear. They are displayed for approx. 2 seconds, then the name disappears so that only the indication - JVC GR-SXM260 | Instruction Manual - Page 23
look misty white, as when an external fog filter is attached to the lens. Softens the image and gives it a "fantasy" look. TWILIGHT Dusk, Twilight mode is selected: •Auto gain control is turned off. •White Balance is set to " :FINE" (day mode), but can also be manually changed to another mode (੬ - JVC GR-SXM260 | Instruction Manual - Page 24
system that simplifies many of the more detailed camcorder settings. 1 Set the Power Switch to "PRO.". Select Wheel MENU Button NT . T I ME T I T LE LANG. DATE / T I ME J L I P I D NO. DEMO MODE OF F OF F CH I NESE 06 OF F 4RE T URN Normal Screen 2 Menu access depends on the function you - JVC GR-SXM260 | Instruction Manual - Page 25
"Manual White Balance Operation" (੬ pg. 32). OFF Does not display black bars. ON Allows you to record black bars at the top and bottom of the screen to produce a cinema-like "wide-screen" effect. If a snapshot (GR-SXM460A/SXM46EA only, ੬ pg. 21) is taken while the camcorder is in the WIDE mode - JVC GR-SXM260 | Instruction Manual - Page 26
device such as a computer using the J terminal (JLIP). The numbers range from 01 to 99. Factory setting is 06. ON Demonstrates certain functions such as Fade/Wipe, etc. When "DEMO MODE" is set to "ON" and the Menu Screen is closed, the demonstration starts. Operating the Power Zoom Lever during - JVC GR-SXM260 | Instruction Manual - Page 27
camcorder or on a connected colour monitor, as well as to record them manually or automatically. You should have already performed the Date/ Time Setting procedure (੬ pg. 9). Select Wheel Power move the highlight bar to the desired mode, then press it. The desired mode is activated. •To make the - JVC GR-SXM260 | Instruction Manual - Page 28
same object for a brief period of time. NOTES: Before performing the following steps, make sure that: ● The Power Switch is set to "PRO.". ● The camcorder is in the Record-Standby mode. ● The recording mode is set to "SP". 1 Press MENU. The Menu Screen appears. 2 Rotate the Select Wheel to move the - JVC GR-SXM260 | Instruction Manual - Page 29
spans. Leaving the camcorder aimed at a specific subject, you can record subtle changes over an extended period of time. NOTES: Before performing the following steps, make sure that: ● The Power Switch is set to "PRO.". ● The camcorder is in the Record-Standby mode. ● The recording mode is set to - JVC GR-SXM260 | Instruction Manual - Page 30
natural background such as at the beach or when skiing. •When the background is overly dark or the subject light. Power Switch 1 Set the Power Switch to "PRO.". Manual Exposure Screen 00 Exposure control level counter 2 Press the Select Wheel to display the Menu Screen. 3 Rotate the Select Wheel - JVC GR-SXM260 | Instruction Manual - Page 31
lens, zoom out first (੬ pg. 18). If zoomed in in the auto focus mode, the camcorder could automatically zoom out depending on the distance between the camcorder warning " " appears MANUAL FOCUS Make the necessary viewfinder adjustments to use the viewfinder (੬ pg. 14). 1 Set the Power Switch to "PRO - JVC GR-SXM260 | Instruction Manual - Page 32
. However, more advanced camcorder operators control this function manually to achieve a more professional colour/tint reproduction. 1 Set the Power Switch to "PRO.". result. ● Once you adjust white balance manually, the setting is retained even if the power is turned off or the battery removed. - JVC GR-SXM260 | Instruction Manual - Page 33
Stop (5) Button * GR-SXM460A/SXM260A/SXM46EA/SXM26EA only EN33 1 Load a tape (੬ pg. 11). 2 Set the Power Switch to "PLAY". To start playback, press 4/6. •To stop playback, press 5. •Press 2 to rewind, or 3 to fast-forward the tape during Stop mode. NOTES: ● The camcorder shuts off automatically - JVC GR-SXM260 | Instruction Manual - Page 34
Button Stop (5) Button (GR-SXM460A/SXM46EA only) CLASSIC camcorder enters the Auto Tracking mode and "AT" is displayed. ● Manual Tracking may not work with tapes recorded on other VCRs or camcorders Memory Function: Makes it easier to locate a specific tape segment. 1) Press COUNTER R/M and hold for - JVC GR-SXM260 | Instruction Manual - Page 35
PLAYBACK Using The Cassette Adapter EN35 Cassette Adapter Use this to play back an S-VHS-C/VHS-C video cassette recorded with this camcorder on a VHS VCR. It is fully compatible with any S-VHS/VHS video cassette recorder. The C-P7U adapter is battery powered and automatically performs tape - JVC GR-SXM260 | Instruction Manual - Page 36
. When making the connections, refer also to your VCR and TV instruction manuals. A. Connection to a TV or VCR equipped only with A/V input connectors Use the provided Audio/Video (A/V) cable. Yellow to Video Output A/V cable (provided) To TV or VCR Yellow to VIDEO White to Audio Output - JVC GR-SXM260 | Instruction Manual - Page 37
, referring to your VCR's instruction manual. 4 Turn on the camcorder, the VCR and the TV. 5 Set the VCR to its AUX input mode, and set the TV to its VIDEO mode. NOTES: ● It is recommended to use the AC Power Adapter/ Charger as the power supply instead of the battery pack (੬ pg. 7). ● If your VCR - JVC GR-SXM260 | Instruction Manual - Page 38
of your VCR. 1 0 2 ! 3 4 5 67 89 @ # $% ^& *( RM-V716U ) (provided with GR-SXM460A/ SXM46EA) Functions Buttons With the camcorder's Power Switch set to "CAMERA" ("AUTO" or "PRO."). With the camcorder's Power Switch set to "PLAY". 1 Infrared beam transmitting window Transmits the beam - JVC GR-SXM260 | Instruction Manual - Page 39
"CAMERA" ("AUTO" or "PRO."). - - Time-Lapse (੬ pg. 48) With the camcorder's Power Switch set to "PLAY". ੬ pg. 45 ੬ pg. 44 - Animation, Time-Lapse (੬ pg. 48) - Retake (forward) (੬ pg. 19) Retake (rewind), Quick Review (੬ pg. 19) - - Transmits the beam signal. Fast-Forward, Forward Shuttle Search - JVC GR-SXM260 | Instruction Manual - Page 40
Tab Installing The Batteries (RM-V716U , provided with GR-SXM460A/SXM46EA only) The remote control uses two "R03 (AAA)" size batteries. See "General Battery Precautions" (੬ pg. 49). 1 Open the battery compartment cover as when the remote sensor is directly exposed to sunlight or powerful lighting. - JVC GR-SXM260 | Instruction Manual - Page 41
Button PLAY PAUSE STOP EN41 Playback Zoom (GR-SXM460A/SXM46EA only) To magnify the recorded to perform this procedure. ● Make sure that the TBC mode is activated (੬ pg. 34). 1 Press PLAY to find . Make sure the remote control is pointed at the camcorder's remote sensor. Pressing T zooms in. To move - JVC GR-SXM260 | Instruction Manual - Page 42
perform this procedure. 1 Set the Power Switch to "PLAY". Power Switch COUNTER R/M Button Display w the Insert Editing mode is engaged. When the scene the camcorder is aimed at mode. 7 To end Insert Editing, press STOP (5). START/STOP REW INSERT PLAY PAUSE STOP RM-V716U (provided with OR GR - JVC GR-SXM260 | Instruction Manual - Page 43
indicator During Audio Dubbing Remote sensor Microphone RM-V716U (provided with GR-SXM460A/ SXM46EA only) REW A.DUB PLAY PAUSE STOP OR RM reaches "0:00:00", Audio Dubbing stops automatically and the camcorder enters the Audio Dub-Standby mode. 4 To end Audio Dubbing, press STOP (5). NOTES: - JVC GR-SXM260 | Instruction Manual - Page 44
GR 7 3 2 6 9 6 1 Create edited videos easily using your camcorder as the source player. You can select up to 8 "cuts" for manually. Before operation, make sure the lithium battery is installed in the remote control RM-V716U/RM- V700U (੬ pg. 40). SET REMOTE/VCR CODE 1 Turn off the power JVC VCRs and those - JVC GR-SXM260 | Instruction Manual - Page 45
THAN TYPE OR Connect the editing cable to the RM-V716U/RMV700U's PAUSE-IN connector. 2 Insert a recorded tape into the camcorder and set the Power Switch to "PLAY". 3 Turn the VCR power on, insert a recordable tape and engage the AUX mode (refer to the VCR's instructions). NOTE: If your VCR has an - JVC GR-SXM260 | Instruction Manual - Page 46
register it. •The data appears under "OUT" CANCEL ON/OFF RM-V716U (provided with OR GR-SXM460A/ SXM46EA only) RM-V700U (optional) Record-Pause mode is cancelled the scene is recorded in its entirety. ● Turning off the camcorder's power erases all registered in- and out-points. IN OUT 1 - JVC GR-SXM260 | Instruction Manual - Page 47
or manually engage the VCR's Record-Pause mode. 11 Press MENU on the camcorder to cable and the audio/video cable. NOTES: ● If you performed step 1 on page 45 ("MAKE CONNECTIONS"), keep the remote control pointed at the VCR during editing. ● The on-screen display only appears while the camcorder - JVC GR-SXM260 | Instruction Manual - Page 48
48 EN USING THE REMOTE CONTROL UNIT (cont.) 1M I N 1 / 2S Interval time indicator Recording time indicator Remote sensor START/STOP INT. TIME REC TIME RM-V700U (optional) FEATURE: Animation and Time-Lapse PURPOSE: The remote control lets you set/release Interval Time and Recording Time without - JVC GR-SXM260 | Instruction Manual - Page 49
shorten service life. ... avoid prolonged uncharged storage. ... remove from charger or powered unit when not in use, as some machines use current even when switched off. NOTES: ● It is normal for the battery pack to be warm after charging, or after use. Temperature Range Specifications Charging - JVC GR-SXM260 | Instruction Manual - Page 50
S-VHS-C or VHS-C safety, DO NOT . . . ... open the camcorder's chassis. ... disassemble or modify the unit. ... short-circuit the terminals of the battery pack battery pack or disconnect the power supply while the power is on. ... leave the battery pack attached when the camcorder the lens directed - JVC GR-SXM260 | Instruction Manual - Page 51
consult your local JVC dealer. EN51 For Your Maintenance 1. After Use 1 Set the Power Switch to "OFF" to turn off the camcorder. 2 Open the . 5 Slide BATTERY RELEASE to remove the battery pack. 6 Turn the LENS COVER Open/Close Ring to close the lens cover. 2. Cleaning The Camcorder 1 CLEAN EXTERIOR - JVC GR-SXM260 | Instruction Manual - Page 52
please consult your JVC dealer. The camcorder is a microcomputer-controlled device. External noise and interference (from a TV, a radio, etc.) might prevent it from functioning properly. In such cases, first disconnect its power supply unit (battery pack, AC Power Adapter/Battery Charger, etc.) and - JVC GR-SXM260 | Instruction Manual - Page 53
second to make the indications appear (੬ pg. 17). ● The battery pack is running low. ● If the LCD monitor is not open over 60 degrees, the EJECT Switch does not function. ● The Power Switch is set to "AUTO". ● Certain combinations of modes or effects are not possible to use. ● This sometimes occurs - JVC GR-SXM260 | Instruction Manual - Page 54
54 EN 1 i INDEX Controls, Connectors And Indicators 2 3 456 up E R q Y o we r W Q t & * y( T ) 7 8 9 0 ! @ # $ ^ % UI ) - JVC GR-SXM260 | Instruction Manual - Page 55
to a device such as a personal computer. For further details consult your nearest JVC dealer. •JLIP-controlled editing from camcorder to VCR is not possible if the VCR is not equipped with a J terminal. Indicators y Power Lamp pg. 16 Other Parts u Battery Pack Mount pg. 7 i Viewfinder pg. 14 - JVC GR-SXM260 | Instruction Manual - Page 56
pg. 19 @ Bright Level Indicator (GR-SXM460A/SXM260A/SXM46EA/ SXM26EA only pg. 16 # Instant Title Display pg. 27 $ Date/Time Display pg. 27 % Focus Indicator pg. 31 ^ Exposure Control Level Counter pg. 30 & White Balance Mode Indicator pg. 32 * S-VHS/S-VHS ET Recording Indicator ... ੬ pg. 12 - JVC GR-SXM260 | Instruction Manual - Page 57
(GR-SXM460A/SXM260A/SXM46EA/ SXM26EA only pg. 33 Indications TAPE END LENS COVER CONDENSATION OPERATION PAUSED PLEASE WAIT HEAD CLEANING REQUIRED USE CLEANING CASSETTE E01- E06 UNIT IN SAFEGUARD MODE REMOVE AND REATTACH BATTERY Function Displays the battery remaining power. Remaining power - JVC GR-SXM260 | Instruction Manual - Page 58
58 EN Camcorder SPECIFICATIONS General Format : S-VHS/VHS PAL standard Power source : DC 6.0 V Power consumption LCD monitor* off, viewfinder on : 4.2 W (GR-SXM460A/SXM260A/SXM46EA/SXM26EA) 3.7 W (GR-SX210A/SX21EA) LCD monitor* on, viewfinder off : 4.6 W (GR-SXM460A/SXM260A/SXM46EA/SXM26EA - JVC GR-SXM260 | Instruction Manual - Page 59
(W x H x D) Weight Accessory Cassette Adapter C-P7U : 188 mm x 25 mm x 104 mm : Approx. 240 g : "R6 (AA)"-size battery x 1 Optional Accessories •Battery Packs BN-V12U, BN-V20U, BN-V856U •Car Battery Charger BH-V3E •Compact S-VHS ( ) Cassettes SE-C45/30 •Compact VHS ( ) Cassettes EC-60/45 - JVC GR-SXM260 | Instruction Manual - Page 60
EN GR-SXM460A GR-SXM260A GR-SX210A GR-SXM46EA GR-SXM26EA GR-SX21EA VICTOR COMPANY OF JAPAN, LIMITED ®Registered Trademark owned by VICTOR COMPANY OF JAPAN, LTD. COPYRIGHT© 2000 VICTOR COMPANY OF JAPAN, LTD. A/EA Printed in Japan * * 0200MKV UN SN
-
 1
1 -
 2
2 -
 3
3 -
 4
4 -
 5
5 -
 6
6 -
 7
7 -
8
-
9
-
10
-
11
-
12
-
13
-
14
-
15
-
16
-
17
-
18
-
19
-
20
-
21
-
22
-
23
-
24
-
25
-
26
-
27
-
28
-
29
-
30
-
31
-
32
-
33
-
34
-
35
-
36
-
37
-
38
-
39
-
40
-
41
-
42
-
43
-
44
-
45
-
46
-
47
-
48
-
49
-
50
-
51
-
52
-
53
-
54
-
55
-
56
-
57
-
58
-
59
-
60
 |
 |

LYT0529-001A
EN
COMPACT
VHS CAMCORDER
INSTRUCTIONS
GR-SXM460A
GR-SXM260A
GR-SX210A
GR-SXM46EA
GR-SXM26EA
GR-SX21EA
VHS
PAL
625
ENGLISH
CONTENTS
SAFETY PRECAUTIONS
2 – 3
MAJOR FEATURES
4
PROVIDED ACCESSORIES
5
GETTING STARTED
6 – 15
RECORDING
16 – 32
Basic Recording
..........................
16
Basic Features
...........................
18
Advanced Features
......................
22
PLAYBACK
33 – 37
Basic Playback
...........................
33
Features
..................................
34
Using The Cassette Adapter
...........
35
Connections
...............................
36
USING THE REMOTE
CONTROL UNIT
38 – 48
Playback Zoom
..........................
41
Insert Editing
.............................
42
Audio Dubbing
...........................
43
Random Assemble Editing
..............
44
Animation And Time-Lapse
.............
48
CAUTIONS
49 – 51
TROUBLESHOOTING
52 – 53
INDEX
54 – 57
Controls, Connectors And
Indicators
...............................
54
Indications
................................
56
SPECIFICATIONS
58 – 59