JVC GY-DV500E Instruction Manual - Page 4

Precautions for Proper Use, OTHERS, Main Unit Configuration - gy dv500 manual

Page 4 highlights

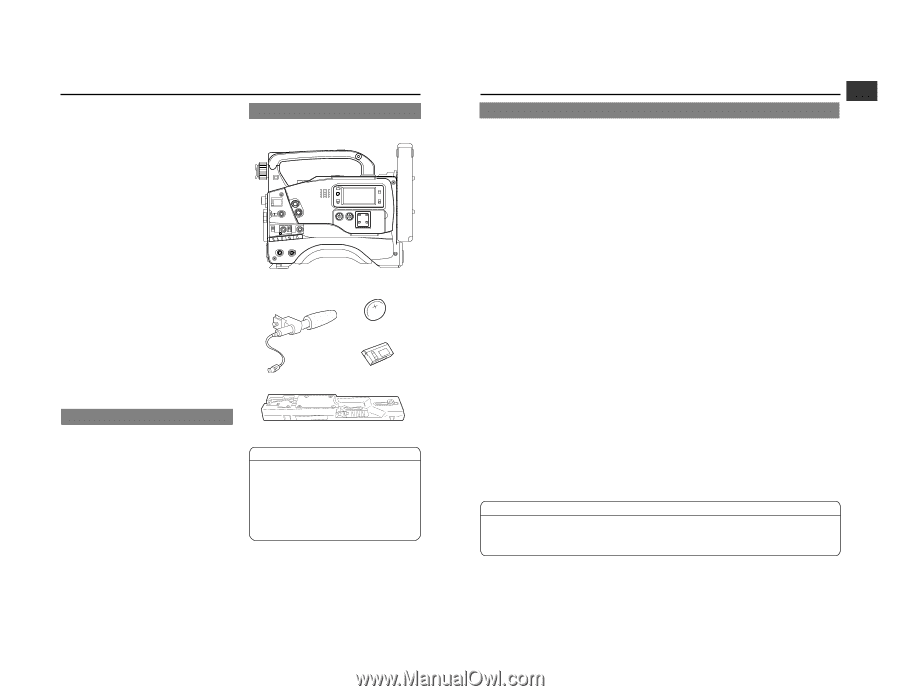
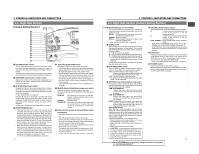
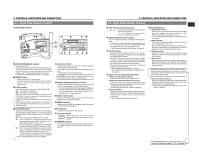
1. INTRODUCTION 11. USING EXTERNAL COMPONENTS 11-1 Connecting a Video Component with DV Connector 64 11-2 Connecting a PC 65 12. SETUP MENU 12-1 VCR Setup Menu 66 • VCR Setup Menu Configuration 66 • Displaying and Setting VCR Setup Menus 67 • VCR Setup Menu Contents 68 12-2 Camera Menu Screen Flow 70 12-3 How to Select from the Camera Menu 71 12-4 VF Display Screen 72 12-5 OPERATION Screen 73 12-6 PROCESS Screen 74 12-7 ADVANCED PROCESS Screen 75 12-8 SKIN COLOR ADJUST Screen 75 12-9 FILE MANAGE Screen 76 12-10 SETUP Screen 77 12-11 Resetting of Camera Menu Setting Values 78 13. FEATURES OF THE CAMERA SECTION 13-1 Full-Time Auto White Balance (FAW 79 13-2 IRIS (Brightness) Adjustment 80 • Adjustment of Lens Iris 80 • Zebra Pattern Display during Manual Adjustment ...... 80 13-3 Shooting the Screen Image on a Computer Monitor 81 13-4 Gain (Sensitivity) Adjustment 82 • Gain Switching 82 • Gain Boost under LOLUX Condition 82 13-5 Switch Setup According to Illumination and Subject 83 • Switch Functions 83 • Full Auto Shooting (FAS) Function 83 13-6 How to Use Skin Detail 84 1. INTRODUCTION 1-1 Main Unit Configuration The GY-DV500 configuration is as shown below. FILTER 1 3200k 2 5600k 3 5600k+ND SHUTTER STATUS MENU ALARM MONITOR AUTO IRIS FULL AUTO BLACK BACK L NORMAL SPOT L STRETCH NORMAL COMPRESS LOLUX PRST A B AUTOFOFKNEE BARS CAM ON HML SAVE STBY VTR GAIN OUTPUT WHT.BAL NG POWER ON OFF OPERATE/WARNING RESET MONITOR SELECT CH-1 AUDIO CH-2 LEVEL LIGHT ON OFF COUNTER CTL TC UB Camcorder (GY-DV500) Microphone CR230V32 Lithium battery Head cleaning tape OTHERS 14. OTHERS 14-1 Troubleshooting 86 • Alarm Indications 86 • Warnings in Viewfinder 88 • Troubles with Error Code Outputs 90 • Troubles without Error Code Outputs 91 14-2 Hour Meter Display 92 14-3 Specifications 93 • Optional Accessories 94 • External Dimensions 94 Tripod base CAUTION : ● The front base mount may be locked while the pin of the tripod base is not inserted into the hole on the rear base mount of the unit. Therefore, after mounting, make sure that these parts are engaged properly. ● When moving the GY-DV500 mounted on a tripod, any impact or vibration should be avoided as this may cause the unit to become detached and to drop from the tripod. Be sure to remove the unit from the tripod before transporting it. 1. INTRODUCTION 1-2 Precautions for Proper Use ● Supply voltage Make sure that the power is between 11 V and 15 V DC. If the power voltage is too low, abnormal color and increased noise may occur. Do not exceed 15 V DC in any case, or the unit could be damaged. ● Allowable ambient temperature and humidity Be sure to use the unit within the allowable temperature range of 0°C to 40°C and a relative humidity of 30% to 80%. Using the unit at a temperature or humidity outside the allowable ranges could result not only in malfunction but the impact on the CCD elements could be serious as small white spots may be generated. When storing the GY-DV500 for a long time, the storage temperatures should be -20°C to 60°C. ● Strong electromagnetic waves or magnetism Where there are strong electromagnetic waves or magnetism, for example near a radio or TV transmitter, transformer, motor, etc., the picture may contain noise and the colors may be incorrect. ● Use of wireless microphone near the camera When a wireless microphone or wireless microphone tuner is used near the camera during recording, the tuner could pick up noise. ● Avoid using or placing the unit in places; • subject to extreme heat or cold; • with excessive dirt or dust; • with high humidity or moisture; • subject to smoke or vapour such as near a cooking stove; • subject to strong vibrations or on an unstable surface. • also do not leave the unit for long hours in a parked car under direct sunlight or near room heating equipment. ● Protect the unit from being splashed with water (especially when shooting in the rain). ● Protect the unit from being wet when shooting on a beach. In addition, salt and sand may adhere to the camera body. Be sure to clean the camera after use. ● Protect the unit against penetration of dust when using it in a place subject to sandy dust. ● Optical performance of lens Due to the optical performance of the lens, color divergence phenomena (magnification chromatic aberration) may occur at the periphery of the image. This is not a camera malfunction. ● Noise may appear in the viewfinder when switching between the playback picture and the EE picture. ● Setup level (NTSC only) The video signal of the unit's video output is provided with a setup level when shipped from the factory. If you want to turn OFF the setup level, please consult the person in charge of professional video equipment at your nearest JVC-authorized service agent. The setup level is never attached to the video signal recorded on the tape. ● Use the unit in an upright position. If placed on its side, heat release efficiency will deteriorate, adversely affecting the tape transport. Depending on circumstances the tape may also be damaged. ● Vibrations Colors may fail to appear during VCR playback in locations subjected to vibrations. ● Precautions for transportation Do not drop or hit the unit against a hard object. ● Remove the videocassette before transporting the unit. ● Do not insert an object other than a videocassette in the cassette insertion slot. Be sure to close the cassette cover when the unit is not to be used for a long period ● Do not set the POWER switch to OFF or remove the power cable during recording or playback. Otherwise the tape may be damaged. ● When the unit is not in use, be sure to set the POWER switch to OFF in order to reduce power consumption. ● Cleaning the body: Wipe body with a dry, soft cloth. When it is extremely dirty, soak the cloth in a solution of neutral detergent, wring it out and then wipe. To prevent deformation of the body, etc. and to avoid operation hazards, do not allow volatile liquids such as benzine and thinner to touch the body, and do not wipe it with a cloth soaked in such a liquid. ● The camera may be unstable in the period immediately after the power is turned on, but this is not a malfunction. ● If a tape containing recorded PAL signals is played back, the GY-DV500 automatically enters the STOP mode. If this happens, remove the videocassette so that the unit returns to its normal state. (U-ver.) ● If a tape containing recorded NTSC signals is played back, the GY-DV500 automatically enters the STOP mode. If this happens, remove the videocassette so that the unit returns to its normal state. (E-ver.) CAUTION : ● Do not point the lens or viewfinder directly at the sun or other strong light source. • Eye damage could result. • If the lens or viewfinder is left pointed at the sun, rays may collect inside the unit and cause damage or a fire. ● When carrying the camera, be sure to hold the carrying handle. Holding the lens or viewfinder may result in damage. 6 7

  • 1
  • 2
  • 3
  • 4
  • 5
  • 6
  • 7
  • 8
  • 9
  • 10
  • 11
  • 12
  • 13
  • 14
  • 15
  • 16
  • 17
  • 18
  • 19
  • 20
  • 21
  • 22
  • 23
  • 24
  • 25
  • 26
  • 27
  • 28
  • 29
  • 30
  • 31
  • 32
  • 33
  • 34
  • 35
  • 36
  • 37
  • 38
  • 39
  • 40
  • 41
  • 42
  • 43
  • 44
  • 45
  • 46
  • 47
  • 48

7
1. INTRODUCTION
6
1. INTRODUCTION
1-2
Precautions for Proper Use
Do not point the lens or viewfinder directly at the sun or other strong light source.
Eye damage could result.
If the lens or viewfinder is left pointed at the sun, rays may collect inside the unit and cause damage or a fire.
When carrying the camera, be sure to hold the carrying handle. Holding the lens or viewfinder may result in damage.
CAUTION :
Supply voltage
Make sure that the power is between 11 V and 15 V DC. If
the power voltage is too low, abnormal color and increased
noise may occur. Do not exceed 15 V DC in any case, or the
unit could be damaged.
Allowable ambient temperature and humidity
Be sure to use the unit within the allowable temperature range
of 0
°
C to 40
°
C and a relative humidity of 30% to 80%. Using
the unit at a temperature or humidity outside the allowable
ranges could result not only in malfunction but the impact on
the CCD elements could be serious as small white spots
may be generated. When storing the GY-DV500 for a long
time, the storage temperatures should be -20
°
C to 60
°
C.
Strong electromagnetic waves or magnetism
Where there are strong electromagnetic waves or magnetism,
for example near a radio or TV transmitter, transformer, motor,
etc., the picture may contain noise and the colors may be
incorrect.
Use of wireless microphone near the camera
When a wireless microphone or wireless microphone tuner
is used near the camera during recording, the tuner could
pick up noise.
Avoid using or placing the unit in places;
subject to extreme heat or cold;
with excessive dirt or dust;
with high humidity or moisture;
subject to smoke or vapour such as near a cooking stove;
subject to strong vibrations or on an unstable surface.
also do not leave the unit for long hours in a parked car
under direct sunlight or near room heating equipment.
Protect the unit from being splashed with water (especially
when shooting in the rain).
Protect the unit from being wet when shooting on a beach.
In addition, salt and sand may adhere to the camera body.
Be sure to clean the camera after use.
Protect the unit against penetration of dust when using it in a
place subject to sandy dust.
Optical performance of lens
Due to the optical performance of the lens, color divergence
phenomena (magnification chromatic aberration) may occur
at the periphery of the image. This is not a camera
malfunction.
Noise may appear in the viewfinder when switching between
the playback picture and the EE picture.
Setup level (NTSC only)
The video signal of the unit's video output is provided with a
setup level when shipped from the factory. If you want to turn
OFF the setup level, please consult the person in charge of
professional video equipment at your nearest JVC-authorized
service agent. The setup level is never attached to the video
signal recorded on the tape.
Use the unit in an upright position.
If placed on its side, heat release efficiency will deteriorate,
adversely affecting the tape transport. Depending on
circumstances the tape may also be damaged.
Vibrations
Colors may fail to appear during VCR playback in locations
subjected to vibrations.
Precautions for transportation
Do not drop or hit the unit against a hard object.
Remove the videocassette before transporting the unit.
Do not insert an object other than a videocassette in the
cassette insertion slot. Be sure to close the cassette cover
when the unit is not to be used for a long period
Do not set the POWER switch to OFF or remove the power
cable during recording or playback. Otherwise the tape may
be damaged.
When the unit is not in use, be sure to set the POWER switch
to OFF in order to reduce power consumption.
Cleaning the body: Wipe body with a dry, soft cloth. When it is
extremely dirty, soak the cloth in a solution of neutral
detergent, wring it out and then wipe. To prevent deformation
of the body, etc. and to avoid operation hazards, do not allow
volatile liquids such as benzine and thinner to touch the body,
and do not wipe it with a cloth soaked in such a liquid.
The camera may be unstable in the period immediately after
the power is turned on, but this is not a malfunction.
If a tape containing recorded PAL signals is played back, the
GY-DV500 automatically enters the STOP mode. If this
happens, remove the videocassette so that the unit returns
to its normal state. (U-ver.)
If a tape containing recorded NTSC signals is played back,
the GY-DV500 automatically enters the STOP mode. If this
happens, remove the videocassette so that the unit returns
to its normal state. (E-ver.)
14. OTHERS
14-1 Troubleshooting
........................................................
86
Alarm Indications
...................................................
86
Warnings in Viewfinder
...........................................
88
Troubles with Error Code Outputs
..........................
90
Troubles without Error Code Outputs
.....................
91
14-2
Hour Meter Display
..................................................
92
14-3 Specifications
...........................................................
93
Optional Accessories
.............................................
94
External Dimensions
..............................................
94
11. USING EXTERNAL COMPONENTS
11-1
Connecting a Video Component with DV Connector
64
11-2
Connecting a PC
......................................................
65
12. SETUP MENU
12-1
VCR Setup Menu
.....................................................
66
VCR Setup Menu Configuration
.............................
66
Displaying and Setting VCR Setup Menus
.............
67
VCR Setup Menu Contents
....................................
68
12-2
Camera Menu Screen Flow
.....................................
70
12-3
How to Select from the Camera Menu
.....................
71
12-4
VF Display Screen
...................................................
72
12-5
OPERATION Screen
................................................
73
12-6
PROCESS Screen
...................................................
74
12-7
ADVANCED PROCESS Screen
...............................
75
12-8
SKIN COLOR ADJUST Screen
................................
75
12-9
FILE MANAGE Screen
.............................................
76
12-10
SETUP Screen
.........................................................
77
12-11
Resetting of Camera Menu Setting Values
..............
78
13. FEATURES OF THE CAMERA SECTION
13-1
Full-Time Auto White Balance (FAW)
.......................
79
13-2
IRIS (Brightness) Adjustment
...................................
80
Adjustment of Lens Iris
..........................................
80
Zebra Pattern Display during Manual Adjustment
......
80
13-3
Shooting the Screen Image on a Computer Monitor
81
13-4
Gain (Sensitivity) Adjustment
...................................
82
Gain Switching
.......................................................
82
Gain Boost under LOLUX Condition
......................
82
13-5
Switch Setup According to Illumination and Subject
83
Switch Functions
....................................................
83
Full Auto Shooting (FAS) Function
.........................
83
13-6
How to Use Skin Detail
............................................
84
OTHERS
LIGHT
ON
OFF
COUNTER
CTL
TC
UB
RESET
OPERATE/WARNING
MONITOR
SELECT
STATUS
SHUTTER
MENU
FILTER
1
3200k
2
5600k
3
5600k+ND
POWER
NG
GAIN
OUTPUT
WHT.BAL
VTR
ON
OFF
ALARM
MONITOR
CH-1
CH-2
AUDIO
LEVEL
Camcorder (GY-DV500)
The GY-DV500 configuration is as shown below.
The front base mount may be locked while the pin of the
tripod base is not inserted into the hole on the rear base
mount of the unit. Therefore, after mounting, make sure
that these parts are engaged properly.
When moving the GY-DV500 mounted on a tripod, any
impact or vibration should be avoided as this may cause
the unit to become detached and to drop from the tripod.
Be sure to remove the unit from the tripod before
transporting it.
1-1
Main Unit Configuration
CAUTION :
CR2032
3V
Lithium battery
Microphone
1.
INTRODUCTION
Head cleaning tape
Tripod base