JVC GZX900US Instructions - Page 16
Necessary Settings before Use, Charging the Battery Pack, Date/Time Setting - everio
 |
UPC - 046838039515
View all JVC GZX900US manuals
Add to My Manuals
Save this manual to your list of manuals |
Page 16 highlights
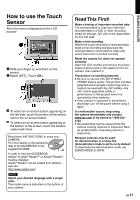
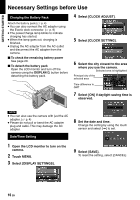
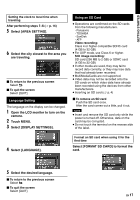
GETTING STARTED Necessary Settings before Use Charging the Battery Pack Attach the battery pack.(Z p. 4) • You can also connect the AC adapter using the Everio dock connector. (Z p. 9) • The power/charge lamp blinks to indicate charging has started. • When the lamp goes out, charging is finished. • Unplug the AC adapter from the AC outlet and disconnect the AC adapter from the camera. To check the remaining battery power See page 20. To detach the battery pack Open the LCD monitor and turn off the camera using the DISPLAY/< button before detaching the battery pack. 4 Select [CLOCK ADJUST]. 5 Select [CLOCK SETTING]. 6 Select the city closest to the area where you use the camera. Selected area is highlighted Principal city of the selected area Time difference to GMT 7 Select [ON] if daylight saving time is observed. NOTE • You can also use the camera with just the AC adapter. (Z p. 4) • Please do not pull or bend the AC adapter plug and cable. This may damage the AC adapter. Date/Time Setting 8 Set the date and time. Change the setting by using the touch sensor and select [&] to set. 1 Open the LCD monitor to turn on the camera. 2 Touch MENU. 3 Select [DISPLAY SETTINGS]. 9 Select [SAVE]. To reset the setting, select [CANCEL]. 16 EN
-
 1
1 -
2
-
3
-
4
-
5
-
6
-
7
-
8
-
9
-
10
-
 11
11 -
 12
12 -
 13
13 -
 14
14 -
 15
15 -
 16
16 -
 17
17 -
 18
18 -
 19
19 -
 20
20 -
 21
21 -
22
-
23
-
24
-
25
-
26
-
27
-
28
-
29
-
30
-
31
-
32
-
33
-
34
-
35
-
36
-
37
-
38
-
39
-
40
-
41
-
42
-
43
-
44
-
45
-
46
-
47
-
48
-
49
-
50
-
51
-
52
-
53
-
54
-
55
-
56
-
57
-
58
-
59
-
60
-
61
-
62
-
63
-
64
-
65
-
66
-
67
-
68
-
69
-
70
-
71
-
72
-
73
-
74
-
75
-
76
-
77
-
78
-
79
-
80
-
81
-
82
-
83
-
84
-
85
-
86
-
87
-
88
 |
 |
