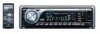
JVC KD-DV7300 Instructions
JVC KD-DV7300 - DVD Player With AM/FM Tuner Manual
 |
UPC - 046838028298
View all JVC KD-DV7300 manuals
Add to My Manuals
Save this manual to your list of manuals |
JVC KD-DV7300 manual content summary:
- JVC KD-DV7300 | Instructions - Page 1
FRANÇAIS ESPAÑOL ENGLISH DVD/CD RECEIVER KD-ADV7380/KD-DV7300 RECEPTOR CON DVD/CD KD-ADV7380/KD-DV7300 RÉCEPTEUR DVD/CD KD-ADV7380/KD-DV7300 For canceling the display demonstration, see page 7. Para cancelar la demostración en pantalla, consulte la página 7. Pour annuler la démonstration des - JVC KD-DV7300 | Instructions - Page 2
or an experienced radio/TV technician for help. Caution Changes or modifications not approved by JVC could void the user's authority to operate the equipment. IMPORTANT FOR LASER PRODUCTS 1. CLASS 1 LASER PRODUCT 2. CAUTION: Do not open the top cover. There are no user serviceable parts inside the - JVC KD-DV7300 | Instructions - Page 3
Your preset adjustments will also be erased (except the registered Bluetooth device, see page 29). How to forcibly eject a disc appears only when the parking brake wire is connected to the parking brake system built in the car (refer to the Installation/Connection Manual). • Be careful not to drop - JVC KD-DV7300 | Instructions - Page 4
is prohibited. KD-ADV7380 is equipped with the steering wheel remote control function. • See the Installation/Connection Manual (separate volume) for connection. Caution for DualDisc playback The Non-DVD side of a "DualDisc" does not comply with the "Compact Disc Digital Audio" standard. Therefore - JVC KD-DV7300 | Instructions - Page 5
the remote controller (RM-RK241 9 Listening to the radio 12 Disc operations 13 Listening to the USB device 26 Dual Zone operations 28 EXTERNAL DEVICES Using the Bluetooth® devices 29 • Using the Bluetooth cellular phone 31 • Using the Bluetooth audio player 33 Listening to the CD changer - JVC KD-DV7300 | Instructions - Page 6
2, Romeo, Joliet DVD-Video DVD-VR (non-CPRM only) DivX/MPEG-1/MPEG-2 Video MP3/WMA/AAC *4/WAV DVD+VR JPEG/MPEG4 DVD-RAM All Dual Disc DVD side Non-DVD side CD/VCD Audio CD/CD Text (CD-DA)/DTS-CD *5 VCD (Video CD) CD-ROM CD-I (CD-I Ready) CD Recordable/Rewritable (CD-R/-RW) • Compliant - JVC KD-DV7300 | Instructions - Page 7
ENGLISH Preparation Cancel the display demonstration and set the clock • See also page 42. When the power is turned off: Check the current clock time When the power is turned on: Change the display information ~ Ÿ ! ] ⁄ @ Turn on the power. Enter the PSM settings. Cancel the display - JVC KD-DV7300 | Instructions - Page 8
XM * = DISC * = USB = CD-CH */IPOD */D.PLAYER * (or EXT IN) = BT-PHONE (Bluetooth Phone) * = BT-AUDIO (Bluetooth Audio) * = LINE IN = (back to the beginning) * You cannot select these sources if they are not ready or not connected. 2 • FM/AM/SIRIUS/XM . 8 USB (Universal Serial Bus) input terminal 9 - JVC KD-DV7300 | Instructions - Page 9
6 Playback mode/item indicators (Random/Repeat) 7 Equalizer indicator 8 Bluetooth indicator 9 Dual Zone indicator p Main display (Time, menu, playback using the remote controller: • Aim the remote controller directly at the remote sensor on the unit. • DO NOT expose the remote sensor to bright - JVC KD-DV7300 | Instructions - Page 10
it. IMPORTANT: If Dual Zone is activated (see page 28), the remote controller only functions for operating the DVD/CD player. EXTRA MONITOR 1 Monitor control buttons • Used for a JVC monitor-KV-MR9010, KV-MH6510, or KV-M706. DVD/RECEIVER 2 • Turns the power on if pressed briefly or attenuates the - JVC KD-DV7300 | Instructions - Page 11
/ # : DivX/MPEG Video: Searches for index held. during play. For advanced disc/USB operations: • DISC +/-: Changes discs when the source is • 5/∞: "CD-CH." DVD-Video: Selects the titles. y *1 RETURN button DVD-VR: Selects the programs. u • DVD-Video: Selects audio language ( ), USB/other - JVC KD-DV7300 | Instructions - Page 12
ENGLISH Listening to the radio Select preset station. Change the display information ~ Select "FM/AM." Ÿ Select the bands. Lights up when receiving an FM stereo broadcast with sufficient signal strength. ! Search for a station to listen-Auto Search. Manual Search: Hold either one of the buttons - JVC KD-DV7300 | Instructions - Page 13
playback by referring to the monitor screen. (See also pages 21 - 25.) The disc type is automatically detected, and playback starts automatically (for DVD: automatic start depends on its internal program). If the current disc does not have any disc menu, all tracks will be played repeatedly until - JVC KD-DV7300 | Instructions - Page 14
ENGLISH Operations using the control panel *1 During stop: Locate title *1 During play/pause: Locate chapter Select title Elapsed playing time = Clock = Current title and chapter number = (back to the beginning) Press: Select chapter Hold: Reverse/fast-forward chapter *2 *1 During stop: Locate - JVC KD-DV7300 | Instructions - Page 15
ENGLISH *1 Locate particular folder directly Select folder Elapsed playing time = Clock = Folder number = Track title = (back to the beginning) Press: Select track Hold: Reverse/fast-forward track *2 *1 Locate particular track directly (PBC not in use) Elapsed playing time and Current track - JVC KD-DV7300 | Instructions - Page 16
), folder name and file name appear. TAG indicator will not light up. *3 Search speed changes to ×2 ] ×10 on the monitor. *4 "NO NAME" appears for an audio CD. 16 - JVC KD-DV7300 | Instructions - Page 17
ENGLISH After pressing , press the following buttons to... Disc type Skip 10 chapters* Skip 10 chapters* Skip 10 tracks (within the same folder) CHP RPT: Repeat current chapter - TIT RPT: Repeat current title CHP RPT: Repeat current chapter PRG RPT: Repeat current program (not - - JVC KD-DV7300 | Instructions - Page 18
ENGLISH Operations using the remote controller-RM-RK241 : Stop play : Pause (Frame by frame playback : Select chapter *3 Hold: Reverse/fast-forward chapter search *4 : Select title : Select audio language : Select subtitle language : Select view angle To search for chapter/title directly 1 Select - JVC KD-DV7300 | Instructions - Page 19
/fast-forward track search *7 : Select folder : • Return/advance the scenes by about 5 minutes (Index search). • Select chapter. : DivX: Select subtitles language : DivX: Select audio language To search for track (within the same folder)/folder directly 1 Select track/folder search. + 2 Enter the - JVC KD-DV7300 | Instructions - Page 20
not 3 work.) • To return to the previous menus, press . : Press: Select track *3 Hold: Reverse/fast-forward track search *4 : Select audio channel Canceling the PBC playback... 1 2 + (ST: stereo, L: left, R: Right) 3 Enter the desired number. + 4 • To resume PBC, press / . : Stop play - JVC KD-DV7300 | Instructions - Page 21
2 Move the enlarged portion. • To cancel zoom, select "ZOOM OFF." Operations using the on-screen bar (DVD/DVD-VR/DivX/MPEG Video/VCD) These operations are possible on the monitor using the remote controller. ~ Show the on-screen bar (see page 22). (twice) Ÿ Select an item. ! Make a selection. If - JVC KD-DV7300 | Instructions - Page 22
bar Ex.: DVD-Video Information Operation 1 Disc type 2 • DVD-Video/DVD-VR/DTS-CD: Audio signal format type and channel • VCD: PBC 3 Playback mode *1 DVD-Video: T. RPT: Title repeat C. RPT: Chapter repeat DVD-VR: C. RPT: Chapter repeat PG. RPT: Program repeat DivX/MPEG Video: T. RPT: Track - JVC KD-DV7300 | Instructions - Page 23
ENGLISH Operations using the control screen (DivX/MPEG Video/MP3/WMA/AAC/WAV/ CD) These operations are possible on the monitor using the remote controller. ~ Show the control screen. DivX/MPEG Video: Press during play. MP3/WMA/AAC/WAV/CD: Automatically appear during play. Ÿ Select "Folder" column - JVC KD-DV7300 | Instructions - Page 24
play all tracks of current folder, then tracks of next folders Operations using the list screen (DVD-VR/DivX/MPEG Video/MP3/WMA/AAC/ WAV) These operations are possible on the monitor using the remote controller. Before playing, you can display the folder list/track list to confirm the contents and - JVC KD-DV7300 | Instructions - Page 25
can use ORIGINAL PROGRAM or PLAY LIST screen anytime while playing DVD-VR with its data recorded. 1 Select a list screen. 2 Select an item from the list. 1 Program/playlist number 2 Recording date 3 Recording source (TV station, the input terminal of the recording equipment, etc.) 4 Start time of - JVC KD-DV7300 | Instructions - Page 26
mass storage class device such as a USB memory, Digital Audio Player (USB mass storage class device), portable HDD, etc. to the unit. Attaching a USB memory USB input terminal USB memory This unit can play DivX/MPEG Video/MP3/WMA/AAC*/WAV tracks stored in a USB device. * This unit can play back AAC - JVC KD-DV7300 | Instructions - Page 27
on the display. • Do not start the car engine if a USB device is connected. • Stop play back before disconnecting a USB device. • This unit may not be able to play the files depending on the type of USB device. • You cannot connect a computer to the USB input terminal of the unit. • Make sure all - JVC KD-DV7300 | Instructions - Page 28
2nd AUDIO OUT plug on the rear, and play back a disc separately from the source selected on the unit. You cannot select "AM" or "USB" as the source when Dual Zone is activated. • When Dual Zone is in use, you can only operate the DVD/CD player using the remote controller. On the remote controller - JVC KD-DV7300 | Instructions - Page 29
39. • Refer also to the instructions supplied with the Bluetooth adapter and the Bluetooth device. • Refer to the list (included in the box) to see the countries where you may use the Bluetooth® function. To use a Bluetooth device through the unit ("BT-PHONE" and "BT-AUDIO") for the first time, you - JVC KD-DV7300 | Instructions - Page 30
. Connecting/disconnecting a registered device 1 Select "BT-PHONE" or "BT-AUDIO." Searching for available devices Perform steps 1 and 2 on page 29, then the specific PIN code of the device to the unit. • Refer to the instructions supplied with the device to check the PIN code. 4 Use the Bluetooth - JVC KD-DV7300 | Instructions - Page 31
display information ~ Select "BT-PHONE." Ÿ Enter Bluetooth menu. ! Make a call or setting using the Bluetooth setting menu. (See pages 32 and 46.) is set to "AUTO" (see page 46), the unit rings and "RCV MSG" (receiving message) appears on the display to inform you the arrival of the message. To end - JVC KD-DV7300 | Instructions - Page 32
Phone book Direct dialing Display the Dial Menu. Select a call history. REDIAL, RECEIVED, MISSED Select "PH BOOK." The list of phone number appears. Select "NUMBER." • If your cellular phone does not support the voice recognition system, "ERROR" appears on the display. Preset phone number See page - JVC KD-DV7300 | Instructions - Page 33
playback did not start automatically, operate the Bluetooth audio player to start playback. • Refer also to page 30 for connecting/disconnecting/deleting a registered device. Bluetooth Information: If you wish to receive more information about Bluetooth, visit our JVC web site. EXTERNAL DEVICES 33 - JVC KD-DV7300 | Instructions - Page 34
rear of the unit. See also page 39. • You can only play conventional CDs (including CD Text) and MP3 discs. Preparation Make sure "CHANGER" is selected for the external input setting, see page 43. ~ Select "CD-CH." Ÿ Select a disc to start playing. Press: For selecting disc number 1 - 6. Hold: For - JVC KD-DV7300 | Instructions - Page 35
either one of the following (separately purchased) to the CD changer jack on the rear of this unit. • JVC SIRIUS radio DLP-Down Link Processor, for listening to the SIRIUS Satellite radio. • XMDirect™ Universal Tuner Box-Using a JVC Smart Digital Adapter (XMDJVC100: not supplied), for listening to - JVC KD-DV7300 | Instructions - Page 36
Ex.: Storing channels into preset number 4 1 Tune in to a channel you want. 2 Checking the XM Satellite radio ID While selecting "XM1," "XM2," or "XM3," select "Channel 0." The display alternately shows "RADIO ID" and the 8-digit (alphanumeric) ID number. To cancel the ID number display, select any - JVC KD-DV7300 | Instructions - Page 37
to the CD changer jack on the rear of the unit. See also page 39. • Interface adapter for iPod-KS-PD100 for controlling an iPod. • player. Preparation Make sure "CHANGER" is selected for the external input setting, see page 43. ~ Select "IPOD" or "D. PLAYER." Ÿ Select a song to start playing. - JVC KD-DV7300 | Instructions - Page 38
Functions the same as "Repeat One" of the iPod or "Repeat Mode = One" of the D. player. Functions the same as "Repeat All" of the iPod or "Repeat Mode = All" of the to: • CD changer jack on the rear of this unit using the following adapters: - Line Input Adapter, KS-U57 - AUX Input Adapter, KS-U58 - JVC KD-DV7300 | Instructions - Page 39
the "EXT IN" setting) MD player, etc., [38] SIRIUS Satellite radio (JVC DLP), [35] XM Satellite radio, [35] MD player, etc., [38] MD player, etc., [38] SIRIUS Satellite radio (JVC PnP) JVC CD changer, [34] Apple iPod, [37] JVC D. player, [37] : Adapter (separately purchased) EXTERNAL DEVICES 39 - JVC KD-DV7300 | Instructions - Page 40
Selecting a preset sound mode ENGLISH Preset frequency level settings: Sound mode USER ROCK CLASSIC POPS HIP HOP JAZZ 60 Hz 150 Hz 00 00 +03 +02 +01 +03 00 +02 +04 +01 +03 +02 Preset equalizing values 400 Hz 1 kHz 2.5 kHz 00 00 00 00 00 +01 +01 00 00 00 00 00 -01 -02 00 - JVC KD-DV7300 | Instructions - Page 41
ENGLISH Adjusting the sound 1 2 Adjust the level. General settings-PSM You can change PSM (Preferred Setting Mode) items listed in the table on pages 42 and 43. 1 Enter the PSM settings. FAD *1 (fader) Adjust the front and rear speaker balance. R06 to F06 BAL (balance) Adjust the left and right - JVC KD-DV7300 | Instructions - Page 42
key of your car, it is recommended to select "OFF" to save the car's battery. *2 Displayed only when SIRIUS Satellite radio or XM Satellite radio is connected. *3 Displayed only when "CLK ADJ" is set to "AUTO." *4 Displayed only when SIRIUS Satellite radio is connected. *5 Only for KD-ADV7380. 42 - JVC KD-DV7300 | Instructions - Page 43
subwoofer if it is connected. : Cancels. EXT IN *7 External input • CHANGER : To use a JVC CD changer, [34], or an Apple iPod/a JVC D. player, [37]. • EXT IN : To use any other selected-FM, AM, DISC, USB, Bluetooth, or LINE IN. *8 Displayed only when Dual Zone is activated (see page 28). SETTINGS - JVC KD-DV7300 | Instructions - Page 44
remote controller. ~ Enter the setup menu while stop. Ÿ Select a menu. ! Select an item you want to set up. • To cancel pop-up menu, press . ⁄ Select an option. To return to normal screen Menu Item MENU LANGUAGE AUDIO " on page 54. Select the initial audio language. Refer also to "Language codes" - JVC KD-DV7300 | Instructions - Page 45
(DISC) Select the file type to play. • AUDIO : Play MP3/WMA/AAC/WAV files. • VIDEO : Play DivX/MPEG Video files. FILE TYPE (USB) Select the file type to play. • AUDIO : Play MP3/WMA/AAC/WAV files. • VIDEO : Play DivX/MPEG Video files. DIGITAL AUDIO OUTPUT Select the signal format to be emitted - JVC KD-DV7300 | Instructions - Page 46
column according to your preference. 1 Select "BT-PHONE" or "BT-AUDIO." 2 Enter the Bluetooth menu. 3 Select "SETTING." 4 Select a setting item. 5 of the arrival of a message by ringing and displaying "RCV MSG" (receiving message). MANUAL: The unit does not inform you of the arrival of a message. - JVC KD-DV7300 | Instructions - Page 47
ENGLISH Assigning titles You can assign titles to 30 station frequencies (FM and AM) and up to 8 characters for each title. ~ Select FM/AM. Ÿ Show the title entry screen. ! Assign a title. 1 Select a character. 2 Move to the next (or previous) character position. 3 Repeat steps 1 and 2 until you - JVC KD-DV7300 | Instructions - Page 48
Moisture condensation Moisture may condense on the lens inside the unit in the following cases: • After starting the heater in the car. • If it becomes very humid inside the car. Should this occur, the unit may malfunction. In this case, eject the disc and leave the unit turned on for a few - JVC KD-DV7300 | Instructions - Page 49
preset stations are erased and stations are stored newly. Disc/USB General • In this manual, words "track" and "file" are interchangeably used. • This unit can also play back 8 cm (3-3/16") discs. • This unit can only play back audio CD (CD-DA) files if different type of files are recorded in - JVC KD-DV7300 | Instructions - Page 50
follow: DVD: 4 Mbps; USB: 2 Mbps • If you want to know more about DivX, visit . Playing MPEG Video files • This unit can play back MPEG Video files with the extension code , , or *. * is an extension code used for the MPEG-2 files recorded by JVC Everio - JVC KD-DV7300 | Instructions - Page 51
are not based upon Windows Media® Audio. - AAC files created by any the device supports the function you have tried. UNFOUND No available Bluetooth device is radio • You can also connect the JVC SIRIUS radio PnP (Plug and Play), using the JVC SIRIUS radio adapter, KS-U100K (not supplied) to the CD - JVC KD-DV7300 | Instructions - Page 52
JVC web site: For iPod users: For D. player users: - JVC KD-DV7300 | Instructions - Page 53
16 bits stereo Linear PCM DTS DTS bitstream MPEG Audio MPEG bitstream 48 kHz, 16 bits stereo Linear PCM Audio CD, Video CD 44.1 kHz, 16 bits stereo Linear PCM / 48 kHz, 16 bits stereo Linear PCM OFF Audio CD with DTS DTS bitstream DivX/MPEG Dolby Digital Dolby Digital bitstream 48 kHz - JVC KD-DV7300 | Instructions - Page 54
ENGLISH Language codes Code Language AA Afar AB Abkhazian AF Afrikaans AM Ameharic AR Arabic AS Assamese AY Aymara AZ Azerbaijani BA Bashkir Code Language FA Persian FI Finnish FJ Fiji FO Faroese FY Frisian GA Irish GD Scots Gaelic GL Galician GN Guarani BE Byelorussian GU Gujarati BG Bulgarian - JVC KD-DV7300 | Instructions - Page 55
. • No playback picture (DVD-Video/DVD-VR/ DivX/MPEG/VCD) appears on the monitor. Parking brake wire is not connected properly. (See Installation/Connection Manual.) • No picture appears on the monitor at all. • Connect the video cord correctly. • Select a correct input on the monitor. • The - JVC KD-DV7300 | Instructions - Page 56
configuration. listening to a USB device. • Readout time varies depending on the USB device. • Do not DivX/MPEG Video file. • Record the audio track using MP3 or Dolby Digital as the audio stream of DivX files. • Record the audio track using MPEG1 Audio Layer 2 as the audio stream for MPEG Video - JVC KD-DV7300 | Instructions - Page 57
between the unit and the Bluetooth audio device. • Move the car to a place where audio device cannot be controlled. Check whether the connected audio device supports AVRCP (Audio Video Remote Control Profile). * For Bluetooth operations, refer also to the instructions supplied with the Bluetooth - JVC KD-DV7300 | Instructions - Page 58
" appears on the display while listening to the XM Satellite radio. Selected channel is not broadcasting at this time. Select another channel or continue listening to the previous channel. The unit is loading the channel information and audio. Text information are temporarily unavailable. • "RESET - JVC KD-DV7300 | Instructions - Page 59
. • "RESET 1" - "RESET 7" appears on the display. Press the reset button of the CD changer. • The CD changer does not work at all. Reset the unit (see page 3). • The iPod or D. player does not turn on or does • Check the connecting cable and its connection. not work. • Update the firmware - JVC KD-DV7300 | Instructions - Page 60
scale) KD-DV7300: 2.5 V/20 kΩ load (full scale) Output Impedance: 1 kΩ Subwoofer-out Level/Impedance: 2.5 V/20 kΩ load (full scale) Color system: NTSC Video Output (composite): 1 Vp-p/75 Ω Other Terminal: CD changer, Steering wheel remote input (for KD-ADV7380), LINE IN, 2nd AUDIO OUT 60 - JVC KD-DV7300 | Instructions - Page 61
(400 kHz): 65 dB Frequency Response: 40 Hz to 15 000 Hz Stereo Separation: 30 dB AM Tuner: Sensitivity: 20 μV Selectivity: 35 dB DVD/CD PLAYER SECTION Signal Detection System: Non-contact optical pickup (semiconductor laser) Number of Channels: 2 channels (stereo) Frequency Response - JVC KD-DV7300 | Instructions - Page 62
ENGLISH DVD/CD PLAYER SECTION DivX/MPEG Video: Video: Max. Resolution: Audio: Bit Rate: Sampling Frequency: DivX: Sampling Frequency: MPEG Video: MP3: Bit Rate: Sampling Frequency: WMA: Bit Rate: Sampling Frequency: AAC: Bit Rate: Sampling Frequency: WAV: Quantization Bit Rate: - JVC KD-DV7300 | Instructions - Page 63
Inc., and XM Satellite Radio, Inc. • iPod is a trademark of Apple Inc., registered in the U.S. and other countries. • The Bluetooth word mark and logos are owned by the Bluetooth SIG, Inc. and any use of such marks by Victor Company of Japan, Limited (JVC) is under license. Other trademarks and - JVC KD-DV7300 | Instructions - Page 64
situada en un circuito distinto del aparato receptor. - Consulte a su distribuidor o a un técnico experto en radio/televisión. Precaución Los cambios o modificaciones no aprobados por JVC pueden anular la autoridad del usuario para operar el equipo. IMPORTANTE PARA PRODUCTOS LÁSER 1. PRODUCTO LÁSER - JVC KD-DV7300 | Instructions - Page 65
én se borrarán los ajustes preestablecidos realizados por usted (excepto el dispositivo Bluetooth registrado, véase página 29). Cómo expulsar el disco por la del freno de estacionamiento incorporado al automóvil (refiérase al Manual de instalación/conexión). Para fines de seguridad... • No aumente - JVC KD-DV7300 | Instructions - Page 66
El KD-ADV7380 está equipado con la función de control remoto en el volante de dirección. • Para la conexión, consulte el Manual de Audio". Por consiguiente, no se recomienda usar el lado no DVD de un DualDisc en este producto. Precaución sobre el ajuste de volumen Los discos y los dispositivos USB - JVC KD-DV7300 | Instructions - Page 67
el dispositivo USB 26 Operaciones de Zona Dual 28 DISPOSITIVOS EXTERNOS Uso de dispositivos Bluetooth 29 • Usar el teléfono celular Bluetooth 31 • Uso del reproductor de audio Bluetooth 33 Escuchando el cambiador de CD 34 Para escuchar la radio satelital 35 Escuchando el iPod / reproductor - JVC KD-DV7300 | Instructions - Page 68
+VR Joliet JPEG/MPEG4 DVD-RAM Todas Dual Disc Lado DVD Lado no-DVD CD/VCD CD de audio/CD-Text (CD-DA)/DTS-CD *5 VCD (Vídeo CD) CD-ROM CD-I (CD-I Ready) CD Grabable/reescribible (CD-R/-RW) • Compatible con ISO 9660 Nivel 1, Nivel 2, Romeo, Joliet CD-DA DivX/MPEG-1/MPEG-2 Vídeo MP3/WMA - JVC KD-DV7300 | Instructions - Page 69
ESPAÑOL Preparativos Cancele la demostración en pantalla y ponga el reloj en hora • Consulte también la página 42. Al apagar la unidad: Verifique la hora actual Al encender la unidad: Cambia la información en pantalla ~ Ÿ ! ] ⁄ @ Encienda la unidad. Introduzca los ajustes PSM. Cancele las - JVC KD-DV7300 | Instructions - Page 70
básicas Uso del panel de control ESPAÑOL 1 Seleccione la fuente. FM/AM = SIRIUS/XM * = DISC * = USB = CD-CH */IPOD */D.PLAYER * (o EXT IN) = BT-PHONE (Teléfono Bluetooth) * = BT-AUDIO (Bluetooth Audio) * = LINE IN = (vuelta al comienzo) * No podrá seleccionar estas fuentes si no están preparadas - JVC KD-DV7300 | Instructions - Page 71
Indicador de pista w Visualización de fuente/N° de preajuste/N° de pista/N° de carpeta/N° de disco/N° de capítulo e Estado del dispositivo Bluetooth (Número de dispositivo, [1 - 5]; intensidad de la señal [0 - 3]*; recordatorio de batería, [0 - 3]*) * Conforme aumenta el número, la intensidad de la - JVC KD-DV7300 | Instructions - Page 72
DVD/CD. EXTRA MONITOR 1 Botones de control del monitor • Se utilizan para el monitor JVC-KV-MR9010, KV-MH6510 o KV-M706. DVD/RECEIVER q Para operaciones de disco/USB: • 7 : Pare la reproducción. • 3 : Inicia la reproducción. • 8 : Pone en pausa. Para operaciones Bluetooth: • 7 : Finaliza la - JVC KD-DV7300 | Instructions - Page 73
DivX/MPEG Video: Efectúa la búsqueda de índice durante la reproducción. • DISC +/-: Cambia los discos cuando la fuente es "CD-CH". y *1 Botón RETURN u • DVD-Vídeo: Selecciona idioma de audio ( ), subtítulos ( )*1, ángulo ( )*5. • DVD-VR: Selecciona idioma de audio ( ) y subtítulos ( )*1. • DivX - JVC KD-DV7300 | Instructions - Page 74
Para escuchar la radio Selecciona la emisora preajustada. ESPAÑOL Cambia la información en pantalla de señal suficiente. ! Efectúa la búsqueda de una emisora-Búsqueda automática. Búsqueda manual: Mantenga pulsado uno de los botones hasta que "M" parpadee en la pantalla y, a continuación, púlselo - JVC KD-DV7300 | Instructions - Page 75
pantalla del monitor. (Consulte también las páginas 21 - 25.) El tipo de disco se detecta automáticamente, y la reproducción se inicia también automáticamente (para DVD: el inicio automático depende de su programa interno). Si el disco actual no dispone de ningún menú de disco, todas las pistas ser - JVC KD-DV7300 | Instructions - Page 76
ESPAÑOL Operaciones utilizando el panel de control *1 Durante la parada: Localiza el título *1 Durante la reproducción o la pausa: Localiza el capítulo Seleccionar título Tiempo de reproducción transcurrido = Reloj = Número Pulse: Seleccionar un capítulo de título y capítulo actual = (vuelta al - JVC KD-DV7300 | Instructions - Page 77
*1 Localizar directamente una carpeta específica Selecciona la carpeta ESPAÑOL Tiempo de reproducción transcurrido = Reloj = Número de la carpeta = Título de la pista = (vuelta al comienzo) Pulse: Seleccionar la pista Sostener: Retroceso/avance rápido de pista *2 *1 Localizar directamente una - JVC KD-DV7300 | Instructions - Page 78
carpeta y el nombre del archivo. El indicador TAG no se enciende. *3 La velocidad de búsqueda cambia a ×2 ] ×10 en el monitor. *4 Aparecerá "NO NAME" para un CD de audio. 16 - JVC KD-DV7300 | Instructions - Page 79
ESPAÑOL Tras pulsar , pulse los siguientes botones para... Tipo de disco Saltar 10 capítulos* CHP RPT: Repetir el capítulo actual - TIT RPT: Repetir el título actual Saltar 10 capítulos* CHP RPT: Repetir el capítulo actual PRG RPT: Repite el programa actual (no disponible - para la - JVC KD-DV7300 | Instructions - Page 80
: Pulse: Seleccionar un capítulo *3 Sostener: Búsqueda de retroceso/avance rápido de capítulo *4 : Seleccionar título : Seleccionar el idioma de audio : Seleccionar el idioma de los subtítulos : Seleccionar el ángulo de visión Para buscar directamente un capítulo/título 1 Seleccione búsqueda de cap - JVC KD-DV7300 | Instructions - Page 81
retorno/avance de las escenas durante unos 5 minutos (Búsqueda de índice) • Seleccionar un capítulo. : DivX: Seleccionar el idioma de los subtítulos : DivX: Seleccionar el idioma de audio Para buscar directamente la pista (dentro de la misma carpeta)/carpeta 1 Seleccione búsqueda de pista/ carpeta - JVC KD-DV7300 | Instructions - Page 82
cámara lenta hacia atrás no funciona). : Pulse: Seleccione la pista *3 Sostener: Búsqueda de retroceso/ avance rápido de pista *4 : Selecciona un canal de audio (ST: estéreo, L: izquierdo, R: derecho) Para seleccionar la pista directamente • Para el VCD con PBC, aparece una lista de ítems en el men - JVC KD-DV7300 | Instructions - Page 83
reproducción o la pausa... 1 Mientras mantiene pulsado , pulse repetidamente . ESPAÑOL 2 Mover la parte ampliada. • Para cancelar el zoom, seleccione "ZOOM OFF". Operaciones usando la barra en pantalla (DVD/DVD-VR/DivX/MPEG Vídeo/ VCD) Estas operaciones se pueden realizar en el monitor usando el - JVC KD-DV7300 | Instructions - Page 84
DVD-Vídeo/DVD-VR/DTS-CD: Tipo de formato de señal de audio y canal • VCD: PBC 3 Modo de reproducción *1 DVD-Vídeo: T. RPT: Repetición de título C. RPT: Repetición de capítulo DVD-VR: C. RPT: Repetición de capítulo PG. RPT: Repetición de programa DivX tulo actual). DVD-Video/DVD-VR: Tiempo - JVC KD-DV7300 | Instructions - Page 85
durante la reproducción. Ÿ Seleccione la columna "Folder" o la columna "Track" (excepto para CD). ! Seleccione una carpeta o una pista. ⁄ Inicia la reproducción. DivX/MPEG Vídeo: Pulse . MP3/WMA/AAC/WAV/CD: La reproducción se inicia automáticamente. Pantalla de control Para seleccionar un - JVC KD-DV7300 | Instructions - Page 86
carpeta): Repetir aleatoriamente todas las pistas de la carpeta actual y luego las pistas de las siguientes carpetas Operaciones usando la pantalla de listas (DVD-VR/DivX/MPEG Vídeo/MP3/ WMA/AAC/WAV) Estas operaciones se pueden realizar en el monitor usando el control remoto. Antes de la reproducci - JVC KD-DV7300 | Instructions - Page 87
-VR Puede usar la pantalla ORIGINAL PROGRAM o PLAY LIST en cualquier momento mientras se reproduce un DVD-VR con sus datos grabados. 1 Seleccione una pantalla de lista. 2 Seleccione una opción de la lista. 1 Número de programa/Lista de reproducción 2 Fecha de grabación 3 - JVC KD-DV7300 | Instructions - Page 88
tal como una memoria USB, un reproductor de audio digital (dispositivo de clase de almacenamiento masivo USB), un HDD (disco duro) portátil, etc. Fijación de una memoria USB Terminal de entrada USB ESPAÑOL Memoria USB La unidad puede reproducir pistas DivX/MPEG Video/MP3/WMA/AAC*/WAV almacenadas - JVC KD-DV7300 | Instructions - Page 89
de la unidad. • Para evitar el borrado accidental, asegúrese de sacar copia de respaldo de todos los datos importantes. • No deje el dispositivo USB en el coche expuesto a la luz directa del sol o a altas temperaturas pues se podrá producir deformación o daños en el dispositivo. ESPAÑOL Pulsando - JVC KD-DV7300 | Instructions - Page 90
a la clavija 2nd AUDIO OUT de la parte trasera, y reproducir un disco separadamente de la fuente seleccionada en la unidad. No podrá seleccionar "AM" ni "USB" como fuente cuando está activada la Zona Dual. • Mientras se está usando la Zona Dual, sólo podrá operar el reproductor DVD/CD utilizando el - JVC KD-DV7300 | Instructions - Page 91
, se deberá conectar el adaptador Bluetooth (KS-BTA200) al jack del cambiador de CD en la parte trasera de esta unidad. Consulte también la página 39. • Consulte también las instrucciones suministradas con el adaptador Bluetooth y el dispositivo Bluetooth. • Consulte la lista (incluida en la - JVC KD-DV7300 | Instructions - Page 92
las instrucciones suministradas con el dispositivo. 4 Utilice el dispositivo Bluetooth que se ha conectado. Ahora la conexión ha quedado establecida página 46). Borrar un dispositivo registrado 1 Seleccione BT-PHONE" o "BT-AUDIO". Conexión de un dispositivo especial Efectúe los pasos 1 y 2 de la - JVC KD-DV7300 | Instructions - Page 93
ESPAÑOL Cambia la información en pantalla ~ Seleccione "BT-PHONE". Ÿ Acceda al menú Bluetooth. ! Haga una llamada o realice ajustes utilizando el menú de ajuste Bluetooth. (Consulte las páginas 32 y 46.) Cuando entra una llamada... La fuente cambiará automáticamente a "BT-PHONE". Cuando - JVC KD-DV7300 | Instructions - Page 94
de otro modo) Historial de llamadas Visualice el menú Seleccione un historial de llamadas. Seleccione un nombre (si está de marcación. REDIAL, RECEIVED, MISSED disponible) o un número telefónico Guía telefónica Seleccione "PH BOOK". Aparece la lista de números telefónicos. Seleccione un - JVC KD-DV7300 | Instructions - Page 95
áticamente, opere el reproductor Bluetooth audio para iniciar la reproducción. • Para conectar/desconectar/borrar un dispositivo registrado, consulte también la página 30. Información Bluetooth: Si desea obtener más información sobre Bluetooth, visite el sitio web de JVC. DISPOSITIVOS EXTERNOS 33 - JVC KD-DV7300 | Instructions - Page 96
la información en pantalla (consulte la página 16) Se recomienda usar un cambiador de CD compatible con MP3 JVC con este receptor. Puede conectar un cambiador de CD al jack del cambiador de CD en la parte trasera de la unidad. Consulte también la página 39. • Solamente se podrán reproducir discos - JVC KD-DV7300 | Instructions - Page 97
de CD de la parte trasera de esta unidad. • SIRIUS radio DLP (Down Link Processor) de JVC, para escuchar la radio satelital SIRIUS su suscripción, visite el sitio web de la radio satelital XM en o llame al 1-800-XM-RADIO (1-800-967-2346). Una vez que termine, - JVC KD-DV7300 | Instructions - Page 98
Seleccione un canal de preajuste. ESPAÑOL Cambia la información en pantalla * Sólo para la radio satelital SIRIUS ~ Seleccione "SIRIUS" o "XM". Ÿ Selecciona las bandas. SIRIUS: XM: ! Seleccione una categoría. ⁄ Seleccione el canal de audición. • Al mantener pulsado el botón, los canales se - JVC KD-DV7300 | Instructions - Page 99
las dos unidades siguientes (adquiridas separadamente) al jack del cambiador de CD de la parte trasera de esta unidad. Consulte también la página 39. • Adaptador de interfaz para iPod-KS-PD100 para controlar un iPod. • Adaptador de interfaz del reproductor D.-KS-PD500 para controlar un reproductor - JVC KD-DV7300 | Instructions - Page 100
seleccione "RPT OFF" o "RND OFF". * iPod: Funciona sólo si se selecciona "ALL" en "ALBUMS" del "MENU" principal. Escuchando otros componentes externos Cambia la información en pantalla Podrá conectar un componente externo a: • Jack del cambiador de CD de la parte trasera de esta unidad utilizando - JVC KD-DV7300 | Instructions - Page 101
Manual de instalación/conexión (volumen separado). Unidad Reproductor MD, etc., [38] Terminales LINE IN Jack del cambiador de CD Radio por satélite SIRIUS (JVC DLP), [35] Radio XM etc., [38] Radio por satélite SIRIUS (JVC PnP) Cambiador de CD JVC, [34] Apple iPod, [37] Reproductor D. JVC, [37] - JVC KD-DV7300 | Instructions - Page 102
Selección de un modo de sonido preajustado ESPAÑOL Ajustes del nivel de frecuencia de preajuste: Valores de ecualización preajustados Modo de sonido 60 Hz 150 Hz 400 Hz 1 kHz 2.5 kHz 6.3 kHz USER 00 00 00 00 00 00 ROCK +03 +02 00 00 +01 +02 CLASSIC +01 +03 +01 00 00 +02 POPS 00 - JVC KD-DV7300 | Instructions - Page 103
ESPAÑOL Cómo ajustar el sonido 1 2 Ajuste el nivel. Configuraciones generales - PSM Podrá cambiar las opciones de PSM (Modo de ajustes preferidos) listadas en la tabla de las páginas 42 y 43. 1 Introduzca los ajustes PSM. FAD *1 (fader) Ajusta el balance de los altavoces delanteros y traseros. - JVC KD-DV7300 | Instructions - Page 104
óvil, se recomienda seleccionar "OFF" para economizar batería del automóvil. *2 Sólo aparece cuando está conectada la radio satelital SIRIUS o XM. *3 Se visualiza sólo cuando "CLK ADJ" se ajusta a "AUTO". *4 Sólo aparece cuando está conectada la radio satelital SIRIUS. *5 Sólo para KD-ADV7380. 42 - JVC KD-DV7300 | Instructions - Page 105
*7 Entrada externa • CHANGER : Para usar un cambiador de CD JVC, [34] o un Apple iPod/un reproductor D. JVC D., [37]. • EXT IN : Para usar cualquier otro componente cuando se selecciona una de las siguientes fuentes-FM, AM, DISC, USB, Bluetooth o LINE IN. *8 Se visualiza sólo cuando se activa la Zona - JVC KD-DV7300 | Instructions - Page 106
PANTALLA Ajuste Selecciona el idioma inicial del menú de disco. Consulte también "Códigos de idioma" en la página 54. Selecciona el idioma de audio inicial. Consulte también "Códigos de idioma" en la página 54. Selecciona el idioma inicial del subtítulo o borra el subtítulo (DESCONECTAR). Consulte - JVC KD-DV7300 | Instructions - Page 107
. TIPO DE Seleccione el tipo de archivo que desea reproducir. ARCHIVO (USB) • AUDIO : Reproduce archivos MP3/WMA/AAC/WAV. • VÍDEO : Reproduce archivos DivX/MPEG Vídeo. SALIDA DE AUDIO DIGITAL Seleccione el formato de señal a emitirse a través del terminal DIGITAL OUT (óptico). • DESCONECTAR - JVC KD-DV7300 | Instructions - Page 108
según sus preferencias. 1 Seleccione BT-PHONE" o "BT-AUDIO". 2 Acceda al menú Bluetooth. 3 Seleccione "SETTING". 4 Seleccione una opción de ajuste. emitiendo un pitido audible y visualizando "RCV MSG" (recepción de mensaje). MANUAL: La unidad no le informa la llegada de un mensaje. MIC SET ( - JVC KD-DV7300 | Instructions - Page 109
de la izquierda... ~ Selecciona FM/AM. Ÿ Muestre la pantalla de entrada de título. ! Asigne un título. 1 Seleccione un carácter. 2 Muévase a la posición del carácter siguiente (o anterior). 3 Repita los pasos 1 y 2 hasta que termine de introducir el título. ⁄ Finalice el procedimiento. Caracteres - JVC KD-DV7300 | Instructions - Page 110
ESPAÑOL Mantenimiento Cómo limpiar los conectores Un desmontaje frecuente producirá el deterioro de los conectores. Para reducir esta posibilidad al mínimo, limpie periódicamente los conectores con un palillo de algodón, teniendo cuidado de no dañar los conectores. Para mantener los discos - JVC KD-DV7300 | Instructions - Page 111
se memorizan las emisoras nuevas. Disco/USB General • En este manual, las palabras "pista" y "archivo" se utilizan indistintamente. • Este receptor también puede reproducir discos de 8 cm (3-3/16 pulgada) . • Este receptor sólo podrá reproducir archivos de CD de audio (CD-DA) si hay diferentes tipos - JVC KD-DV7300 | Instructions - Page 112
velocidad de bit para las señales de vídeo (promedio): DVD: 4 Mbps; USB: 2 Mbps • Si desea más información sobre el DivX, visite . Reproducción de archivos MPEG Vídeo • Esta unidad puede reproducir archivos MPEG Video con el código de extensión , o *. * - JVC KD-DV7300 | Instructions - Page 113
Media® Audio. - Archivos dispositivo Bluetooth disponible Radio satelital • También puede conectar la radio SIRIUS PnP (Plug and Play) de JVC con el adaptador de radio SIRIUS KS-U100K de JVC (no suministrado) a la toma del cambiador de CD, situada en la parte a la radio satelital XM, visite el - JVC KD-DV7300 | Instructions - Page 114
JVC: Para usuarios de iPod: Para los usuarios del reproductor D.: - JVC KD-DV7300 | Instructions - Page 115
ón : Poner en pausa : DVD-Video/DVD-VR/VCD: Cámara lenta hacia adelante : DVD-Video: Cámara lenta hacia atrás DVD-Vídeo 48 kHz, 16/20/24 bit PCM Lineal 96 kHz, PCM Lineal Dolby Digital DTS MPEG Audio CD de audio, Vídeo CD CD de audio con DTS DivX/MPEG Dolby Digital MP3/WMA AAC WAV MPEG Audio - JVC KD-DV7300 | Instructions - Page 116
ESPAÑOL Códigos de idioma Código Idioma Código Idioma Código Idioma Código Idioma Código Idioma AA Afar FA Persa KL Groenlandés OC Ocitano ST Sesotho AB Abkasiano FI Finlandés KM Camboyano OM (Afan) Oromo SU Sudanés AF Afrikaans FJ Islas Fiji KN Kanadí OR Oriya SW Suahili AM Amearico FO Faro - JVC KD-DV7300 | Instructions - Page 117
Almacene manualmente las emisoras. • Ruidos estáticos mientras se escucha la radio. Conecte firmemente la antena. • No se puede reproducir el disco. de estacionamiento no está (DVD-Vídeo/DVD-VR/DivX/MPEG/VCD) en el correctamente conectado. (Consulte el Manual de monitor. Instalación/Conexión.) - JVC KD-DV7300 | Instructions - Page 118
ESPAÑOL DivX/MPEG Video/MP3/WMA/AAC/WAV y dispositivo USB Síntoma Soluciones/Causas • No se pueden reproducir las pistas. • Grabe las pistas en los discos apropiados, utilizando una aplicación compatible (consulte la página 6). • Añada el código de extensión , , , , - JVC KD-DV7300 | Instructions - Page 119
la posición de la unidad del micrófono. • La calidad del sonido telefónico es mala. • Reduzca la distancia entre la unidad y el dispositivo de audio Bluetooth. • Mueva el coche a un lugar donde pueda mejorar la recepción de la señal. • El sonido se interrumpe u omite durante la reproducción de un - JVC KD-DV7300 | Instructions - Page 120
"LOADING" aparece en la pantalla mientras escucha la radio satelital XM. El canal seleccionado no está emitiendo en ese momento. Seleccione otro canal o continúe escuchando el canal anterior. El receptor está cargando la información del canal y el audio. La información de texto no está disponible - JVC KD-DV7300 | Instructions - Page 121
"RESET 1" - "RESET 7" en la pantalla. Pulse el botón de reinicialización del cambiador de CD. • El cambiador de CD no funciona en absoluto. Reinicialice el receptor (consulte la página 3). • El iPod o el reproductor D. no se enciende o no • Verifique el cable de conexión y su conexión. funciona - JVC KD-DV7300 | Instructions - Page 122
kHz Nivel: ±10 dB Nivel de Salida de Audio: Digital (DIGITAL OUT: Óptico): Longitud de onda de señal: 660 nm Nivel de salida: -21 dBm a -15 dBm Nivel/impedancia salida línea: KD-ADV7380: 5,0 V/20 kΩ de carga (plena escala) KD-DV7300: 2,5 V/20 kΩ de carga (plena escala) Impedancia de salida - JVC KD-DV7300 | Instructions - Page 123
: 40 Hz a 15 000 Hz Separación estereofónica: 30 dB Sintonizador de AM: Sensibilidad: 20 μV Selectividad: 35 dB SECCIÓN DEL REPRODUCTOR DVD/CD Sistema de detección de Captor óptico sin contacto (láser semiconductor) señal: Número de canales: 2 canales (estereofónicos) Respuesta de - JVC KD-DV7300 | Instructions - Page 124
ÓN DEL REPRODUCTOR DVD/CD DivX/MPEG Vídeo: Vídeo: Resolución máx.: Audio: Velocidad de bit: Frecuencia de muestreo: DivX: Frecuencia de muestreo audio/vídeo reproducible: Corriente máx.: 62 USB 1,1/USB 2,0 Máx. 12 Mbps Máx. 1,5 Mbps Clase de almacenamiento masivo FAT 12/16/32 DivX/MPEG Video - JVC KD-DV7300 | Instructions - Page 125
especializada en car audio más cercana. XM Satellite Radio, Inc. • iPod es una marca comercial de Apple Inc., registrada en los EE.UU. y otros países. • La marca Bluetooth y sus logotipos son propiedad de Bluetooth SIG, Inc., y cualquier uso de los mismos por Victor Company of Japan, Limited (JVC - JVC KD-DV7300 | Instructions - Page 126
avoir acheté un produit JVC. Veuillez lire attentivement toutes les instructions avant d'utiliser l'appareil afin de bien comprendre son fonctionnement et d'obtenir les meilleures performances possibles. Précautions Tout changement ou modification non approuvés par JVC peut annuler l'autorité de - JVC KD-DV7300 | Instructions - Page 127
ajustements préréglés sont aussi effacés (saut le périphérique Bluetooth enregistré, voir page 29). Comment forcer l'éjection d'un disque d'installation/ raccordement). Pour sécurité... • N'augmentez pas trop le volume car cela bloquerait les sons de l'extérieur rendant la conduite dangereuse. • - JVC KD-DV7300 | Instructions - Page 128
inverse et le désassemblage sont interdits. Le KD-ADV7380 est muni d'une fonction de télécommande de Audio". Par conséquent, l'utilisation de la face non DVD d'un disque à double face sur cet appareil n'est pas recommandée. Précautions sur le réglage du volume Les disques et les périphériques USB - JVC KD-DV7300 | Instructions - Page 129
périphérique USB 26 Fonctionnement sur Deux Zones 28 APPAREILS EXTÉRIEURS Utilisation d'appareil Bluetooth 29 • Utilisation d'un téléphone portable Bluetooth 31 • Utilisation d'un lecteur audio Bluetooth 33 Écoute du changeur de CD 34 Écoute de la radio satellite 35 Écoute de iPod / lecteur - JVC KD-DV7300 | Instructions - Page 130
/MPEG4 Romeo et Joliet DVD-RAM Tous Dual Disc Côté DVD Face non DVD CD/VCD CD Audio/CD-Text (CD-DA)/DTS-CD *5 VCD (CD Vidéo) CD-ROM CD-I (CD-I Ready) CD enregistrable/réinscriptible (CD-R/-RW) • Compatibles avec ISO 9660 Niveau 1, Niveau 2, Romeo et Joliet CD-DA DivX/MPEG-1/MPEG-2 Vid - JVC KD-DV7300 | Instructions - Page 131
FRANÇAIS Préparation Annulez la démonstration des affichages et réglez l'horloge • Référez-vous aussi à la page 42. Quand l'appareil est hors tension: Vérifiez l'heure actuelle Quand l'appareil est sous tension: Changez l'information sur l'affichage ~ Ÿ ! ] ⁄ @ Mise sous tension de l'appareil. - JVC KD-DV7300 | Instructions - Page 132
. FM/AM = SIRIUS/XM * = DISC * = USB = CD-CH */IPOD */D.PLAYER * (ou EXT IN) = BTPHONE (Téléphone Bluetooth) * = BT-AUDIO (Bluetooth Audio) * = LINE IN une des touches suivantes (avant 5 secondes)... MO : Mise en/hors service de la réception monophonique. 8 SSM : Préréglage automatique des stations - JVC KD-DV7300 | Instructions - Page 133
w Affichage de la source/No de préréglage/No de plage/No de dossier/No de disque/No de chapitre e État du périphérique Bluetooth (Numéro du périphérique, [1 - 5]; puissance du signal, [0 - 3]*; indication de batterie, [0 - 3]*) * Plus le numéro augmente, plus la puissance du signal/niveau de la - JVC KD-DV7300 | Instructions - Page 134
fonction de double zone est en service (voir page 28), la télécommande fonctionne uniquement pour commander le lecteur de DVD/CD. 10 EXTRA MONITOR 1 Touches de commande du moniteur • Utilisé pour un moniteur JVC-KV-MR9010, KV-MH6510, ou KV-M706. DVD/RECEIVER 2 • Appuyez brièvement sur cette touche - JVC KD-DV7300 | Instructions - Page 135
Pour les opérations Bluetooth: • 4 / ¢ : Saut vers l'arrière/saut vers l'avant (pour les opérations audio). SHIFT. - FM/AM/SIRIUS/XM: Choisit des stations/canaux préréglés (1 - 6). - DISC/USB: Choisit un chapitre/titre/dossier/plage Pour utiliser iPod d'Apple/lecteur D. de JVC: après être entr - JVC KD-DV7300 | Instructions - Page 136
Écoute de la radio Sélection d'une station préréglée. FRANÇAIS Changez l'information sur l'affichage ~ Choisissez "FM/AM". Ÿ Sélection de la bande. S'allume lors de la réception d'une émission - JVC KD-DV7300 | Instructions - Page 137
en vous référant à l'écran du moniteur. (Voir aussi pages 21 - 25.) Le type de disque est détecté automatiquement et la lecture démarre automatiquement (pour les DVD: le démarrage automatique de la lecture dépend de son programme interne). Si le disque actuel ne possède pas de menu de disque, toutes - JVC KD-DV7300 | Instructions - Page 138
Opérations en utilisant le panneau de commande *1 À l'arrêt: Localisation d'un titre *1 Pendant la lecture ou une pause: Localisation d'un chapitre Sélection d'un titre FRANÇAIS Durée de lecture écoulée = Horloge = Titre et numéro du chapitre actuel = (retour au début) Appuyez sur la touche: Sé - JVC KD-DV7300 | Instructions - Page 139
Sélection d'une plage Maintenez pressée la touche: Recherche rapide de plage vers l'arrière/vers l'avant *2 *1 Localiser une plage particulière directement (PBC hors service) Durée de lecture écoulée et numéro de plage actuel = Horloge et numéro de plage actuel = (retour au début) Appuyez sur la - JVC KD-DV7300 | Instructions - Page 140
le nom du fichier apparaissent. L'indicateur TAG ne s'allume pas. *3 La vitesse de recherche change sur ×2 ] ×10 sur le moniteur. *4 "NO NAME" apparaît pour les CD audio. 16 - JVC KD-DV7300 | Instructions - Page 141
érieur du même dossier) actuelle FLDR RPT: Répéter le dossier actuel Sauter 10 plages (PBC hors TRK RPT: Répéter la plage service) actuelle (PBC hors service) Sauter 10 plages (à TRK RPT: Répéter la plage l'intérieur du même dossier) actuelle FLDR RPT: Répéter le dossier actuel Sauter - JVC KD-DV7300 | Instructions - Page 142
FRANÇAIS Opérations en utilisant de la télécommande-RM-RK241 : Arrêt de la lecture : Pause de la lecture (lecture image par image si la touche est pressée pendant une pause.) : Démarrage de la lecture : Recherche de chapitre vers l'arrière/vers l'avant *1 • Lecture au ralenti*2 si la touche est - JVC KD-DV7300 | Instructions - Page 143
ère/vers l'avant *7 : Sélection d'un dossier : • Recule/avance les scènes d'environ 5 minutes (recherche d'index). • Sélection d'un chapitre. : DivX: Sélection de la langue des sous-titres : DivX: Sélection de la langue des dialogues Pour rechercher une plage (à l'intérieur du même dossier)/dossier - JVC KD-DV7300 | Instructions - Page 144
sur la touche: Sélection d'une plage *3 Maintenez pressée la touche: Recherche rapide de plage vers l'arrière/vers l'avant *4 : Choisissez le canal audio (ST: stéréo, L: gauche, R: droit) Pour choisir une plage directement • Pour les VCD avec PBC, une liste d'éléments apparaît sur le menu de - JVC KD-DV7300 | Instructions - Page 145
"ZOOM OFF". Opérations en utilisant la barre sur l'écran (DVD/DVD-VR/DivX/MPEG Vidéo/ VCD) Ces opérations sont possibles sur le moniteur finaux (les deux derniers chiffres dans les exemples ci-dessous). Ex.: Recherche temporelle DVD Ex.: 1:02:00) Appuyez une fois sur , puis deux fois sur appuyez - JVC KD-DV7300 | Instructions - Page 146
1 Type de disque 2 • DVD Vidéo/DVD-VR/DTS-CD: Type de format de signal audio et canal • VCD: PBC 3 Mode de lecture *1 DVD Vidéo: T. RPT: Répétition de titre C. RPT: Répétition de chapitre DVD-VR: C. RPT: Répétition de chapitre PG. RPT: Répétition de programme DivX/Vidéo MPEG: T. RPT - JVC KD-DV7300 | Instructions - Page 147
. Ÿ Choisissez la colonne "Folder" ou la colonne "Track" (saut pour les CD). ! Choisissez un dossier ou une plage. Écran de commande ⁄ Démarrez la lecture. DivX/Vidéo MPEG: Appuyez sur . MP3/WMA/AAC/WAV/CD: La lecture démarre automatiquement. Pour choisir un mode de lecture 1 Pendant que - JVC KD-DV7300 | Instructions - Page 148
aléatoirement toutes les plages du dossier actuel, puis toutes les dossier): plages des dossiers suivants Opérations en utilisant l'écran de liste (DVD-VR/DivX/MPEG Vidéo/MP3/ WMA/AAC/WAV) Ces opérations sont possibles sur le moniteur en utilisant la télécommande. Avant de commencer la lecture - JVC KD-DV7300 | Instructions - Page 149
pouvez utiliser l'écran ORIGINAL PROGRAM ou PLAY LIST à n'importe quel moment pendant la lecture d'un DVD-VR avec ses données enregistrées. 1 Choisissez un écran de liste. 2 Choisissez un élément sur la liste. 1 Numéro de programme/liste de lecture 2 - JVC KD-DV7300 | Instructions - Page 150
capacité tel qu'une mémoire USB, un lecteur audio numérique (périphérique USB à mémoire de grande capacité), un disque dur portable, etc. à cet appareil. Fixation d'une mémoire USB Prise d'entrée USB FRANÇAIS Mémoire USB Cet appareil peut reproduite les plages DivX/MPEG Vídeo/MP3/WMA/AAC*/WAV - JVC KD-DV7300 | Instructions - Page 151
. • Assurez-vous que toutes les données importantes ont été sauvegardées pour éviter toute perte de données. • Ne laissez pas un périphérique USB dans la voiture, exposé aux rayons directs du soleil ou aux hautes températures pour éviter toute déformation ou tout dommage du périphérique. Appuyer - JVC KD-DV7300 | Instructions - Page 152
AUDIO OUT à l'arrière et reproduire un disque séparément de la source choisie sur l'appareil. Vous ne pouvez pas choisir "AM" ou "USB" comme source quand le fonctionnement sur deux zone est en service. • Quand le fonctionnement sur deux zone est en service, vous pouvez commander le lecture de DVD/CD - JVC KD-DV7300 | Instructions - Page 153
du chiffre suivant (ou précédent). Enregistrement en utilisant "OPEN" Préparation Réglez le périphérique pour mettre en service la fonction Bluetooth. 1 Choisissez "BT-PHONE" ou "BT-AUDIO". 2 Choisissez un chiffre ou une espace. 3 Répétez les étapes 1 et 2 jusqu'à ce que le code PIN soit entr - JVC KD-DV7300 | Instructions - Page 154
le déconnectez. Utilisez "CONNECT" (ou mettez en service "AUTO CNT") pour connecter le même périphérique 1 Choisissez "BT-PHONE" ou "BT-AUDIO". Recherche des appareils disponibles Réalisez les instructions fournies avec le périphérique pour vérifier le code PIN. 4 Utilisez le périphérique Bluetooth - JVC KD-DV7300 | Instructions - Page 155
un appel ou des réglages en utilisant le menu de réglage Bluetooth. (Voir pages 32 et 46.) Quand un appel arrive.... La source change automatiquement sur "BT-PHONE". Quand "AUTO ANS" (réponse automatique) est en service... L'appareil répond automatiquement aux appels entrant, voir page 46. • Quand - JVC KD-DV7300 | Instructions - Page 156
(saut mention contraire) Historique des appels Répertoire téléphonique Affichez le menu de composition de numéro. Choisissez un historique des appels. REDIAL, RECEIVED, MISSED Choisissez "PH BOOK". La liste des numéros de téléphone apparaît. Choisissez un nom (s'il a été obtenu) ou un numéro de - JVC KD-DV7300 | Instructions - Page 157
"REDIAL" ou "RECEIVED", le réglage que vous souhaitez utiliser. 3 Choisissez un numéro de téléphone 4 Utilisation d'un lecteur audio Bluetooth Mise en pause/dé le système Bluetooth: Si vous souhaitez recevoir plus d'informations sur le système Bluetooth, consultez le site web de JVC. APPAREILS EXT - JVC KD-DV7300 | Instructions - Page 158
Changez l'information sur l'affichage (voir page 16) Il est recommandé d'utiliser un changeur de CD JVC compatible MP3 avec votre autoradio. Vous pouvez connecter un changeur de CD à la prise de changeur de CD à l'arrière de l'appareil. Voir aussi page 39. • Vous pouvez uniquement reproduire les - JVC KD-DV7300 | Instructions - Page 159
du changeur de CD à l'arrière de l'appareil. • JVC SIRIUS radio DLP-Processeur de signaux satellite-terre pour la radio satellite SIRIUS. Contactez la radio satellite XM sur Internet à l'adresse pour activer votre suscription ou appelez le 1-800-XM-RADIO (1-800-967 - JVC KD-DV7300 | Instructions - Page 160
Choisissez un canal préréglé. FRANÇAIS Changez l'information sur l'affichage * Uniquement pour la radio satellite SIRIUS ~ Choisissez "SIRIUS" ou "XM". Ÿ Sélection de la bande. SIRIUS: XM: ! Choisissez une catégorie. ⁄ Choisissez un canal à écouter. • Maintenir la touche pressée permet de changer - JVC KD-DV7300 | Instructions - Page 161
, connectez un des appareils suivants (vendu séparément) à la prise du changeur de CD à l'arrière de l'appareil. Voir aussi page 39. • Adaptateur d'interface pour iPod-KS-PD100 pour commander un iPod. • Adaptateur d'interface pour lecteur D.-KS-PD500 pour commander un lecteur D. Préparation Assurez - JVC KD-DV7300 | Instructions - Page 162
ou la lecture aléatoire, choisissez "RPT OFF" ou "RND OFF". * iPod: Fonctionne uniquement si vous choisissez "ALL" dans "ALBUMS" du menu principal "MENU pouvez connecter un appareil extérieur à: • la prise de changeur de CD à l'arrière de cet appareil en utilisant les adaptateurs suivants: - - JVC KD-DV7300 | Instructions - Page 163
satellite SIRIUS (JVC DLP), [35] Radio satellite XM, [35] avec ou san (voir pages 29 à 33) (voir page 43 pour le réglage "EXT IN") (voir page 43 pour le réglage "EXT IN") Lecteur de MD, etc., [38] Lecteur de MD, etc., [38] Radio satellite SIRIUS (JVC PnP) Changeur de CD JVC, [34] iPod Apple, [37 - JVC KD-DV7300 | Instructions - Page 164
Sélection d'un mode sonore préréglé FRANÇAIS Réglages du niveau de fréquence préréglé: Mode sonore Valeurs d'égalisation préréglées 60 Hz 150 Hz 400 Hz 1 kHz 2.5 kHz 6.3 kHz USER 00 00 00 00 00 00 ROCK +03 +02 00 00 +01 +02 CLASSIC +01 +03 +01 00 00 +02 POPS 00 +02 00 00 - JVC KD-DV7300 | Instructions - Page 165
FRANÇAIS Ajustement du son 1 2 Ajustez le niveau. Réglages généraux-PSM Vous pouvez changer les options PSM (mode des réglages préférés) du tableau des pages 42 et 43. 1 Accédez aux réglages PSM. FAD *1 (fader) Ajustez la balance avant-arrière des enceintes. R06 à F06 BAL (balance) L06 à R06 - JVC KD-DV7300 | Instructions - Page 166
ON : La démonstration des affichages entre en service si aucune opération n'est réalisée par le cana de la radio satellite. : Annulation. T- ON • OFF : Mettez en service l'heure d'été si votre zone affiché uniquement quand la radio satellite SIRIUS ou XM est connectée. *3 Est affiché uniquement - JVC KD-DV7300 | Instructions - Page 167
est connecté. : Annulation. : Pour utiliser un changeur de CD JVC, [34] ou iPod d'Apple/lecteur D. de JVC, [37]. : Pour utiliser n'importe quel autre appareil ext -FM, AM, DISC, USB, Bluetooth ou LINE IN. *8 Apparaît uniquement quand le fonctionnement sur deux zones est en service (voir page 28). RÉ - JVC KD-DV7300 | Instructions - Page 168
. • Pour annuler le menu déroulant, appuyez sur . ⁄ Choisisse une option. Pour revenir à l'écran normal FRANÇAIS LANGUE Menu Élément LANGUE MENU LANGUE AUDIO SOUS-TITRE LANGUE D'ECRAN Réglage Choisissez la langue initiale du menu de disque. Référez-vous aussi à "Codes de langue" à la page 54 - JVC KD-DV7300 | Instructions - Page 169
Position basse (les instructions d'aide sous le menu de réglage du disque disparaissent.) TYPE FICHIER (DISC) Choisissez le type de fichier à reproduire. • AUDIO : Reproduisez des fichiers MP3/WMA/AAC/WAV. • VIDEO : Reproduisez des fichiers DivX/Vidéo MPEG. TYPE FICHIER (USB) Choisissez le type - JVC KD-DV7300 | Instructions - Page 170
de vos préférences. 1 Choisissez "BT-PHONE" ou "BT-AUDIO". 2 Affichez le menu Bluetooth. 3 Choisissez "SETTING". 4 Choisissez une option de réglage. 5 par une sonnerie et en affichant "RCV MSG" (réception d'un message). MANUAL: L'appareil ne vous informe pas de l'arrivée d'un message. MIC SET - JVC KD-DV7300 | Instructions - Page 171
Affectation de titres FRANÇAIS Vous pouvez affecter un titre à 30 fréquences de station Pour effacer tout le titre (FM et AM) et un maximum de 8 caractères pour chaque À l'étape Ÿ ci-à gauche... titre. ~ Choisissez FM/AM. Ÿ Affiche l'écran d'entrée de titre. ! Affectez un titre. 1 Choisissez un - JVC KD-DV7300 | Instructions - Page 172
le disque par ses bords. Ne touchez pas la surface enregistrée. Pour remettre un disque dans sa boîte, insérez-le délicatement sur le support central (avec la surface imprimée dirigée vers le haut). • Conservez les disques dans leur boîte quand vous ne les utilisez pas. Étiquette autocollante - JVC KD-DV7300 | Instructions - Page 173
pouces). • Cet autoradio peut uniquement reproduire les fichiers CD audio (CD-DA) si différents types de fichier sont USB, référezvous aussi à ses instructions. • Connectez un seul périphérique USB à la fois à cet appareil. N'utilisez pas de nœud de raccordement USB. • Si le périphérique USB - JVC KD-DV7300 | Instructions - Page 174
tre conforme au format MPEG1 Audio Layer 2. • Cet autoradio ne peut pas reproduire les fichiers suivants: - Fichiers WMV (Windows Media Video) - Fichiers au format RM (Real Media) • Le débit binaire maximum pour les signaux vidéo (moyenne) est comme suit: DVD: 4 Mbps; USB: 2 Mbps Lecture de fichiers - JVC KD-DV7300 | Instructions - Page 175
Bluetooth. Si le message ne disparaît pas, mettez l'appareil hors tension puis sous tension, puis connecter de nouveau le périphérique (ou réinitialisez l'appareil). RESET 8 Vérifiez la connexion entre l'adaptateur et cet appareil. Radio satellite • Vous pouvez aussi connecter la radio JVC - JVC KD-DV7300 | Instructions - Page 176
JVC suivant: Pour les utilisateurs de iPod: Pour les utilisateurs d'un lecteur D.: - JVC KD-DV7300 | Instructions - Page 177
du menu de réglage (voir page 45). Disque reproduit DVD Vidéo 48 kHz, 16/20/24 bits Linear PCM 96 kHz, Linear PCM Dolby Digital DTS MPEG Audio CD Audio, CD Vidéo CD audio avec DTS DivX/MPEG Dolby Digital MP3/WMA AAC WAV MPEG Audio FLUX/PCM Signal de sortie DOLBY SEULEMENT DIGITAL/PCM PCM - JVC KD-DV7300 | Instructions - Page 178
FRANÇAIS Codes de langue Code Langue Code Langue AA Afar FA Persan AB Abkhazien FI Finnois AF Afrikaans FJ Fidji AM Amharique FO Faroese AR Arabe FY Frison AS Assamais GA Irlandais AY Aymara GD Gaélique écossais AZ Azerbaïdjanais GL Galicien BA Bashkir GN Guarani BE Biélorusse BG - JVC KD-DV7300 | Instructions - Page 179
Guide de dépannage Ce qui apparaît être un problème n'est pas toujours sérieux. Vérifiez les points suivants avant d'appeler un centre de service statique pendant l'écoute de la radio. Connectez l'antenne solidement. • Le DVD Vidéo/DVD-VR/ Le fil de frein de stationnement n'est pas connecté DivX - JVC KD-DV7300 | Instructions - Page 180
ée d'initialisation varie en fonction du USB. périphérique USB. • N'utilisez pas trop de DivX/MPEG. • Enregistrez la piste audio en utilisant le format MP3 ou Dolby Digital pour flux audio des fichiers DivX. • Enregistrez la piste audio en utilisant le format MPEG1 Audio Layer 2 comme flux audio - JVC KD-DV7300 | Instructions - Page 181
pas rétabli), connectez de nouveau le périphérique. Vérifiez si le périphérique audio connecté prend en charge AVRCP (Audio Video Remote Control Profile). * Pour les opérations Bluetooth, référez-vous aux instructions fournies avec l'adaptateur Bluetooth. Suite à la page suivante RÉFÉRENCES 57 - JVC KD-DV7300 | Instructions - Page 182
l'affichage lors de l'écoute de la radio satellite XM. Le canal choisi n'est pas diffusé actuellement. Choisissez un autre canal ou continuez d'écouter le canal précédent. L'appareil est en train de changer les informations du canal et audio. Le texte d'information est temporairement indisponible - JVC KD-DV7300 | Instructions - Page 183
réinitialisation du changeur de CD. • Le changeur de CD ne fonctionne pas du tout. Réinitialisez l'autoradio (voir page 3). • iPod ou le lecteur D. ne . • Le son est déformé. Mettez hors service l'égaliseur sur cet appareil ou sur iPod/lecteur D. • "NO IPOD" ou "NO DP" apparaît sur l'affichage - JVC KD-DV7300 | Instructions - Page 184
, 15 kHz Niveau: ±10 dB Niveau de Sortie Audio: Numérique (DIGITAL OUT: Optique): Longueur d'onde du signal: 660 nm Niveau de sortie: -21 dBm à -15 dBm Niveau de sortie de ligne/Impédance: KD-ADV7380: 5,0 V/20 kΩ en charge (pleine échelle) KD-DV7300: 2,5 V/20 kΩ en charge (pleine échelle) Imp - JVC KD-DV7300 | Instructions - Page 185
dB Réponse en fréquence: 40 Hz à 15 000 Hz Séparation stéréo: 30 dB Tuner AM: Sensibilité: 20 μV Sélectivité: 35 dB SECTION DU LECTEUR DE DVD/CD Système de détection du Capteur optique sans contact (laser semi-conducteur) signal: Nombre de canaux: 2 canaux (stéréo) Réponse en fréquence - JVC KD-DV7300 | Instructions - Page 186
DU LECTEUR DE DVD/CD DivX/Vidéo MPEG: Vidéo: Résolution max.: Audio: Débit binaire: Fréquence d'échantillonnage: DivX: Fréquence d'é 44,1 kHz, 48 kHz 16 bit 44,1 kHz SECTION USB Standard USB: Vitesse de transfert de données: Pleine vitesse: Faible vitesse: Périphériques compatibles: - JVC KD-DV7300 | Instructions - Page 187
. et de XM Satellite Radio, Inc. • iPod est une marque de commerce d'Apple Inc., enregistrée aux États-Unis et dans les autres pays. • La marque du mot et les logos Bluetooth sont la propriété de Bluetooth SIG, Inc. et toute utilisation de ces marques par Victor Company of Japan, Limited (JVC) est - JVC KD-DV7300 | Instructions - Page 188
Having TROUBLE with operation? Please reset your unit Refer to page of How to reset your unit Still having trouble?? USA ONLY Call 1-800-252-5722 http://www.jvc.com We can help you! EN, SP, FR © 2007 Victor Company of Japan, Limited 0207DTSMDTJEIN - JVC KD-DV7300 | Instructions - Page 189
Instructions DVD/CD RECEIVER KD-ADV7380/KD-DV7300
-
 1
1 -
 2
2 -
 3
3 -
 4
4 -
 5
5 -
 6
6 -
 7
7 -
8
-
9
-
10
-
11
-
12
-
13
-
14
-
15
-
16
-
17
-
18
-
19
-
20
-
21
-
22
-
23
-
24
-
25
-
26
-
27
-
28
-
29
-
30
-
31
-
32
-
33
-
34
-
35
-
36
-
37
-
38
-
39
-
40
-
41
-
42
-
43
-
44
-
45
-
46
-
47
-
48
-
49
-
50
-
51
-
52
-
53
-
54
-
55
-
56
-
57
-
58
-
59
-
60
-
61
-
62
-
63
-
64
-
65
-
66
-
67
-
68
-
69
-
70
-
71
-
72
-
73
-
74
-
75
-
76
-
77
-
78
-
79
-
80
-
81
-
82
-
83
-
84
-
85
-
86
-
87
-
88
-
89
-
90
-
91
-
92
-
93
-
94
-
95
-
96
-
97
-
98
-
99
-
100
-
101
-
102
-
103
-
104
-
105
-
106
-
107
-
108
-
109
-
110
-
111
-
112
-
113
-
114
-
115
-
116
-
117
-
118
-
119
-
120
-
121
-
122
-
123
-
124
-
125
-
126
-
127
-
128
-
129
-
130
-
131
-
132
-
133
-
134
-
135
-
136
-
137
-
138
-
139
-
140
-
141
-
142
-
143
-
144
-
145
-
146
-
147
-
148
-
149
-
150
-
151
-
152
-
153
-
154
-
155
-
156
-
157
-
158
-
159
-
160
-
161
-
162
-
163
-
164
-
165
-
166
-
167
-
168
-
169
-
170
-
171
-
172
-
173
-
174
-
175
-
176
-
177
-
178
-
179
-
180
-
181
-
182
-
183
-
184
-
185
-
186
-
187
-
188
-
189
 |
 |

ENGLISH
ESPAÑOL
FRANÇAIS
DVD/CD RECEIVER
KD-ADV7380/KD-DV7300
RECEPTOR CON DVD/CD
KD-ADV7380/KD-DV7300
RÉCEPTEUR DVD/CD
KD-ADV7380/KD-DV7300
For canceling the display demonstration, see page 7.
Para cancelar la demostración en pantalla, consulte la página 7.
Pour annuler la démonstration des affichages, référez-vous à la page 7.
For installation and connections, refer to the separate manual.
Para la instalación y las conexiones, refiérase al manual separado.
Pour l’installation et les raccordements, se référer au manuel séparé.
INSTRUCTIONS
MANUAL DE INSTRUCCIONES
MANUEL D’INSTRUCTIONS
GET0448-001A
[J]
For customer Use:
Enter below the Model
No. and Serial No. which
are located on the top or
bottom of the cabinet. Retain
this information for future
reference.
Model No.
Serial No.