JVC KDDV5400 Instructions
JVC KDDV5400 - DVD Player With Radio Manual
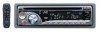 |
UPC - 046838032912
View all JVC KDDV5400 manuals
Add to My Manuals
Save this manual to your list of manuals |
JVC KDDV5400 manual content summary:
- JVC KDDV5400 | Instructions - Page 1
RÉCEPTEUR DVD/CD KD-ADV5490/KD-DV5400 For canceling the display demonstration, see page 7. Para cancelar la demostración en pantalla, consulte la página 7. Pour annuler la démonstration des affichages, référez-vous à la page 7. For installation and connections, refer to the separate manual. Para - JVC KDDV5400 | Instructions - Page 2
not approved by JVC could void the user's authority to operate the equipment. IMPORTANT FOR LASER PRODUCTS 1. CLASS 1 LASER PRODUCT 2. CAUTION: Do not open the top cover. There are no user serviceable parts inside the unit; leave all servicing to qualified service personnel. 3. CAUTION: (For - JVC KDDV5400 | Instructions - Page 3
be shown. - This warning appears only when the parking brake lead is connected to the parking brake system built in the car (refer to the Installation/Connection Manual). [Within 5 seconds...] For safety... • Do not raise the volume level too much, as this will block outside sounds, making driving - JVC KDDV5400 | Instructions - Page 4
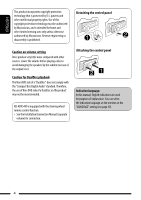
with the "Compact Disc Digital Audio" standard. Therefore, the use of Non-DVD side of a DualDisc on this product may not be recommended. KD-ADV5490 is equipped with the steering wheel remote control function. • See the Installation/Connection Manual (separate volume) for connection. Attaching - JVC KDDV5400 | Instructions - Page 5
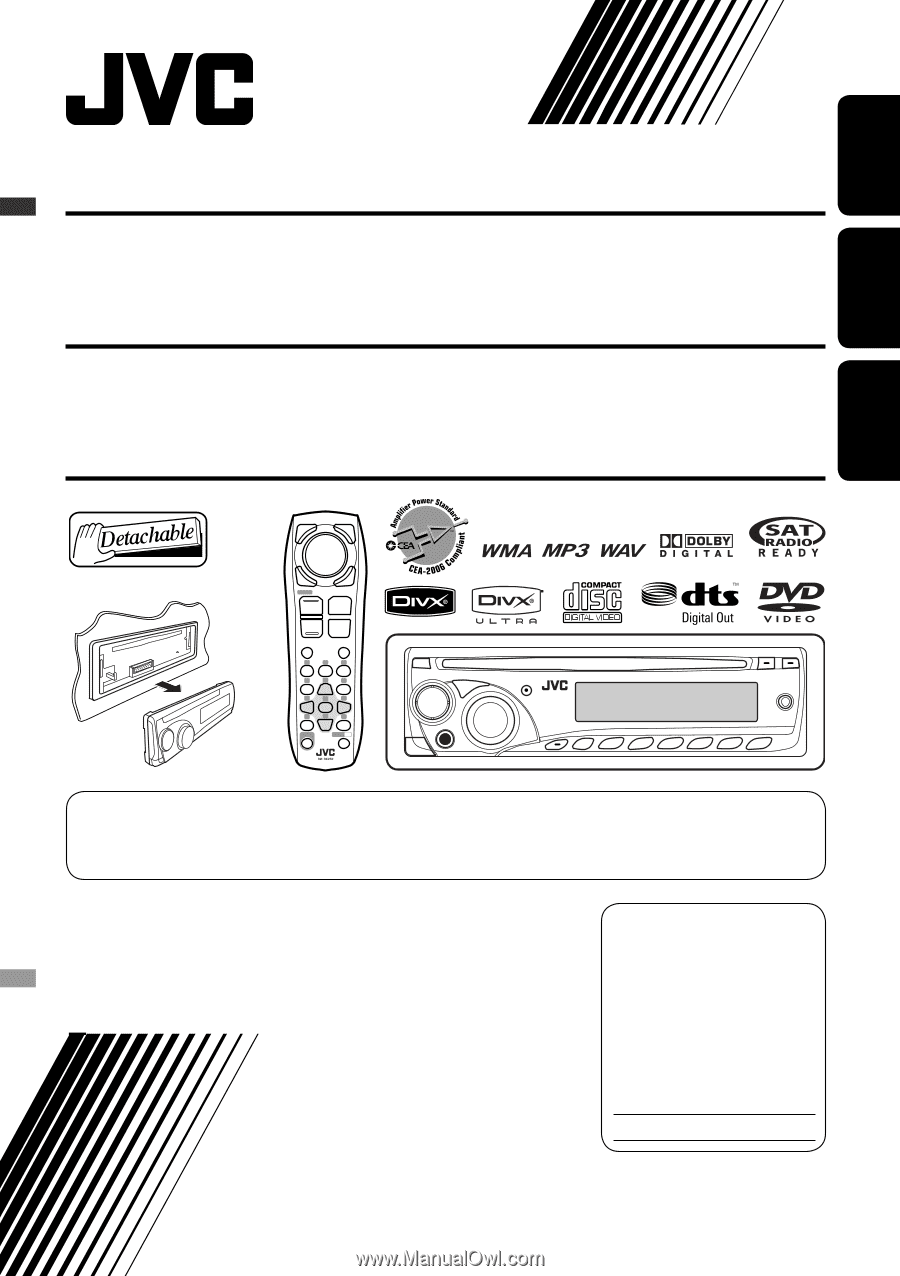
...12 Disc operations...13 • Operations using the control panel...14 • Operations using the remote controller (RM-RK252 16 EXTERNAL DEVICES Listening to the CD changer ...22 Listening to the ...32 REFERENCES More about this unit ...32 Maintenance...38 Troubleshooting...39 Specifications...42 5 - JVC KDDV5400 | Instructions - Page 6
Playable DVD-Audio DVD-ROM DVD Recordable/Rewritable (DVD-R/-RW *2, +R/+RW *3) • DVD Video: UDF bridge • DVD-VR • DivX/MPEG-1/MPEG-2/MP3/ WMA/WAV: ISO 9660 level 1, level 2, Romeo, Joliet DVD-Video DVD-VR DivX/MPEG1/MPEG2 MP3/WMA/WAV AAC JPEG/MPEG4 DVD+VR DVD-RAM Dual Disc DVD side Non-DVD - JVC KDDV5400 | Instructions - Page 7
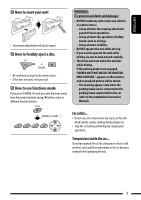
ENGLISH Preparation Cancel the display demonstration and set the clock • See also page 28. 1 Turn on the power. 2 Enter the PSM settings. 3 Cancel the display demonstrations Select "DEMO," then "DEMO OFF." Set the clock Select "CLOCK HOUR," then adjust the hour. Select "CLOCK MIN" ( - JVC KDDV5400 | Instructions - Page 8
disc. 3 • Turn on the power. • Turn off the power [Hold]. • Attenuate the sound (if the power is on). 4 Volume control [Turn]. 5 Remote sensor 6 • FM/AM/SIRIUS/XM: Select the band. • DISC: Start/pause playback. 7 Loading slot 8 Display window 9 Select the sound mode. p Change the display information - JVC KDDV5400 | Instructions - Page 9
, playback information) Using the remote controller (RM-RK252) Installing the battery • If the effectiveness of the remote controller decreases, replace both batteries. R03/LR03/AAA Before using the remote controller: • Aim the remote controller directly at the remote sensor on the unit. • DO - JVC KDDV5400 | Instructions - Page 10
2 5/∞ buttons • FM/AM: Selects the preset stations. • SIRIUS/XM: Selects the categories. • DISC: - DVD-Video: Selects the title. - DVD-VR: Selects the program . 4 / ¢ buttons • FM/AM: - Searches for stations automatically if pressed briefly. - Searches for stations manually if pressed and held. • - JVC KDDV5400 | Instructions - Page 11
disc setup menu (during stop). 7* TOP M (menu) button • DVD-Video/DivX: Shows the disc menu. • DVD-VR: Shows the Original Program screen. • VCD: Resumes PBC playback. buttons/* (asterisk)/# (hatch) when pressed with SHIFT button. - FM/AM/SIRIUS/XM: Selects the preset stations/ channels (1 - 6). - JVC KDDV5400 | Instructions - Page 12
AM." 2 Select the bands. 3 Search for a station to listen-Auto Search. Manual Search: Hold either one of the buttons until "M" flashes on the display, then press it repeatedly. • When receiving an FM stereo broadcast with sufficient signal strength, "ST" lights up on the display. Change the - JVC KDDV5400 | Instructions - Page 13
of other discs by referring to the monitor screen. (See pages 18 - 21.) The disc type is automatically detected, and playback starts automatically (for DVD: automatic start depends on its internal program). If the current disc does not have any disc menu, all tracks will be played repeatedly until - JVC KDDV5400 | Instructions - Page 14
ENGLISH Change the display information. Current chapter number and Elapsed playing time = Current chapter number and Clock = Current title and chapter number = (back to the beginning) Current chapter number and Elapsed playing time = Current chapter number and Clock = Current program (or playlist) - JVC KDDV5400 | Instructions - Page 15
" is set to "TAG OFF" (see page 29), folder name and file name appear. TAG indicator will not light up. *2 "NO NAME" appears for an audio CD. *3 Search speed: *4 Search speed: *5 Press to select number 1 to 6; hold to select number 7 to 12. OPERATIONS 15 - JVC KDDV5400 | Instructions - Page 16
using the remote controller (RM-RK252) Disc Button / Stop play Stop play Start play/Pause (if pressed during play) Start play/Pause (if pressed during play) • Reverse/forward chapter search*1 (No sound can be heard.) • Slow motion*2 during pause (No sound can be heard.) * DVD-VR: Reverse - JVC KDDV5400 | Instructions - Page 17
[Hold] Reverse/fast-forward track search *3 - - - - - • For DivX/MPEG Video/MP3/WMA/WAV, track is searched within the same folder. • For DVD-VR, program/playlist search is possible during Original program playback (PG)/Playlist playback (PL). • To erase a misentry, press CLR (clear) while - JVC KDDV5400 | Instructions - Page 18
Press ENT (enter) to confirm. • To resume PBC, press TOP M/MENU. Operations using the on-screen bar (DVD/DVD-VR/DivX/MPEG Video/VCD) These operations are possible on the monitor using the remote controller. 1 Show the on-screen bar (see page 19). (twice) 2 Select an item. 3 Make a selection. If pop - JVC KDDV5400 | Instructions - Page 19
ENGLISH On-screen bar Ex.: DVD-Video Information Operation 1 Disc type 2 • DVD-Video/DTS-CD: Audio signal format type and channel • VCD:PBC 3 Playback mode*1 DVD-Video: T. RPT: Title repeat C. RPT: Chapter repeat DVD-VR: C. RPT: Chapter repeat PG. RPT: Program repeat DivX/MPEG Video: T. - JVC KDDV5400 | Instructions - Page 20
ENGLISH Operations using the control screen (DivX/MPEG Video/MP3/WMA/WAV/CD) These operations are possible on the monitor using the remote controller. 1 Show the control screen. DivX/MPEG Video: Press 7 during play. MP3/WMA/WAV/CD: Automatically appear during play. 2 Select "Folder" column or " - JVC KDDV5400 | Instructions - Page 21
ENGLISH Operations using the list screen (DVD-VR/DivX/MPEG Video/MP3/WMA/WAV) These operations are possible on the monitor using the remote controller. Before playing, you can display the folder list/track list to confirm the contents and start playing a track. 1 Display the folder list while stop. - JVC KDDV5400 | Instructions - Page 22
ENGLISH Listening to the CD changer It is recommended to use a JVC MP3-compatible CD changer with your unit. You can connect a CD changer to the CD changer jack on the rear of the unit. • You can - JVC KDDV5400 | Instructions - Page 23
of the following (separately purchased) to the CD changer jack on the rear of this unit. • JVC SIRIUS Satellite radio interface, KS-SRA100, for listening to the SIRIUS Satellite radio. • JVC Smart Digital Adapter, XMDJVC100, for listening to the XM Satellite radio. GCI (Global Control Information - JVC KDDV5400 | Instructions - Page 24
ENGLISH 1 Select "SIRIUS" or "XM." 2 Select the bands. SIRIUS: XM: 3 Select a category. SIRIUS: If you select "ALL," you can tune in to all the channels of all categories. 4 Select a channel to listen. • Holding the button changes the channels rapidly. • While searching, invalid and - JVC KDDV5400 | Instructions - Page 25
ENGLISH Listening to the iPod Before operating, connect the Interface adapter for iPod, KS-PD100 (separately purchased) to the CD changer jack on the rear of the unit. Preparation: Make sure "CHANGER" is selected for the external input setting, see page 29. 1 Select "IPOD." 2 Select a song to - JVC KDDV5400 | Instructions - Page 26
the source. 3 Adjust the volume. 4 - Adjust the sound as you want (see page 27). Connecting an external component to the AUX input jack 3.5 mm (3/16") stereo mini plug (not supplied) Portable audio player, etc. 26 EXTERNAL DEVICES - JVC KDDV5400 | Instructions - Page 27
(c-EQ: custom equalizer). ENGLISH Preset value setting for each sound mode Sound mode USER ROCK CLASSIC POP HIP HOP JAZZ BAS (bass) 00 +03 +01 +04 ) Adjust and store auto-adjustment volume level for each source, comparing to the FM volume level. -05 to +05; initial: 00 VOLUME Adjust the volume. - JVC KDDV5400 | Instructions - Page 28
ENGLISH General settings - PSM You can change PSM (Preferred Setting Mode) items listed in the table below and on page 29. 1 Enter the PSM settings. 3 Select or adjust the selected PSM item. 2 Select a PSM item. 4 Repeat steps 2 and 3 to adjust other PSM items if necessary. 5 Finish the - JVC KDDV5400 | Instructions - Page 29
JVC CD changer, [22], or an Apple iPod, [25]. • EXT INPUT : To connect portable audio stereo effect will remain. AREA Tuner channel interval • AREA US • AREA EU • AREA SA : When using in North/Central/South America. AM/FM your car, it is recommended to select "CLOCK OFF" to save the car's battery - JVC KDDV5400 | Instructions - Page 30
Disc setup menu These operations are possible on the monitor using the remote controller. 1 Enter the disc setup menu while stop. 2 Select language. Refer also to "Language codes" on page 37. Select the initial audio language. Refer also to "Language codes" on page 37. Select the initial subtitle - JVC KDDV5400 | Instructions - Page 31
DIGITAL OUT terminal when "PCM ONLY" is selected for "DIGITAL AUDIO OUTPUT"). • SURROUND COMPATIBLE : Select to enjoy multi-channel surround audio by connecting an amplifier compatible with Dolby Surround. • STEREO : Normally select this. D. RANGE COMPRESSION You can enjoy a powerful sound - JVC KDDV5400 | Instructions - Page 32
a disc, disc play will start automatically, next time you turn on the power. FM/AM Storing stations in memory • During SSM search... - Received stations are preset in General • In this manual, words "track" and "file" are interchangeably used. • This unit can only play back audio CD (CD-DA) files - JVC KDDV5400 | Instructions - Page 33
DVD-VR files • For details about DVD-VR format and playlist, refer to the instructions of the letter case-upper/lower). • This unit supports DivX Media Format files, or . MPEG-2 files recorded by JVC Everio camcorders. • Audio stream should conform to MPEG1 Audio Layer 2. • This unit - JVC KDDV5400 | Instructions - Page 34
By turning on/off the power of the unit, you can turn on/off the JVC PnP. However, you cannot control it from this unit. • To know more about or as intended. In this case, visit the following JVC web site: Title assignment • If you try - JVC KDDV5400 | Instructions - Page 35
channel sources to this terminal, and set "DIGITAL AUDIO OUTPUT" correctly. (See page 31.) On-screen guide icons During playback, the following guide icons may appear for a while on the monitor. : Playback : Pause : DVD-Video/VCD: Forward slow motion : DVD-Video: Reverse slow motion : Forward search - JVC KDDV5400 | Instructions - Page 36
DIGITAL/ PCM ONLY OFF PCM DVD-Video 48 kHz, 16/20/24 bits Linear PCM 48 kHz, 16 bits stereo Linear PCM * 96 kHz, Linear PCM 48 kHz, 16 bits stereo Linear PCM Dolby Digital Dolby Digital bitstream 48 kHz, 16 bits stereo Linear PCM DTS DTS bitstream MPEG Audio MPEG bitstream 48 kHz, 16 - JVC KDDV5400 | Instructions - Page 37
ENGLISH Language codes Code Language AA Afar AB Abkhazian AF Afrikaans AM Ameharic AR Arabic AS Assamese AY Aymara AZ Azerbaijani BA Bashkir Code Language FA Persian FI Finnish FJ Fiji FO Faroese FY Frisian GA Irish GD Scots Gaelic GL Galician GN Guarani BE Byelorussian GU Gujarati BG Bulgarian - JVC KDDV5400 | Instructions - Page 38
inside the unit in the following cases: • After starting the heater in the car. • If it becomes very humid inside the car. Should this occur, the unit may malfunction. In this case, eject the shape C-thru Disc (semitransparent disc) Transparent or semi-transparent parts on its recording area 38 - JVC KDDV5400 | Instructions - Page 39
ENGLISH Troubleshooting What appears to be trouble is not always serious. Check the following points before calling a service center. FM/AM picture (DVD-Video/DivX/MPEG/ Parking brake wire is not connected properly. (See VCD) appears on the monitor. Installation/Connection Manual.) • No - JVC KDDV5400 | Instructions - Page 40
when picture is displayed while playing a DivX/MPEG Video file. • Record the audio track using MP3 or Dolby Digital as the audio stream of DivX files. • Record the audio track using MPEG1 Audio Layer 2 as the audio stream for MPEG Video files. • Elapsed playing time is not correct. This sometimes - JVC KDDV5400 | Instructions - Page 41
previous channel. • "LOADING" appears on the display while listening to the XM Satellite radio. The unit is loading the channel information and audio. Text information are temporarily unavailable. • "RESET 8" appears on the display. • Satellite radio does not work at all. Reconnect this unit and - JVC KDDV5400 | Instructions - Page 42
(full scale) KD-DV5400: 2.5 V/20 kΩ load (full scale) Output Impedance: 1 kΩ Color system: NTSC Video Output (composite): 1 Vp-p/75 Ω Other Terminal: CD changer, AUX (auxiliary) input jack, Steering wheel remote input (for KD-ADV5490) Frequency Range: FM Tuner: AM Tuner: FM: with channel - JVC KDDV5400 | Instructions - Page 43
) Number of Channels: 2 channels (stereo) Frequency Response: DVD, fs=48 kHz/96 kHz: 16 (W × H × D): Installation Size (approx.): Panel Size ) (excluding accessories) If a kit is necessary for your car, consult your telephone directory for the nearest car audio speciality shop. REFERENCES 43 - JVC KDDV5400 | Instructions - Page 44
ESPAÑOL Muchas gracias por la compra de un producto JVC. Como primer paso, por favor lea detenidamente este manual para comprender a fondo todas las instrucciones y obtener un máximo disfrute de esta unidad. IMPORTANTE (EE.UU.) Este equipo se ha sometido a todo tipo de pruebas y - JVC KDDV5400 | Instructions - Page 45
diferentes funciones. ADVERTENCIAS: (Para evitar daños y accidentes) • NO instale ningún receptor o tienda ningún cable en una ubicación donde; - sistema del freno de estacionamiento incorporado al automóvil (consulte el Manual de Instalación/Conexión). [En menos de 5 segundos...] Para fines de - JVC KDDV5400 | Instructions - Page 46
con la norma "Compact Disc Digital Audio". Por consiguiente, no se recomienda usar el lado no DVD de un DualDisc en este producto. El KD-ADV5490 está equipado con la función de control remoto en el volante de dirección. • Para la conexión, consulte el Manual de instalación/conexión (volumen separado - JVC KDDV5400 | Instructions - Page 47
ESPAÑOL CONTENIDO INTRODUCCIÓN Tipo de disco reproducible ...6 Preparativos...7 OPERACIONES Operaciones básicas • Uso del panel de control ...8 • Uso del control remoto (RM-RK252) ...9 Para escuchar la radio ...12 Operaciones de los discos ...13 • Operaciones utilizando el panel de control 14 • - JVC KDDV5400 | Instructions - Page 48
ESPAÑOL DVD-Audio DVD-ROM DVD Grabable/reescribible (DVD-R/-RW *2, +R/+RW *3) • DVD Vídeo: Puente UDF • DVD-VR • DivX/MPEG-1/MPEG-2/MP3/ WMA/WAV: ISO 9660 Nivel 1, Nivel 2, Romeo, Joliet DVD-Vídeo DVD-VR DivX/MPEG1/MPEG2 MP3/WMA/WAV AAC JPEG/MPEG4 DVD+VR DVD-RAM Dual Disc Lado DVD Lado no - JVC KDDV5400 | Instructions - Page 49
ESPAÑOL Preparativos Cancele la demostración en pantalla y ponga el reloj en hora • Consulte también la página 28. 1 Encienda la unidad. 2 Introduzca los ajustes PSM. 3 Cancele las demostraciones en pantalla. Seleccione "DEMO" y, a continuación, "DEMO OFF". Ponga el reloj en hora - JVC KDDV5400 | Instructions - Page 50
• Encienda la unidad. • Apaga el sistema [Sostener]. • Atenúa el sonido (si el sistema está encendido). 4 Control de volumen [Gire]. 5 Sensor remoto 6 • FM/AM/SIRIUS/XM: Selecciona la banda. • DISC: Inicie/pause la reproducción. 7 Ranura de carga 8 Ventanilla de visualización 9 Selecciona el modo de - JVC KDDV5400 | Instructions - Page 51
sonido (c-EQ: ecualizador personalizable)-CLASSIC, HIP HOP, JAZZ, ROCK, POPS, USER 5 Indicadores del modo de reproducción / ítem- RND (aleatoria), (disco una luz brillante (luz solar directa o iluminación artificial). Instale las pilas en el control remoto haciendo coincidir correctamente las - JVC KDDV5400 | Instructions - Page 52
está encendida. • La unidad se apaga si lo pulsa y mantiene pulsado. 2 Botones 5/∞ • FM/AM: Selecciona las emisoras preajustadas. • SIRIUS/XM: Selecciona las categorías. • DISC: - DVD-Vídeo: Selecciona el título. - DVD-VR: Selecciona el programa/lista de reproducción. - DivX/MPEG Vídeo/MP3/WMA/WAV - JVC KDDV5400 | Instructions - Page 53
Botón DISP (visualizar) • Cambia la información en pantalla. q Botones 1/¡ • DVD-Vídeo/VCD: Reproducción a menor velocidad (durante una pausa). • DivX/MPEG Ví )/# (numeral) cuando se lo presiona junto con el botón SHIFT. - FM/AM/SIRIUS/XM: Selecciona las emisoras/canales preajustados (1 - 6). - DISC: - JVC KDDV5400 | Instructions - Page 54
el procedimiento. Aparece "MONO OFF" y el indicador MO se apaga. Las emisoras FM locales con señales más potentes se buscan y almacenan automáticamente en la banda de FM seleccionada. Preajuste manual Ej.: Para guardar una emisora FM que transmite en 92,50MHz en el número de preajuste 4 de la banda - JVC KDDV5400 | Instructions - Page 55
la pantalla del monitor. (Consulte las páginas 18 a 21.) El tipo de disco se detecta automáticamente, y la reproducción se inicia también automáticamente (para DVD: el inicio automático depende de su programa interno). Si el disco actual no dispone de ningún menú de disco, todas las pistas ser - JVC KDDV5400 | Instructions - Page 56
Cambia la información en pantalla. ESPAÑOL Número de capítulo actual y tiempo de reproducción transcurrido = Número de capítulo actual y reloj = Número de título y capítulo actual = (vuelta al comienzo) Número de capítulo actual y tiempo de reproducción transcurrido = Número de capítulo actual y - JVC KDDV5400 | Instructions - Page 57
29), aparecerán el nombre de la carpeta y el nombre del archivo. El indicador TAG no se enciende. *2 Aparecerá "NO NAME" para un CD de audio. *3 Velocidad de búsqueda: *4 Velocidad de búsqueda: *5 Pulse para seleccionar número 1 a 6; mantenga pulsado para seleccionar número 7 a 12. OPERACIONES 15 - JVC KDDV5400 | Instructions - Page 58
avance de pista *4 (El (El sonido no se escucha.) sonido no se escucha.) • Cámara lenta*2 durante la pausa (El sonido no se escucha.) * DVD-VR: La cámara lenta hacia atrás no funciona. [Pulse] Seleccionar un capítulo (durante la reproducción o la pausa) [Sostener] Búsqueda de retroceso/avance - JVC KDDV5400 | Instructions - Page 59
la carpeta - - - - - • En el caso de DivX /MPEG Vídeo/MP3/WMA/WAV, busca la pista dentro de la misma carpeta. • En caso de DVD-VR, es posible realizar una búsqueda por programa/lista de reproducción durante la Reproducción de programas originales (PG)/Reproducción de listas de reproducción (PL - JVC KDDV5400 | Instructions - Page 60
(0 - 9) para ingresar el número deseado. 3 Pulse ENT (ingresar) para confirmar • Para reanudar PBC, pulse TOP M/MENU. Operaciones usando la barra en pantalla (DVD/DVD-VR/DivX/MPEG Vídeo/VCD) Estas operaciones se pueden realizar en el monitor usando el control remoto. 1 Muestra la barra en pantalla - JVC KDDV5400 | Instructions - Page 61
deo Información Funcionamiento ESPAÑOL 1 Tipo de disco 2 • DVD-Vídeo/DTS-CD: Tipo de formato de señal de audio y canal • VCD:PBC 3 Modo de reproducción*1 DVD-Vídeo: T. RPT: Repetición de título C. RPT: Repetición de capítulo DVD-VR: C. RPT: Repetición de capítulo PG. RPT: Repetición de - JVC KDDV5400 | Instructions - Page 62
ESPAÑOL Operaciones utilizando la pantalla de control (DivX/MPEG Vídeo/MP3/WMA/WAV/CD) Estas operaciones se pueden realizar en el monitor usando el control remoto. 1 Muestre la pantalla de control. DivX/MPEG Vídeo: Pulse 7 durante la reproducción. MP3/WMA/WAV/CD: Aparece automáticamente durante la - JVC KDDV5400 | Instructions - Page 63
lista 4 Carpeta/pista actual (barra resaltada) Pantalla de lista (DVD-VR) Puede usar la pantalla PROGRAMA ORIGINAL o LISTA REPRODUCCIÓN en cualquier momento mientras se reproduce un DVD-VR con sus datos grabados. 1 Seleccione una pantalla de lista. - JVC KDDV5400 | Instructions - Page 64
ESPAÑOL Escuchando el cambiador de CD Se recomienda usar un cambiador de CD compatible con MP3 JVC con este receptor. Puede conectar un cambiador de CD al jack del cambiador de CD en la parte trasera de la unidad. • Solamente se podrán reproducir discos CD (incluyendo CD Text) y MP3 convencionales. - JVC KDDV5400 | Instructions - Page 65
(adquiridas separadamente) al jack del cambiador de CD de la parte trasera de esta unidad. • Interfaz de radio satelital SIRIUS de JVC, KS-SRA100, para escuchar la radio satelital SIRIUS. • Adaptador digital inteligente de JVC, XMDJVC100, para escuchar la radio satelital XM. Actualización de GCI - JVC KDDV5400 | Instructions - Page 66
ESPAÑOL 1 Seleccione "SIRIUS" o "XM". 2 Selecciona las bandas. SIRIUS: XM: 3 Seleccione una categoría. SIRIUS: Si selecciona "ALL", puede sintonizar todos los canales de todas las categorías. 4 Seleccione el canal de audición. • Al mantener pulsado el botón, los canales se cambian rá - JVC KDDV5400 | Instructions - Page 67
Antes de hacer funcionar, conecte la interfaz adaptadora para iPod, KS-PD100 (de venta por separado) al jack del cambiador de CD en la parte posterior de la unidad. Preparativos: Asegúrese de que se ha seleccionado "CHANGER" para el ajuste de entrada externa, consulte la página 29. 1 Seleccione - JVC KDDV5400 | Instructions - Page 68
externos Podrá conectar un componente externo a: • Jack del cambiador de CD de la parte trasera de esta unidad utilizando los siguientes adaptadores: - Adaptador de entrada de línea, de 3,5 mm (3/16 pulgada) (no suministrado) Reproductor de audio portátil, etc. 26 DISPOSITIVOS EXTERNOS - JVC KDDV5400 | Instructions - Page 69
ÑOL Configuración del valor preajustado para cada modo de sonido Modo de sonido USER ROCK CLASSIC POP HIP HOP JAZZ BAS (graves) 00 +03 +01 + volumen de ajuste automático para cada fuente, comparándolo con el nivel de volumen de FM. -05 a +05; inicial: 00 VOLUME Ajuste el volumen. 00 a 50 o 00 - JVC KDDV5400 | Instructions - Page 70
ESPAÑOL Configuraciones generales - PSM Puede cambiar los elementos de PSM (Modo de ajustes preferidos) enumerados en la siguiente tabla y en la página 29. 1 Introduzca los ajustes PSM. 3 Seleccione o ajuste la opción de PSM seleccionada. 2 Seleccione una opción de PSM. 4 Repita los pasos 2 y 3 - JVC KDDV5400 | Instructions - Page 71
EXT INPUT : Para conectar un cambiador de CD JVC [22] o un iPod Apple [25]. : Para conectar un reproductor de audio portátil al jack del cambiador de CD, [26 Cuando se utiliza en los países de América del Sur donde el intervalo de FM es 100 kHz. El intervalo de AM está ajustado a 10 kHz. *1 Si la - JVC KDDV5400 | Instructions - Page 72
PANTALLA Ajuste Selecciona el idioma inicial del menú de disco. Consulte también "Códigos de idioma" en la página 37. Selecciona el idioma de audio inicial. Consulte también "Códigos de idioma" en la página 37. Selecciona el idioma inicial del subtítulo o borra el subtítulo (DESCONECTAR). Consulte - JVC KDDV5400 | Instructions - Page 73
Menú Opción TIPO DE MONITOR Ajuste Seleccione el tipo de monitor para ver una imagen en pantalla ancha en su monitor. IMAGEN ESPAÑOL AUDIO POSICIÓN DEL OSD Seleccione la posición de la barra en pantalla en el monitor. • 1 : Posición más alta • 2 : Posición más baja (La guía que está debajo del - JVC KDDV5400 | Instructions - Page 74
de título Puede asignar títulos a 30 frecuencias de emisoras (FM y AM), con un máximo de 8 carácteres para cada título. 1 Selecciona la emisora a la • En este manual, las palabras "pista" y "archivo" se utilizan indistintamente. • Este receptor sólo podrá reproducir archivos de CD de audio (CD-DA) - JVC KDDV5400 | Instructions - Page 75
Reproducción de archivos DVD-VR • Para los detalles sobe el formato DVD-VR y la lista de reproducción, consulte el manual entregado con el equipo para archivos MPEG-2 grabados mediante videocámaras JVC Everio. • "Audio stream" debe cumplir con MPEG1 Audio Layer 2. • Este receptor no puede reproducir - JVC KDDV5400 | Instructions - Page 76
Plug and Play) de JVC con el adaptador de radio SIRIUS KS-U100K de JVC (no suministrado) a la toma del cambiador de CD, situada en la parte trasera. Al apagar . En tal caso, visite el siguiente sitio web de JVC: Asignación de título • - JVC KDDV5400 | Instructions - Page 77
deo: Cámara lenta hacia atrás : Búsqueda progresiva : Búsqueda regresiva DVD: Los siguientes iconos aparecen al comienzo de una escena que contiene: : Múltiples idiomas para subtítulos : Múltiples idiomas para audio : Múltiples ángulos de visión • Fabricado bajo licencia de Dolby Laboratories. Dolby - JVC KDDV5400 | Instructions - Page 78
terminal DIGITAL OUT Las señales emitidas difieren según el ajuste "SALIDA DE AUDIO DIGITAL" en el menú de configuración (consulte la página 31). Disco reproducido Señal de salida STREAM/PCM DOLBY DIGITAL/ PCM SÓLO PCM DESCONECTAR DVD-Vídeo 48 kHz, 16/20/24 bit PCM Lineal 48 kHz, 16 bit - JVC KDDV5400 | Instructions - Page 79
ESPAÑOL Códigos de idioma Código Idioma Código Idioma Código Idioma Código Idioma Código Idioma AA Afar FA Persa KK Kazak NO Noruego ST Sesotho AB Abkasiano FI Finlandés KL Groenlandés OC Ocitano SU Sudanés AF Afrikaans FJ Islas Fiji KM Camboyano OM (Afan) Oromo SW Suahili AM Amearico FO Faro - JVC KDDV5400 | Instructions - Page 80
utilice los siguientes discos: CD simple-disco de 8 cm (3-3/16 pulgada) Disco alabeado Pegatinas y restos de pegatina Rótulo autoadhesivo Forma irregular C-thru Disc (disco semitransparente) Partes transparente o semitransparentes en el área de grabación. 38 - JVC KDDV5400 | Instructions - Page 81
cilmente. Verifique los siguientes puntos antes de llamar al centro de servicio. FM/AM General Síntoma Soluciones/Causas • No se puede escuchar el sonido de estacionamiento no está (DVD-Vídeo/DivX/MPEG/VCD) en el monitor. correctamente conectado. (Consulte el Manual de Instalación/Conexión.) • - JVC KDDV5400 | Instructions - Page 82
usando MP3 o Dolby Digital visualiza la imagen mientras se reproduce un como el "audio stream" de los archivos DivX. archivo DivX/MPEG Vídeo. • Grabe la pista de audio usando MPEG1 Audio Layer 2 como el "audio stream" para archivos MPEG Vídeo. • El tiempo de reproducción transcurrido no Esto - JVC KDDV5400 | Instructions - Page 83
. • La señal "LOADING" aparece en la pantalla mientras escucha la radio satelital XM. El receptor está cargando la información del canal y el audio. La información de texto no está disponible temporalmente. • Aparece "RESET 8" en la pantalla. • La radio satelital no funciona. Vuelva a conectar - JVC KDDV5400 | Instructions - Page 84
Audio: Digital (DIGITAL OUT: Óptico): Longitud de onda de señal: 660 nm Nivel de salida: -21 dBm a -15 dBm Nivel/impedancia salida línea: KD-ADV5490: 5,0 V/20 kΩ de carga (plena escala) KD-DV5400 dirección (para KD-ADV5490) Gama de frecuencias: Sintonizador de FM: Sintonizador de AM: FM: con el - JVC KDDV5400 | Instructions - Page 85
ptico sin contacto (láser semiconductor) señal: Número de canales: 2 canales (estereofónicos) Respuesta de frecuencias: DVD, fs=48 kHz/96 kHz: CD, fs=44,1 kHz: 16 Hz a 22 000 Hz 16 Hz a consulte su directorio telefónico para buscar la tienda especializada en car audio más cercana. REFERENCIAS 43 - JVC KDDV5400 | Instructions - Page 86
pour avoir acheté un produit JVC. Veuillez lire attentivement toutes les instructions avant d'utiliser l'appareil afin de bien comprendre son fonctionnement et d'obtenir les meilleures performances possibles. Précautions Tout changement ou modification non approuvé par JVC peut annuler l'autorité de - JVC KDDV5400 | Instructions - Page 87
connecté au système de frein de stationnement intégré à la voiture (référez-vous au Manuel d'installation/ raccordement). [Avant 5 secondes...] Pour sécurité... • N'augmentez pas trop le volume car cela bloquerait les sons de l'extérieur rendant la conduite dangereuse. • Arrêtez la voiture avant - JVC KDDV5400 | Instructions - Page 88
non DVD d'un disque à "DualDisc" n'est pas compatible avec le standard "Compact Disc Digital Audio". Par conséquent, l'utilisation de la face non DVD d' voir page 30). Le KD-ADV5490 est muni d'une fonction de télécommande de volant. • Référez-vous au Manuel d'installation/ raccordement (volume sépar - JVC KDDV5400 | Instructions - Page 89
généraux - PSM...28 Menu de réglage du disque...30 Affectation d'un titre...32 RÉFÉRENCES Pour en savoir plus à propos de cet autoradio 32 Entretien ...38 Guide de dépannage ...39 Spécifications...42 5 - JVC KDDV5400 | Instructions - Page 90
• DivX/MPEG-1/MPEG-2/MP3/ WMA/WAV: ISO 9660 Niveau 1, Niveau 2, Romeo et Joliet DVD Vidéo DVD-VR DivX/MPEG1/MPEG2 MP3/WMA/WAV AAC JPEG/MPEG4 DVD+VR DVD-RAM Dual Disc Côté DVD Face non DVD CD/VCD CD Audio/CD Text (CD-DA)/DTS-CD*4 VCD (CD Vidéo) SVCD (Super CD Vidéo) CD-ROM CD-I (CD - JVC KDDV5400 | Instructions - Page 91
Préparation Annulez la démonstration des affichages et réglez l'horloge • Référez-vous aussi à la page 28. 1 Mise sous tension de l'appareil. 2 Accédez aux réglages PSM. 3 Annulez de la démonstration des affichages Choisissez "DEMO", puis "DEMO OFF". Réglez l'horloge Choisissez "CLOCK - JVC KDDV5400 | Instructions - Page 92
tension). 4 Réglage du volume [Tournez]. 5 Capteur de télécommande 6 • FM/AM/SIRIUS/XM: Permet de choisir la bande. • DISC: Démarre/met en sur une des touches suivantes (avant 5 secondes)... MO : Mise en/hors service de la réception monophonique. SSM : Préréglage automatique des stations [Maintenez - JVC KDDV5400 | Instructions - Page 93
source de lecture-CH (changeur de CD), DISC / Indicateurs de mode sonore (c-EQ: égaliseur personnalisé)-CLASSIC, HIP HOP, JAZZ, ROCK, POPS, USER 5 Indicateurs de mode de lecture / indicateurs d'option-RND (aléatoire), (disque), (dossier), RPT (répétition) 6 Indicateurs de réception du tuner-ST (st - JVC KDDV5400 | Instructions - Page 94
• Maintenez cette touche pressée pour mettre l'appareil hors tension. 2 Touches 5/∞ • FM/AM: Choisit des stations préréglées. • SIRIUS/XM: Permet de choisir les catégories. • DISC: - DVD Vidéo: Permet de choisir le titre. - DVD-VR: Choisit le programme/liste de lecture. - DivX/MPEG Vidéo/MP3/WMA/WAV - JVC KDDV5400 | Instructions - Page 95
du disque (à l'arrêt) 7* Touche TOP M (menu) • DVD Vidéo/DivX: Affiche le menu de disque. • DVD-VR: Affiche l'écran du programme original. • VCD: Reprend la quand les touches sont pressées en même temps que la touche SHIFT. - FM/AM/SIRIUS/XM: Choisit des stations/canaux préréglés (1 - 6). - DISC: - JVC KDDV5400 | Instructions - Page 96
une station, "NO NAME" apparaît. Pour affecter un titre à une station, référez-vous à la page 32. Préréglage automatique des stations FM-SSM (Mémorisation automatique séquentielle des stations puissantes) Vous pouvez prérégler six stations maximum pour chaque bande. 1 Lors de l'écoute d'une station - JVC KDDV5400 | Instructions - Page 97
vous référant à l'écran du moniteur. (Voir les pages 18 à 21). Le type de disque est détecté automatiquement et la lecture démarre automatiquement (pour les DVD: le démarrage automatique de la lecture dépend de son programme interne). Si le disque actuel ne possède pas de menu de disque, toutes les - JVC KDDV5400 | Instructions - Page 98
Changement de l'information sur l'affichage. FRANÇAIS Numéro du chapitre actuel et durée de lecture écoulée = Numéro du chapitre actuel et horloge = Titre et numéro du chapitre actuel = (retour au début) Numéro du chapitre actuel et durée de lecture écoulée = Numéro du chapitre actuel et horloge = - JVC KDDV5400 | Instructions - Page 99
(voir page 29), le nom du dossier et le nom du fichier apparaissent. L'indicateur TAG ne s'allume pas. *2 "NO NAME" apparaît pour les CD audio. *3 Vitesse de recherche: *4 Vitesse de recherche: *5 Appuyez sur ces touches pour choisir un numéro de 1 à 6; maintenez pressées ces touches pour choisir un - JVC KDDV5400 | Instructions - Page 100
si la touche est pressée*2 pendant une pause (Aucun son n'est entendu.) * DVD-VR: La lecture au ralenti vers l'arrière ne fonctionne pas. Recherche de , appuyez répétitivement sur DIRECT pour choisir le mode de recherche souhaité. DVD Vidéo : DVD-VR : DivX/Vidéo MPEG : MP3/WMA/WAV : 2 Tout - JVC KDDV5400 | Instructions - Page 101
l'arrière/vers l'avant *3 - - - - - • Pour les DivX/MPEG Vidéo/MP3/WMA/WAV, une plage est recherchée à l'intérieur du même dossier. • Pour les DVD-VR, la recherche de programme/liste de lecture est possible pendant la lecture du programme original (PG)/liste de lecture (PL). • Pour annuler une - JVC KDDV5400 | Instructions - Page 102
3 Appuyez sur ENT (entrée) pour valider. • Pour rétablir la lecture PBC, appuyez sur TOP M/ MENU. Opérations en utilisant la barre sur l'écran (DVD/DVD-VR/DivX/MPEG Vidéo/VCD) Ces opérations sont possibles sur le moniteur en utilisant la télécommande. 1 Affichez la barre sur l'écran (voir page 19 - JVC KDDV5400 | Instructions - Page 103
de la durée Durée de lecture écoulée du disque (Pour les DVD-Vidéo, la durée de lecture écoulée du titre/ programme/liste de lecture numéro) Changement de la langue des dialogues ou le canal audio Changez ou mettez hors service la langue des sous-titres Changement de l'angle de vue Lecture - JVC KDDV5400 | Instructions - Page 104
Opérations en utilisant l'écran de commande (DivX/MPEG Vidéo/MP3/WMA/WAV/CD) Ces opérations sont possibles sur le moniteur en utilisant la télécommande. 1 Affiche l'écran de commande. DivX/Vidéo MPEG: Appuyez sur 7 pendant la lecture. MP3/WMA/WAV/CD: Apparaît automatiquement pendant la lecture. 2 - JVC KDDV5400 | Instructions - Page 105
la liste 4 Dossier/plage actuelle (mis en valeur) Écran de liste (DVD-VR) Vous pouvez utiliser l'écran PROGRAMME ORIGINAL ou LISTE LECTURE à n'importe quel moment pendant la lecture d'un DVD-VR avec ses données enregistrées. 1 Choisissez un écran de - JVC KDDV5400 | Instructions - Page 106
FRANÇAIS Écoute du changeur de CD Il est recommandé d'utiliser un changeur de CD JVC compatible MP3 avec votre autoradio. Vous pouvez connecter un changeur de CD à la prise de changeur de CD à l'arrière de l'appareil. • Vous pouvez uniquement - JVC KDDV5400 | Instructions - Page 107
séparément) à la prise du changeur de CD à l'arrière de l'appareil. • Interface de radio satellite SIRIUS JVC, KS-SRA100, pour écouter la radio satellite SIRIUS. • Adaptateur JVC Smart Digital, XMDJVC100, pour écouter la radio satellite XM. Mise à jour des informations GCI (Informations de commande - JVC KDDV5400 | Instructions - Page 108
FRANÇAIS 1 Choisissez "SIRIUS" ou "XM". 2 Sélection de la bande. SIRIUS: XM: 3 Choisissez une catégorie. SIRIUS: Si vous choisissez "ALL", vous pouvez accorder tous les canaux de toutes les catégories. 4 Choisissez un canal à écouter. • Maintenir la touche pressée permet de changer les - JVC KDDV5400 | Instructions - Page 109
Écoute de iPod Avant de commencer, connectez l'adaptateur d'interface pour iPod, KS-PD100 (vendu séparément) à la prise du changeur de CD à l'arrière de l'appareil. Préparation: Assurez-vous que "CHANGER" est choisi pour le réglage de l'entrée extérieure, voir page 29. 1 Choisissez "IPOD". 2 - JVC KDDV5400 | Instructions - Page 110
vous le souhaitez (voir page 27). Connexion d'un appareil extérieur à la prise d'entrée AUX mini fiche stéréo de 3,5 mm (3/16 pouces) (non fournie) Lecteur audio portable, etc. 26 APPAREILS EXTÉRIEURS - JVC KDDV5400 | Instructions - Page 111
EQ: égaliseur personnalisé). FRANÇAIS Valeur préréglée pour chaque mode sonore Mode sonore USER ROCK CLASSIC POP HIP HOP JAZZ BAS (graves) 00 +03 +01 +04 + initial: 00 automatique pour chaque source, par rapport au niveau de volume FM. VOLUME Ajuste le volume. 00 à 50 ou 00 à 30*4 *1 - JVC KDDV5400 | Instructions - Page 112
TIME ZONE*2, *3 Fuseau horaire 1 - 12 00 - 59 • AUTO • OFF - Réglage, [page de référence] : La démonstration des affichages entre en service si aucune opération n'est réalisée pendant environ 20 secondes, [7]. : Annulation. : L'horloge apparaît sur l'affichage tout le temps quand l'appareil est - JVC KDDV5400 | Instructions - Page 113
• DST OFF : Mettez en service l'heure d'été si votre zone de CD JVC, [22], ou un iPod Apple, [25]. : Pour connecter un lecteur audio portable à les pays d'Amérique du Sud ou l'intervalle FM est de 100 kHz. L'intervalle AM est régl choisir "CLOCK OFF" pour ne pas user la batterie de la voiture. *2 - JVC KDDV5400 | Instructions - Page 114
régler. • Pour annuler le menu déroulant, appuyez sur RETURN. 4 Choisisse une option. Pour revenir à l'écran normal LANGUE Menu Élément LANGUE MENU LANGUE AUDIO SOUS-TITRE LANGUE D'ECRAN Réglage Choisissez la langue initiale du menu de disque. Référez-vous aussi à "Codes de langue" à la page 37 - JVC KDDV5400 | Instructions - Page 115
basse (les instructions d'aide sous le menu de réglage du disque disparaissent.) SORTIE AUDIO NUM. Choisissez Dolby Surround. • STEREO : Normalement choisissez ce support Dolby Digital. • AUTO : Choisissez ce réglage pour appliquer les effets aux supports codés multicanaux (sauf les supports - JVC KDDV5400 | Instructions - Page 116
automatiquement, la prochaine fois que vous mettez l'appareil sous tension. FM/AM Mémorisation des stations • Pendant la recherche SSM... - Les de façon interchangeable. • Cet autoradio peut uniquement reproduire les fichiers CD audio (CD-DA) si différents types de fichier sont enregistrés sur le - JVC KDDV5400 | Instructions - Page 117
de fichiers DVD-VR • Pour les détails sur le format DVD-VR et la liste de lecture, référez-vous aux instructions fournies avec pour les fichiers MPEG2 enregistrés par les caméscopes JVC Everio. • Le flux audio doit être conforme au format MPEG1 Audio Layer 2. • Cet autoradio ne peut pas reproduire - JVC KDDV5400 | Instructions - Page 118
que iPod est connecté, toutes les opérations à partir de iPod sont hors service. Réalisez toutes les opérations à partir de cet appareil. • Le comme prévues. Dans ce cas, consultez le site Web JVC suivant: Affectation d'un titre • Si - JVC KDDV5400 | Instructions - Page 119
avec ces sources multicanaux, et réglez "SORTIE AUDIO NUM." correctement. (Voir page 31.) Icônes guides sur l'écran Pendant la lecture, les ic sont des marques déposées de DTS, Inc. • Le "DVD Logo" est une marque de commerce de DVD Format/Logo Licensing Corporation, enregistrée aux États- Unis, au - JVC KDDV5400 | Instructions - Page 120
la prise DIGITAL OUT Les signaux de sortie diffèrent en fonction du réglage "SORTIE AUDIO NUM." du menu de réglage (voir page 31). Disque reproduit FLUX/PCM Signal de sortie DOLBY DIGITAL/ SEULEMENT PCM ARRET PCM DVD Vidéo 48 kHz, 16/20/24 bits Linear PCM 48 kHz, 16 bits st - JVC KDDV5400 | Instructions - Page 121
FRANÇAIS Codes de langue Code Langue Code Langue AA Afar FA Persan AB Abkhazien FI Finnois AF Afrikaans FJ Fidji AM Amharique FO Faroese AR Arabe FY Frison AS Assamais GA Irlandais AY Aymara GD Gaélique écossais AZ Azerbaïdjanais GL Galicien BA Bashkir GN Guarani BE Biélorusse BG - JVC KDDV5400 | Instructions - Page 122
jusqu'à ce que l'humidité s'évapore. Comment manipuler les disques Pour retirer un disque de sa boîte, faites pression vers le centre du boîtier Support central et soulevez légèrement le disque en el tenant par ses bords. • Tenez toujours le disque par ses bords. Ne touchez pas la surface enregistr - JVC KDDV5400 | Instructions - Page 123
FRANÇAIS Guide de dépannage Ce qui apparaît être un problème n'est pas toujours sérieux. Vérifiez les points suivants avant d'appeler un centre de service. FM/AM Généralités Symptôme • Aucun son n'est entendu des enceintes. • Cet autoradio ne fonctionne pas du tout. Remède/Cause • Ajustez le - JVC KDDV5400 | Instructions - Page 124
la lecture d'un fichier vidéo DivX/MPEG. • Enregistrez la piste audio en utilisant le format MP3 ou Dolby Digital pour flux audio des fichiers DivX. • Enregistrez la piste audio en utilisant le format MPEG1 Audio Layer 2 comme flux audio pour les fichiers vidéo MPEG. • La durée de lecture écoul - JVC KDDV5400 | Instructions - Page 125
L'appareil est en train de changer les informations du canal et audio. Le texte d'information est temporairement indisponible. • "RESET 8" appara à jour la version du micrologiciel. • Le son est déformé. Mettez hors service l'égaliseur sur cet appareil ou sur iPod. • "NO IPOD" apparaît sur - JVC KDDV5400 | Instructions - Page 126
Audio: Numérique (DIGITAL OUT: Optique): Longueur d'onde du signal: 660 nm Niveau de sortie: -21 dBm à -15 dBm Niveau de sortie de ligne/Impédance: KD-ADV5490: 5,0 V/20 kΩ en charge (pleine échelle) KD-DV5400 (pour le KD-ADV5490) Plage de fréquences: Tuner FM: Tuner AM: FM: avec l'intervalle - JVC KDDV5400 | Instructions - Page 127
: 2 canaux (stéréo) Réponse en fréquence: DVD, fs=48 kHz/96 kHz: 16 Hz à 22 × 480 pixels (30 i/s) 720 × 576 pixels (25 i/s) Audio: Débit binaire: DivX: 32 kbps à 320 kbps Vidéo MPEG 104°F) GÉNÉRALITÉS Dimensions (L × H × P): Taille d'installation (approx.): 182 mm × 52 mm × 159 mm (7-3/16 - JVC KDDV5400 | Instructions - Page 128
Having TROUBLE with operation? Please reset your unit Refer to page of How to reset your unit Still having trouble?? USA ONLY Call 1-800-252-5722 http://www.jvc.com We can help you! EN, SP, FR © 2007 Victor Company of Japan, Limited 1207DTSMDTJEIN - JVC KDDV5400 | Instructions - Page 129
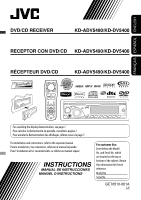
Instructions DVD/CD RECEIVER KD-ADV5490/KD-DV5400
-
 1
1 -
 2
2 -
 3
3 -
 4
4 -
 5
5 -
 6
6 -
 7
7 -
8
-
9
-
10
-
11
-
12
-
13
-
14
-
15
-
16
-
17
-
18
-
19
-
20
-
21
-
22
-
23
-
24
-
25
-
26
-
27
-
28
-
29
-
30
-
31
-
32
-
33
-
34
-
35
-
36
-
37
-
38
-
39
-
40
-
41
-
42
-
43
-
44
-
45
-
46
-
47
-
48
-
49
-
50
-
51
-
52
-
53
-
54
-
55
-
56
-
57
-
58
-
59
-
60
-
61
-
62
-
63
-
64
-
65
-
66
-
67
-
68
-
69
-
70
-
71
-
72
-
73
-
74
-
75
-
76
-
77
-
78
-
79
-
80
-
81
-
82
-
83
-
84
-
85
-
86
-
87
-
88
-
89
-
90
-
91
-
92
-
93
-
94
-
95
-
96
-
97
-
98
-
99
-
100
-
101
-
102
-
103
-
104
-
105
-
106
-
107
-
108
-
109
-
110
-
111
-
112
-
113
-
114
-
115
-
116
-
117
-
118
-
119
-
120
-
121
-
122
-
123
-
124
-
125
-
126
-
127
-
128
-
129
 |
 |
ENGLISH
ESPAÑOL
FRANÇAIS
DVD/CD RECEIVER
KD-ADV5490/KD-DV5400
RECEPTOR CON DVD/CD
KD-ADV5490/KD-DV5400
RÉCEPTEUR DVD/CD
KD-ADV5490/KD-DV5400
For canceling the display demonstration, see page 7.
Para cancelar la demostración en pantalla, consulte la página 7.
Pour annuler la démonstration des affichages, référez-vous à la page 7.
For installation and connections, refer to the separate manual.
Para la instalación y las conexiones, refiérase al manual separado.
Pour l’installation et les raccordements, se référer au manuel séparé.
INSTRUCTIONS
MANUAL DE INSTRUCCIONES
MANUEL D’INSTRUCTIONS
GET0510-001A
[J]
For customer Use:
Enter below the Model
No. and Serial No. which
are located on the top or
bottom of the cabinet. Retain
this information for future
reference.
Model No.
Serial No.