JVC KDDV5400 Instructions - Page 9
Using the remote controller RM-RK252 - stereo
 |
UPC - 046838032912
View all JVC KDDV5400 manuals
Add to My Manuals
Save this manual to your list of manuals |
Page 9 highlights
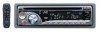
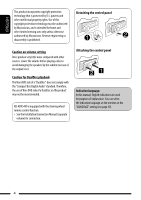
Display window ENGLISH 1 Tr (track) indicator 2 Source display / Track number / Folder number / Disc number / Title number / PBC indicator / Time countdown indicator 3 Playback source indicators-CH (CD changer), DISC 4 Sound mode (c-EQ: custom equalizer) indicators -CLASSIC, HIP HOP, JAZZ, ROCK, POPS, USER 5 Playback mode / item indicators- RND (random), (disc), (folder), RPT (repeat) 6 Tuner reception indicators-ST (stereo), MO (monaural) 7 LOUD (loudness) indicator 8 EQ (equalizer) indicator 9 Disc information indicators- TAG (Tag information), (folder), (track/file) p Main display (Time, menu, playback information) Using the remote controller (RM-RK252) Installing the battery • If the effectiveness of the remote controller decreases, replace both batteries. R03/LR03/AAA Before using the remote controller: • Aim the remote controller directly at the remote sensor on the unit. • DO NOT expose the remote sensor to bright light (direct sunlight or artificial lighting). Insert the batteries into the remote controller by matching the polarity (+ and -) correctly. Caution: Battery shall not be exposed to excessive heat such as sunshine, fire, or the like. Continued on the next page OPERATIONS 9
-
 1
1 -
2
-
3
-
 4
4 -
 5
5 -
 6
6 -
 7
7 -
 8
8 -
 9
9 -
 10
10 -
 11
11 -
 12
12 -
 13
13 -
 14
14 -
15
-
16
-
17
-
18
-
19
-
20
-
21
-
22
-
23
-
24
-
25
-
26
-
27
-
28
-
29
-
30
-
31
-
32
-
33
-
34
-
35
-
36
-
37
-
38
-
39
-
40
-
41
-
42
-
43
-
44
-
45
-
46
-
47
-
48
-
49
-
50
-
51
-
52
-
53
-
54
-
55
-
56
-
57
-
58
-
59
-
60
-
61
-
62
-
63
-
64
-
65
-
66
-
67
-
68
-
69
-
70
-
71
-
72
-
73
-
74
-
75
-
76
-
77
-
78
-
79
-
80
-
81
-
82
-
83
-
84
-
85
-
86
-
87
-
88
-
89
-
90
-
91
-
92
-
93
-
94
-
95
-
96
-
97
-
98
-
99
-
100
-
101
-
102
-
103
-
104
-
105
-
106
-
107
-
108
-
109
-
110
-
111
-
112
-
113
-
114
-
115
-
116
-
117
-
118
-
119
-
120
-
121
-
122
-
123
-
124
-
125
-
126
-
127
-
128
-
129
 |
 |
