JVC KWAVX706 Instructions
JVC KWAVX706 - DVD Player With LCD Monitor Manual
 |
View all JVC KWAVX706 manuals
Add to My Manuals
Save this manual to your list of manuals |
JVC KWAVX706 manual content summary:
- JVC KWAVX706 | Instructions - Page 1
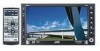
FRANÇAIS ESPAÑOL ENGLISH DVD RECEIVER WITH MONITOR KW-AVX706 RECEPTOR DVD CON MONITOR KW-AVX706 RÉCEPTEUR DVD ET MONITEUR KW-AVX706 EXTRA MONITOR CONTROL MODE ASPECT MENU DVD / RECEIVER CONTROL ATT ZOOM SOURCE BAND DUAL VOL 2nd VOL SHIFT +10 -100 +100 ASPECT 1 TOP M 4 7 SETUP -10 - JVC KWAVX706 | Instructions - Page 2
circuit different from that to which the receiver is connected. - Consult the dealer or an experienced radio/ TV technician for help. Caution: IMPORTANT FOR LASER PRODUCTS 1. CLASS 1 LASER PRODUCT 2. CAUTION: Do not open the top cover. There are no user serviceable parts inside the unit; leave all - JVC KWAVX706 | Instructions - Page 3
• The monitor built in this receiver has been Remote controller (RM-RK240 8 Listening to the radio 10 Disc operations 13 Dual Zone operations 24 SD operations 27 EXTERNAL DEVICES Listening to the CD changer 29 Listening to the satellite radio 31 Watching TV 34 Listening to the iPod®/D. player - JVC KWAVX706 | Instructions - Page 4
ISO 9660 level 1, level 2, Romeo, Joliet CD-DA MPEG1/MPEG2 JPEG MP3/WMA/WAV DivX/MPEG4 *1 DVD-R recorded in multi-border format is also playable (except for dual layer discs). *2 It is possible to play back finalized +R/+RW (Video mode only) discs. However, the use of +R double layer disc is not - JVC KWAVX706 | Instructions - Page 5
Note on Region Code: DVD players and DVD Video discs have their own Region Code numbers. This unit can only play back DVD discs whose Region Code numbers include "1." If you insert a DVD Video disc of an incorrect Region Code "Region Error Please Eject" appears on the monitor. Before operating the - JVC KWAVX706 | Instructions - Page 6
ENGLISH Time Set 12Hours/24Hours 1:00 AM @ Return to the menu. ¤ Select ]. # Activate the screen. ‹ Set the clock time. Time Set 12Hours/24Hours 1:00 AM Time Set 12Hours/24Hours 3:45 PM $ Return to the menu. › Select . % Activate - JVC KWAVX706 | Instructions - Page 7
TUNER = SAT (SIRIUS/XM) = DISC (DVD/VCD/CD) = SD =CD-CH, iPod, D.PLAYER, or EXT-IN = TV = AV-IN =(back to the beginning) • You cannot select these sources if they are not ready. • Turn on the power. • Turn off the power [Hold]. • Attenuate the sound (if the power is on). Open and close the monitor - JVC KWAVX706 | Instructions - Page 8
or saving it. IMPORTANT: If Dual Zone is activated ( page 24), the remote controller functions only for operating the DVD/CD player. MONITOR CONTROL 1 Monitor control buttons • Used for a JVC monitor-KV-MR9010, or KV-MH6510. DVD/RECEIVER CONTROL 2 • Turns on the power. • Attenuates the sound if the - JVC KWAVX706 | Instructions - Page 9
discs except CD: Selects the folders. • 4 / ¢: reverse skip/forward skip • 1 / ¡: reverse search/forward search For FM/AM/TV tuner operations: • 5 / ∞: Changes the preset stations. • 4 / ¢: - Functions to search for stations. Press briefly: auto search Press and hold: manual search For satellite - JVC KWAVX706 | Instructions - Page 10
-frequency/ assigned station names ~ Select "TUNER." Ÿ Select the bands. ! Search for a station-Auto Search. • Manual Search: Hold either to left or right until "Manual Search" appears on the display, then push it repeatedly. • The ST indicator lights up when receiving an FM stereo broadcast with - JVC KWAVX706 | Instructions - Page 11
ENGLISH Tuning in to stations with sufficient signal strength This function works only for FM bands. Once you have activated this function (selected "Local"), it always works when searching for FM stations. 1 Setup Surround Equalizer Sound Mode List 2 Setup Surround Equalizer Sound Mode List 3 Mono - JVC KWAVX706 | Instructions - Page 12
ENGLISH Manual presetting Ex.: Storing FM station of 92.5 MHz into preset number 4 of the FM1 MHz 88.7 MHz 91.5 MHz 93.1 MHz 95.3 MHz 5 FM1 P4 NO NAME 92.5 MHz Selecting preset stations On the remote: 1 2 or On the unit: 1 2 • Preset List can also be accessed through = . Setup Surround - JVC KWAVX706 | Instructions - Page 13
: Do not place your finger behind the monitor panel. DISP: Press if no playback picture appears , but disc information ( pages 14 and 15) screen is displayed. Now Reading... DISC 3: 45 PM 7: Stop. 3: Start playback if necessary. (For DVD: 10-second review if pressed during play.) 13 OPERATIONS - JVC KWAVX706 | Instructions - Page 14
button, playback . picture and disc information screens (with/without level meter) appear in turn. Audio format Surround/ sound mode Playback mode Speaker/signal indicators ( page 50) Title no./Chapter no./Play time DVD VIDEO DIGITAL MULTI CHAP.RPT L C R SW LFE LS RS 3: 45 PM 01 01 0:00:12 - JVC KWAVX706 | Instructions - Page 15
ENGLISH Audio format (MP3/WMA/WAV) Track no./Play time CD FLAT REPEAT L R SW LS RS 3: 45 PM 01 0:00:12 Disc Title Current track Title Next track title Next track title Next track title Next - JVC KWAVX706 | Instructions - Page 16
ENGLISH Selecting playback modes You can use only one of the following playback modes-Intro/Repeat/Random. Ex. To select Track Repeat 1 Setup Surround Equalizer Sound Mode List 2 Setup Surround Equalizer Sound Mode List 3 Off Intro Repeat Random 4 Off Track Folder When one of the playback modes is - JVC KWAVX706 | Instructions - Page 17
ENGLISH Selecting tracks on the list If a disc includes folders, you can display the Folder/Track Lists, then start playback. 1 Folder List with the current Track List on the right column appears. My Best Cinema My Best 2 Pops Favorite Songs Easy Listenings Track001.mp3 Track002.mp3 Track003.mp3 - JVC KWAVX706 | Instructions - Page 18
ENGLISH Operations using the remote controller-RM-RK240 EXTRA MONITOR CONTROL MODE ASPECT MENU DVD / RECEIVER CONTROL ATT ZOOM SOURCE BAND DUAL by frame playback if pressed during pause). : Start play (10-second review if pressed during play). : Reverse/forward search*1. (No sound can be - JVC KWAVX706 | Instructions - Page 19
ENGLISH : Stop play. : Pause (Frame by frame playback if pressed during pause). : Start play. : Reverse/forward search*4. (No sound can be heard.) : Press: Select track. Hold: Reverse/forward search*5. (No sound can be heard.) : Select folder. : Select aspect ratio. + : Select track (within the - JVC KWAVX706 | Instructions - Page 20
names-01, 02, 03, and so on. Playing back a bonus group If a DVD Audio including a "bonus group" is detected, the BONUS indicator lights up on the disc number depends on the disc. 3 Follow the interactive instructions shown on the monitor. Selecting browsable still picture... When a disc including - JVC KWAVX706 | Instructions - Page 21
encoded sources such as Dolby Digital*1, DTS*2, and DVD Audio. (When activated, "MULTI" is shown on the disc information screen.) Dolby Pro Logic II (Movie/Music): For 2 channel sources except for MPEG 2-channel discs. (This can also be used for SD card playback. page 27) To turn on the surround - JVC KWAVX706 | Instructions - Page 22
ENGLISH Operations using the on-screen bar (DVD/VCD/MPEG/JPEG) These operations are possible on the monitor using the remote controller. OSD 1 2 3 4 5 6 ENTER 7 8 9 ~ Display the on-screen bar ( page 23). (twice) Ÿ Select an item. 0 SHIFT RM-RK240 ! Make a selection. If pop-up menu - JVC KWAVX706 | Instructions - Page 23
. Items shown on the bar vary due to the disc type. 1 Disc type 2 • DVD: Audio signal format • VCD: PBC 3 Playback mode DVD Video: T. RPT: Title repeat C. RPT: Chapter repeat DVD Audio: T. RPT: Track repeat MPEG: T. RPT: Track repeat F. RPT: Folder repeat JPEG: F. RPT: Folder repeat - JVC KWAVX706 | Instructions - Page 24
can enjoy a disc playback on the external monitor connected to the VIDEO OUT and 2nd AUDIO OUT plugs, while listening to any other source through the speakers. • When Dual Zone is in use, you can only operate the DVD/CD player using the remote controller. 1 Setup Surround Equalizer Sound - JVC KWAVX706 | Instructions - Page 25
ENGLISH Operations using the control screen (MP3/ WMA/WAV/MPEG/JPEG/CD) While Dual Zone is on, these operations are possible on the external monitor using the remote controller. The control screen automatically appears when you insert a disc. (For MPEG/JPEG; while not playing.) Control screen MP3/ - JVC KWAVX706 | Instructions - Page 26
ENGLISH Operations using the list screen (MP3/WMA/ WAV/MPEG/JPEG) While Dual Zone is on, these operations are possible on the external monitor using the remote controller. List screen Folder list While not playing... 1 Display the folder list. Each time you press the button, the list screen comes - JVC KWAVX706 | Instructions - Page 27
To eject the disc push in the SD card lightly. To open/close the monitor panel Caution: Do not release your finger quickly; otherwise, the SD card may pop out from the unit. Push in the SD card until you hear a clicking sound. Now Reading... SD 3: 45 PM 3: Restart playback 7: Stop Press: Select - JVC KWAVX706 | Instructions - Page 28
Track Folder When one of the playback modes is selected, the corresponding indicator lights up on the monitor. To cancel, select "Off" in step 3 or 4. File type Intro Track: Plays the then tracks of next folders SD: Randomly plays all tracks Folder: Repeats current folder - 28 OPERATIONS - JVC KWAVX706 | Instructions - Page 29
List It is recommended to use a JVC MP3-compatible CD changer with your unit. • You can play only CDs (CD-DA) and MP3 discs. Preparation: Make Select a disc to start playing. MP3 DISC JVC CAR AUDIO BEST 10 BEST JAZZ DISC 05 DISC 06 • When using the remote DISC+ controller, press... DISC- • While - JVC KWAVX706 | Instructions - Page 30
When one of the playback modes is selected, the corresponding indicator lights up on the monitor. To cancel, select "Off" in step 3 or 4. Disc type Intro Track use the following buttons on the remote controller to operate the CD changer. DISC- DISC+ : Select disc. : Select folder (MP3 only). - JVC KWAVX706 | Instructions - Page 31
CD changer jack on the rear of this unit. • JVC SIRIUS radio DLP-Down Link Processor, for listening to the SIRIUS Satellite radio. • XMDirectTM Universal Tuner Box-With a JVC Smart Digital Adapter on the monitor once subscription has been completed. XMDirectTM Universal Tuner Box starts updating - JVC KWAVX706 | Instructions - Page 32
Satellite Radio Inc., and XM Satellite Radio, Inc. Checking the XM Satellite radio ID Select channel "0." The 8-digit (alphanumeric) ID number is displayed on the monitor. To cancel the ID number display, select any channel other than channel "0." 32 - JVC KWAVX706 | Instructions - Page 33
number. Channel Name The City 40 at 40 Hank's Place Audio Visions Preview 4 XM1 P5 38 Rock XM Music Lab Selecting preset channels On the remote only: 1 2 Selecting on the lists You can select a channel using one of the following lists-Preset list/Category list/ Channel list. 1 Setup Surround - JVC KWAVX706 | Instructions - Page 34
to left or right until "Manual Search" appears on the display, then push it repeatedly. • You can also use the remote controller supplied for the TV tuner unit, but some functions may not work. (Aim it to the remote sensor of this receiver.) Presetting TV stations Automatic Memory presetting You - JVC KWAVX706 | Instructions - Page 35
3 List OSD Auto MEMORY Title Entry 4 Off Channel Channel+Station • Off: No information will be displayed while watching TV. • Channel: Channel number will be displayed while watching TV. • Channel+Station: Channel number and assigned name of the received station will be displayed while watching - JVC KWAVX706 | Instructions - Page 36
iPod and JVC D. player, it is required to connect the interface adapter (KS-PD100 or KS-PD500) to the CD changer jack on the rear. Preparation: Make sure "iPod" or "D. player modes is selected, the corresponding indicator lights up on the monitor. 1 Display , then select ] - JVC KWAVX706 | Instructions - Page 37
You can connect an external component to the LINE IN/VIDEO IN plugs. POWER]ON AV-IN AV-INPUT Assigned title monitor while viewing the picture. EXT-INPUT You can connect an external component to the CD changer jack on the rear using the Line Input Adapter-KS-U57 (not supplied) or AUX Input Adapter - JVC KWAVX706 | Instructions - Page 38
ENGLISH Sound equalization POWER]ON Freq. Freq. Freq. Freq. Freq. Freq. Freq. 60Hz +03 150Hz +02 400Hz +02 1kHz 00 2.5kHz +01 6.3kHz +01 15kHz +03 Selecting sound mode ~ Setup Surround Equalizer Sound Mode List Ÿ Setup Surround Equalizer Sound Mode List ! Select a sound mode. Flat Hard Rock R&B - JVC KWAVX706 | Instructions - Page 39
tune in to a station. • For AV-IN/EXT-IN: Select the source. • For TV station: Select "TV," then tune in to a TV station. • For a CD in this receiver: Insert a CD. • For CDs in the CD changer: Select "CD-CH," then select a disc number. Ÿ Display the title entry screen. 1 Setup Surround Equalizer - JVC KWAVX706 | Instructions - Page 40
to the top menu To return to the previous screen MENU Setup Surround Equalizer Sound Mode List Display Clock Disc Setup1 Disc Setup2 Tuner Input Ex. Changing the "High Pass Filter" setting ~ Setup Surround Equalizer Sound Mode List • Non-available items will be displayed being shaded. Ÿ Setup - JVC KWAVX706 | Instructions - Page 41
. -15 (darkest) to +15 (brightest); Initial 00 You can adjust the following to make the monitor clear and legible for watching the playback picture. The settings are stored separately for each source-"DISC," "AV-IN," and "TV." -15 to +15; Initial 00 Bright: Adjust if the picture is too bright or too - JVC KWAVX706 | Instructions - Page 42
:9 original pictures Just: Display Zoom: Auto: • For "DISC": Aspect ratio is automatically selected to match to the incoming signals. • For the other video sources: Aspect ratio is xed to "NORMAL." Time Set [6] Clock 12Hours/24Hours Clock Adjust*2 Time Zone*3 12 Hours, 24 Hours, [6] Auto - JVC KWAVX706 | Instructions - Page 43
monitor. Select the position of the on-screen bar, [23]. • 1 : Higher position • 2 : Lower position Disc Setup 1*4 File Type Select playback file type when a disc or an SD card : Plays back JPEG files. • Video : Plays back MPEG files (not available for SD cards). D. (Dynamic) Range Compres. ( - JVC KWAVX706 | Instructions - Page 44
the output level of the activated speakers ( see "Speaker Size" above), monitoring the test tone. • Front Left/Center/Front Right/Rear Right/ Sub Woofer *4 Selectable only for "DISC" or "SD" (while not playing). *5 Selectable only for "DISC" or "SD." *6 This subwoofer level setting takes effect - JVC KWAVX706 | Instructions - Page 45
CD changer, iPod, or D. player [29, 36] External Input: Any other than the above. [37] *8 Appears only when SIRIUS Satellite radio is connected. *9 Reverse lamp wire connection is required. See Installation/Connection Manual (separate volume). The rear view through the camera appears on the monitor - JVC KWAVX706 | Instructions - Page 46
level. The volume level will automatically increase or decrease when you change the source. • -12 to +12; Initial 00 *11 Selectable only for "DISC" and "SD." *12 Selectable only when surround is deactivated. 46 - JVC KWAVX706 | Instructions - Page 47
Amplifier Gain You can change the maximum volume level of this receiver. Off : Deactivates the built-in amplifier. Low Power: VOL CDs, FM/AM stations, TV stations, AVIN, and EXT-IN. [39] Off/Intro/Repeat/Random Only for disc playback, SD playback, and iPod/D. player. [16, 30, 36] OSD Only for TV - JVC KWAVX706 | Instructions - Page 48
ENGLISH Language codes (for DVD language selection) Code Language Code Language AA Afar FA Persian Setswana LV Latvian,Lettish RW Kinyarwanda TO Tonga MG Malagasy SA Sanskrit TR Turkish MI Maori SD Sindhi TS Tsonga MK Macedonian SG Sangho TT Tatar ML Malayalam SH Serbo-Croatian TW Twi - JVC KWAVX706 | Instructions - Page 49
Maintenance Moisture condensation Moisture may condense on the lens inside the DVD/CD player in the following cases: • After starting the heater in the car. • If it becomes very humid inside the car. Should this occur, the DVD/CD player may malfunction. In this case, eject the disc and leave the - JVC KWAVX706 | Instructions - Page 50
of the picture to look distorted. FM/AM Storing stations in memory • When SSM is over, received stations are preset in No. 1 (lowest frequency) to No. 6 (highest frequency). Disc General • In this manual, words "track" and "file" are interchangeably used. • This unit can also play back 8 cm discs - JVC KWAVX706 | Instructions - Page 51
the extension code or . • The stream format should conform to MPEG system/program stream. • The file format should be MP@ML (Main Profile at Main Level)/SP " setting. • You cannot activate surround for MPEG multi-channel DVD Video and MPEG 2channel sources. If "Surround On" is selected, - JVC KWAVX706 | Instructions - Page 52
site: For iPod users: For D. player users: Title assignment • If you try to assign titles to more than 30 radio stations, 30 TV stations, or 30 CDs, "NAME FULL" flashes - JVC KWAVX706 | Instructions - Page 53
the following characters will be used to show the various information on the monitor. • You can also use the following characters to assign titles (see page 39). • To assign the titles to the TV stations, you can only use the roman alphabet (A - Z, a - z) and numbers (0 - 9). Numbers and symbols - JVC KWAVX706 | Instructions - Page 54
Zone is activated, the remote controller only functions for operating the DVD/CD player.) • The monitor is not clear and legible monitor. Parking brake wire is not connected properly. ( Installation/Connection Manual.) • "Region Error Please Eject" appears on the monitor when you insert a DVD Video - JVC KWAVX706 | Instructions - Page 55
one played back using other players. • Readout time varies depending on the SD card. • Do not use too many hierarchy and folders. • Turn off the power then on again. Insert an SD card that contains tracks encoded in an appropriate format. Track is unplayable. • SD card may be malfunctioning, or may - JVC KWAVX706 | Instructions - Page 56
Selected channel is no longer available or is unauthorized. Select another channel or continue listening to the previous channel. • "NO NAME" appears on the monitor. No text information for the selected channel. • "Channels Updating XX% completed"(for SIRIUS) or "UPDATING" (for XM) appear son the - JVC KWAVX706 | Instructions - Page 57
work at all. Press the reset button of the TV tuner unit. • "Reset 08" appears on the monitor. This unit is not connected to the TV tuner unit correctly. Connect it correctly then press the reset button of the TV tuner unit. • The iPod or D. player does not turn on or does • Check the connecting - JVC KWAVX706 | Instructions - Page 58
ENGLISH Specifications AMPLIFIER Power Output: Video Output (composite): Other Terminals: Input: Output: Others: Frequency Range: FM Tuner AM Tuner load (full scale) 1 kΩ NTSC 1 Vp-p/75 Ω LINE IN, VIDEO IN, Antenna input 2nd AUDIO OUT CD changer, AV BUS 87.5 MHz to 107.9 MHz 87.5 MHz to 108 - JVC KWAVX706 | Instructions - Page 59
ENGLISH DVD/CD MONITOR Signal Detection System: Non-contact optical pickup (semiconductor laser) Frequency Response: DVD, fs=48 kHz: 16 Hz to 22 000 Hz DVD, fs=96 kHz: 16 Hz to 44 000 Hz VCD/CD: 16 Hz to 20 000 Hz Dynamic Range: 93 dB Signal-to-Noise Ratio: 95 dB Wow and Flutter: Less - JVC KWAVX706 | Instructions - Page 60
ESPAÑOL Muchas gracias por la compra de un producto JVC. Como primer paso, por favor lea detenidamente este manual para comprender a fondo todas las instrucciones y obtener un máximo disfrute de esta unidad. IMPORTANTE (EE.UU.) Este equipo se ha sometido a todo tipo de pruebas y - JVC KWAVX706 | Instructions - Page 61
daños y accidentes • NO instale la unidad en los siguientes sitios; Operaciones de Zona Dual 24 Operaciones de SD 27 Precauciones sobre el monitor: • Este producto cuenta con una lá cambiador de CD 29 Para escuchar la radio satelital 31 Para ver televisión 34 Escuchando el iPod®/reproductor D - JVC KWAVX706 | Instructions - Page 62
DVD Vídeo DVD Audio DVD-ROM DVD Vídeo MPEG1/MPEG2 JPEG MP3/WMA/WAV DivX/MPEG4 DVD-VR, +VR Lado DVD Lado no-DVD Audio CD/CD Text (CD-DA), DTS-CD VCD (Vídeo CD) SVCD (Súper Vídeo CD) CD-ROM CD-I (CD-I Ready) CD doble capa. • "DVD Logo" es una marca comercial de DVD Format/Logo Licensing Corporation - JVC KWAVX706 | Instructions - Page 63
ón incluyan un "1". Si inserta un disco DVD Vídeo con un código de región incorrecto Aparece "Region Error Please Eject" en el monitor. Antes de operar la unidad-Cancele la Disc Setup 1 Disc Setup 2 Tuner Input Display Clock Disc Setup 1 Disc Setup 2 Tuner Input ⁄ Cancele las demostraciones en - JVC KWAVX706 | Instructions - Page 64
ESPAÑOL Time Set 12Hours/24Hours 1:00 AM @ Vuelva al menú . ¤ Seleccione ]. # Active la pantalla . ‹ Ponga el reloj en hora. Time Set 12Hours/24Hours 1:00 AM Time Set 12Hours/24Hours 3:45 PM $ Vuelva al menú . › Seleccione . % Active - JVC KWAVX706 | Instructions - Page 65
Selecciona la fuente. Abra y cierre el panel del monitor. TUNER = SAT (SIRIUS/XM) = DISC (DVD/VCD/CD) = SD • Cuando se abre el panel del monitor, podrá =CD-CH, iPod, D.PLAYER, o EXT-IN = TV = AV-IN = insertar un disco y una tarjeta SD. (vuelta al comienzo) • Podrá seleccionar algunas fuentes si - JVC KWAVX706 | Instructions - Page 66
ón. • Para la conexión, consulte el Manual de instalación/conexión (volumen separado). DVD / RECEIVER CONTROL ATT ZOOM SOURCE BAND DUAL VOL 2nd reproductor DVD/CD. MONITOR CONTROL 1 Botones de control del monitor • Se utilizan para el monitor JVC- KV-MR9010 o KV-MH6510. DVD/RECEIVER CONTROL - JVC KWAVX706 | Instructions - Page 67
pulsado: búsqueda manual Para las operaciones de la radio por Satélite: • 5 / ∞: Cambia las categorías. • 4 / ¢: - Cambia los canales si lo pulsa brevemente. - Cambia rápidamente los canales si lo pulsa y mantiene pulsado. Para las operaciones de Apple iPod®/ reproductor D. de JVC: • ∞: Pone en - JVC KWAVX706 | Instructions - Page 68
FM 88.7 MHz GHI Radio 91.5 MHz JVC FM 93.1 MHz JKL Radio 95.3 MHz MNO FM Lista de preajustes-frecuencias/ nombres asignados a las emisoras ~ Seleccione "TUNER". Ÿ Selecciona las bandas. ! Búsqueda de una emisora-Búsqueda automática. • Búsqueda manual: Sosténgalo hacia la izquierda o la derecha - JVC KWAVX706 | Instructions - Page 69
ESPAÑOL Para sintonizar emisoras con un señal suficientemente fuerte Esta función funciona sólo para las bandas FM. Una vez activada (habiendo seleccionado "Local"), esta función siempre funcionará al efectuar la búsqueda de emisoras FM. 1 Setup Surround Equalizer Sound Mode List 2 Setup Surround - JVC KWAVX706 | Instructions - Page 70
ESPAÑOL Preajuste manual Ej.: Almacenando una emisora FM de 92,5 MHz en el número de preajuste 4 de la banda FM1. 1 Selección de las emisoras preajustadas En el control - JVC KWAVX706 | Instructions - Page 71
el dedo detrás del panel del monitor. DISP: Púlselo si la imagen reproducida no aparece, pero sí se visualiza la pantalla de información del disco ( páginas 14 y 15). Now Reading... DISC 3: 45 PM 7: Parar. 3: Inicie la reproducción, si es necesario. (Para DVD: 10 segundos de revisión instantánea - JVC KWAVX706 | Instructions - Page 72
Modo Surround/ sonido Modo de reproducción Indicadores de altavoz/señal ( página 50) DVD VIDEO DIGITAL MULTI CHAP.RPT L C R SW LFE LS RS 3: 45 PM 01 de carpeta/Nº de pista/tiempo de reproducción Para JPEG: Nº de carpeta/Nº de pista CD MPEG FLAT REPEAT L R SW LS RS 3: 45 PM 01 01 0:00:12 Current - JVC KWAVX706 | Instructions - Page 73
pista Sostener: Búsqueda hacia atrás/ adelante*1 Lista de pistas nuevas (sólo para CD Text) • Aparece "NO NAME" cuando no hay ningún título grabado . Nº de carpeta/Nº de pista/tiempo de reproducción Formato de audio (MP3/WMA/WAV) CD MP3 FLAT REPEAT L R SW LS RS 3: 45 PM 01 01 0:00:12 Current - JVC KWAVX706 | Instructions - Page 74
ESPAÑOL Selección de los modos de reproducción Podrá utilizar solamente uno de los siguientes modos de reproducción-Introducciones musicales/repetida/aleatoria. Ej.: Para seleccionar repetición de pista 1 Setup Surround Equalizer Sound Mode List 2 Setup Surround Equalizer Sound Mode - JVC KWAVX706 | Instructions - Page 75
ESPAÑOL Selección de pistas en la lista Si un disco incluye carpetas, podrá visualizar las listas de carpetas/pistas y luego iniciar la reproducción. 1 La lista de carpetas con la actual lista de pistas aparece en la columna derecha. My Best Cinema My Best 2 Pops Favorite Songs Easy Listenings - JVC KWAVX706 | Instructions - Page 76
ESPAÑOL Operaciones utilizando el control remoto-RM-RK240 EXTRA MONITOR CONTROL MODE ASPECT MENU DVD / RECEIVER CONTROL ATT ZOOM SOURCE BAND DUAL VOL 2nd VOL SHIFT +10 -100 +100 -10 DIRECT ASPECT 1 TOP M 4 DISC+ 2 5 OSD 3 MENU 6 7 SETUP ENTER DISC- 8 0 9 RETURN SURROUND - JVC KWAVX706 | Instructions - Page 77
ESPAÑOL : Parar la reproducción. : Poner en pausa (Reproducción cuadro por cuadro si lo pulsa durante la pausa). : Inicia la reproducción. : Búsqueda hacia atrás/adelante*4. (El sonido no se escucha). : Pulse: Seleccionar la pista. Sostener:Búsqueda hacia atrás/ adelante*5. (El sonido no se escucha - JVC KWAVX706 | Instructions - Page 78
de bonificación Si se detecta un DVD Audio que incluya un "grupo de ZOOM 3 ZOOM 4 ZOOM OFF ZOOM 6 ZOOM 5 Mover la parte ampliada. Mientras está en pausa... ZOOM 1 ZOOM 2 ZOOM 3 Siga las instrucciones interactivas que aparecen en el monitor. Selección de imágenes fijas buscables... Cuando - JVC KWAVX706 | Instructions - Page 79
Para fuentes codificadas multicanal, como por ejemplo, Dolby Digital*1, DTS*2, y DVD Audio. (Al activarse, aparece "MULTI" en la pantalla de información 2 canales. (Esto también se puede usar para reproducción con tarjeta SD. página 27) Para activar el efecto surround... 1 Setup Surround Equalizer - JVC KWAVX706 | Instructions - Page 80
ESPAÑOL Operaciones usando la barra en pantalla (DVD/VCD/MPEG/JPEG) Estas operaciones se pueden realizar en el monitor usando el control remoto. OSD 1 2 3 4 5 6 ENTER 7 8 9 ~ Visualiza la barra en pantalla ( página 23). (dos veces) Ÿ Seleccione una opción. 0 SHIFT RM-RK240 ! Efectúe - JVC KWAVX706 | Instructions - Page 81
-T001 Carpeta/pista actual 5 Indicación de la hora TOTAL Tiempo de reproducción transcurrido del disco T. REM Tiempo estante del título (para DVD) Tiempo restante del disco (para los otros) TIME Tiempo de reproducción transcurrido del capítulo/pista actual REM Tiempo restante del cap - JVC KWAVX706 | Instructions - Page 82
monitor externo conectado a las clavijas VIDEO OUT y 2nd AUDIO OUT. • Mientras se está usando la Zona Dual, sólo podrá operar el reproductor DVD/CD 2nd AUDIO OUT. 3 Opere el reproductor DVD/CD. * Sistema virtual Surround para auriculares original de JVC Este efecto Surround también será efectivo - JVC KWAVX706 | Instructions - Page 83
ESPAÑOL Operaciones usando la pantalla de control (MP3/WMA/WAV/MPEG/JPEG/CD) Mientras esté activada la Zona Dual, estas operaciones se pueden realizar en el monitor externo utilizando el control remoto. La pantalla de control aparece automáticamente al insertar un disco. (Para MPEG/JPEG; mientras - JVC KWAVX706 | Instructions - Page 84
usando la pantalla de listas (MP3/WMA/WAV/MPEG/JPEG) Mientras esté activada la Zona Dual, estas operaciones se pueden realizar en el monitor externo utilizando el control remoto. Pantalla de lista Lista de carpetas Mientras no se está reproduciendo... 1 Visualice la lista de carpetas. Cada vez - JVC KWAVX706 | Instructions - Page 85
tener una copia de respaldo de todos los datos importantes. Puede efectuar la reproducción SD de la misma manera que para los discos MP3/WMA/JPEG (excepto la operación OSD y las que se realizan en el monitor externo). • Para una información general sobre las operaciones, véase las páginas 13 a 21 - JVC KWAVX706 | Instructions - Page 86
Folder Al seleccionar uno de los modos de reproducción, el indicador correspondiente se enciende en el monitor. Para cancelar, seleccione "Off" en el paso 3 o 4. Tipo de archivo Intro Track las pistas de las siguientes carpetas SD: Reproducir aleatoriamente todas las pistas - 28 OPERACIONES - JVC KWAVX706 | Instructions - Page 87
-DA) y MP3. Preparativos: Asegúrese de que se ha seleccionado "Changer" para el ajuste de entrada externa. ( página 45) ~ Seleccione "CD-CH". Ÿ Visualice la lista de discos. MP3 DISC JVC CAR AUDIO BEST 10 BEST JAZZ DISC 05 DISC 06 • Siempre que mantenga apretada la perilla hacia arriba o abajo, podr - JVC KWAVX706 | Instructions - Page 88
Al seleccionar uno de los modos de reproducción, el indicador correspondiente se enciende en el monitor. Para cancelar, seleccione "Off" en el paso 3 o 4. Tipo de disco remoto se pueden utilizar para operar el cambiador de CD. DISC- DISC+ : Seleccionar el disco. : Seleccionar la carpeta (sólo MP3). - JVC KWAVX706 | Instructions - Page 89
CD de la parte trasera de esta unidad. • SIRIUS radio DLP (Down Link Processor) de JVC, para escuchar la radio satelital SIRIUS. • XMDirectTM Universal Tuner Box-Usando un Smart Digital Adapter JVC Press Any Key to Continue" en el monitor. El Sintonizador universal XMDirectTM comienza a actualizar - JVC KWAVX706 | Instructions - Page 90
Inc. y de XM Satellite Radio, Inc. Comprobación de la identificación (ID) de la radio XM Satellite Seleccione el canal "0". En el monitor se visualiza el número de identificación de 8 dígitos (alfanuméricos). Para cancelar la visualización del número de identificación, seleccione cualquier canal - JVC KWAVX706 | Instructions - Page 91
ESPAÑOL Cómo almacenar canales en la memoria Se pueden preajustar seis canales para cada banda. Ej.: Almacenando canales en el número de preajuste 5. 1 Sintonice el canal que desee. XM1 38 Rock XM Music Lab 2 Visualice la lista de preajustes. Channel Name The City 40 at 40 Hank's Place Audio - JVC KWAVX706 | Instructions - Page 92
C1000 de JVC al terminal AV BUS de la parte trasera. Nº de canal Aparece el nombre asignado. Si no hay ningún nombre asignado, POWER]ON 4 TV BBC1 Title Las emisoras de TV locales con las señales más fuertes serán exploradas y almacenadas automáticamente. Preajuste manual 1 Seleccione la - JVC KWAVX706 | Instructions - Page 93
ESPAÑOL 4 2 P5 JVCTV Selección de las emisoras preajustadas Selección en la lista de preajustes 1 BBC1 BBC2 ABCTV CBS JVCTV HTV 2 Seleccione la emisora presintonizada. BBC1 BBC2 ABCTV CBS JVCTV HTV • También se podrá acceder a la lista de preajustes a través de = . Setup - JVC KWAVX706 | Instructions - Page 94
iPod y el reproductor D. de JVC, es necesario conectar el adaptador de interfaz (KS-PD100 o KS-PD500) al jack del cambiador de CD de la parte trasera. Preparativos: Asegúrese de que se ha seleccionado "iPod" o "D. player el indicador correspondiente se enciende en el monitor. 1 Visualice y, a - JVC KWAVX706 | Instructions - Page 95
AV-INPUT Puede conectar un componente externo a las clavijas LINE IN/VIDEO IN. POWER]ON AV-IN AV-INPUT FLAT 3: 45 PM Tí , no aparecerán en el monitor mientras mira la imagen. EXT-INPUT Puede conectar un componente externo al jack del cambiador de CD de la parte trasera mediante el adaptador de - JVC KWAVX706 | Instructions - Page 96
ESPAÑOL Ecualización de sonido POWER]ON Freq. Freq. Freq. Freq. Freq. Freq. Freq. 60Hz +03 150Hz +02 400Hz +02 1kHz 00 2.5kHz +01 6.3kHz +01 15kHz +03 Selección del modo de sonido ~ Setup Surround Equalizer Sound Mode List Ÿ Setup Surround Equalizer Sound Mode List ! Seleccione un modo de - JVC KWAVX706 | Instructions - Page 97
TV: Seleccione "TV" y seguidamente sintonice una emisora de TV. • Para un CD de este receptor: Inserte un CD. • Para los CDs del cambiador de CD: Seleccione "CD Intro Repeat Random Title Entry ! Asigne un título. 1 Seleccione un carácter y, a continuación, intro. • Para cambiar el juego de caracteres - JVC KWAVX706 | Instructions - Page 98
ON Para volver al menú superior Para volver a las pantallas anteriores MENU Setup Surround Equalizer Sound Mode List Display Clock Disc Setup1 Disc Setup2 Tuner Input ESPAÑOL Ej.: Cambio del ajuste "High Pass Filter" (Filtro pasaaltos) ~ Setup Surround Equalizer Sound Mode List • Las opciones no - JVC KWAVX706 | Instructions - Page 99
brillante); Inicial 00 Screen Control*1 Puede realizar el siguiente ajuste para que el monitor aparezca claro y legible para ver la imagen reproducida. Los ajustes se almacenan separadametne para cada fuente- "DISC", "AV-IN", y "TV". -15 a +15; Inicial 00 Bright: Ajústelo si la imagen es demasiado - JVC KWAVX706 | Instructions - Page 100
ESPAÑOL Opciones del menú Aspect*1 Configuraciones seleccionables, [página de referencia] Puede cambiar la relación de aspecto de la imagen. Relación de aspecto de la señal entrante 4:3 16:9 Normal: Para imágenes originales 4:3 Full: Para imágenes originales 16:9 Just: Dispaly Zoom: Auto - JVC KWAVX706 | Instructions - Page 101
el monitor externo conectado a la clavija VIDEO OUT; Inicial English. Seleccione el tipo de monitor para ver la imagen en pantalla ancha en el monitor externo. Picture : Reproduce archivos JPEG. • Video: Reproduce archivos MPEG (no disponible para tarjetas SD). D. (Dynamic) Range Compres. ( - JVC KWAVX706 | Instructions - Page 102
cm (5-1/4 pulg.) o menos. Independientemente del ajuste anterior... • El sonido no sale del subwoofer mientras se reproduce Dolby Pro Logic II Movie o Music si el lo para "DISC" o "SD" (mientras no se está reproduciendo). *5 Se puede seleccionar sólo para "DISC" o "SD". *6 Este ajuste de nivel - JVC KWAVX706 | Instructions - Page 103
Tuner monitor externo). Input External Input Cuando se conecta un componente externo al jack del cambiador de CD en la parte trasera. Changer/iPod/D. player*10: Cambiador de CD, iPod Manual de instalación/conexión (volumen separado). La retrovisión a través de la cámara aparece en el monitor - JVC KWAVX706 | Instructions - Page 104
de FM. El nivel de volumen aumenta o disminuye automáticamente al cambiar la fuente. • -12 a +12; Inicial 00 *11 Se puede seleccionar sólo para "DISC" y "SD". *12 Se puede seleccionar sólo cuando Surround se encuentra desactivado. 46 - JVC KWAVX706 | Instructions - Page 105
FM. [11] Mode*15 Title Entry Sólo para CDs convencionales, emisoras FM/AM, emisoras de TV, AV-IN, y EXT-IN. [39] Off/Intro/Repeat/Random OSD Solo para reproducción del disco, reproducción de SD, y iPod/reproductor D. [16, 30, 36] Sólo para TV. (Off, Channel, Channel+Station), [35] Auto MEMORY - JVC KWAVX706 | Instructions - Page 106
OL Códigos de idiomas (para selección del idioma de DVD) Código Idioma Código Idioma Código Idioma Código LV Letón, Latvio RW Kinyarwanda TO Tonga MG Malagasio SA Sánscrito TR Turco MI Maorí SD Sindhi TS Tsonga MK Macedonio SG Sangho TT Tártaro ML Malayalam SH Serbocroata TW Twi MN - JVC KWAVX706 | Instructions - Page 107
siguientes casos: • Después de encender el calefactor del automóvil. • Si hay mucha humedad en el habitáculo. En estos casos, el reproductor DVD/CD podría no funcionar correctamente. En este caso, saque el disco y deje el receptor encendido durante algunas horas hasta que se evapore la humedad. Cómo - JVC KWAVX706 | Instructions - Page 108
se ajuste al tamaño del monitor. Esto podría hacer que la parte central de la imagen aparezca distorsionada manual, las palabras "pista" y "archivo" se utilizan indistintamente. • Este receptor también puede reproducir discos de 8 cm. • Este receptor sólo podrá reproducir archivos de CD de audio (CD - JVC KWAVX706 | Instructions - Page 109
del ajuste "Surround On". • No podrá activar Surround para DVD Vídeo MPEG multicanal, y fuentes MPEG de 2 canales. Si la reproducción en estéreo para fuentes DVD, DTS-CD, y MPEG de 2 canales sin señal Surround codificada. En este caso, no sale sonido del subwoofer. • Si aparece "FIX - JVC KWAVX706 | Instructions - Page 110
forma intentada. En tal caso, visite el siguiente sitio web de JVC: Para usuarios de iPod: Para los usuarios del reproductor D.: Acerca de los sonidos reproducidos a trav - JVC KWAVX706 | Instructions - Page 111
án los siguientes caracteres para mostrar diversas informaciones en el monitor. • También podrá utilizar los siguientes caracteres para asignar títulos (consulte la página 39). • Para asignar títulos a las emisoras de TV, sólo podrá usar el alfabeto romano (A - Z, a - z) y números (0 - 9). Números - JVC KWAVX706 | Instructions - Page 112
imagen de reproducción El cable del freno de estacionamiento no está en el monitor. correctamente conectado. ( Manual de Instalación/ Conexión). • Aparece "Region Error Please Eject" en el monitor al insertar un DVD Vídeo. El código de región no es correcto. ( página 5). 54 Reproducción del - JVC KWAVX706 | Instructions - Page 113
Reading" permanece parpadeando en el monitor. • Aparece "SD No Files Please Eject" en el monitor y, a continuación, vuelve a la fuente anterior. • Aparece "Not Support" en el monitor y se omite la pista. • Aparece "SD Error Please Eject" en el monitor y, a continuación, vuelve a la fuente anterior - JVC KWAVX706 | Instructions - Page 114
• Aparece "CALL 1-888-539-SIRIUS TO SUBSCRIBE" en el monitor. • Aparece "No Signal" o "NO SIGNAL" en el monitor. • Aparece "No Antenna" o "CHECK ANTENNA" en el monitor. • Aparece "Invalid Channel" en el monitor durante unos 5 segundos y, a continuación, vuelve a aparecer la visualización anterior - JVC KWAVX706 | Instructions - Page 115
continuación, pulse el botón de reinicialización de la unidad del sintonizador de TV. • El iPod o el reproductor D. no se enciende o no funciona. • El sonido está distorsionado. • Aparece "Disconnect" en el monitor. • Para iPod: La reproducción se detiene. • No se escucha ningún sonido al conectar - JVC KWAVX706 | Instructions - Page 116
Hz, 400 Hz, 1 kHz, 2,5 kHz, 6,3 kHz, 15 kHz ±10 dB 2,5 V/20 kΩ de carga (plena escala) 1 kΩ NTSC 1 Vp-p/75 Ω LINE IN, VIDEO IN, entrada de antena 2nd AUDIO OUT Cambiador de CD, AV BUS Gama de frecuencias: Sintonizador de FM Sintonizador de AM FM (con el intervalo entre canales 87,5 MHz a 107,9 MHz - JVC KWAVX706 | Instructions - Page 117
DVD/CD ESPAÑOL MONITOR Sistema de detección de Captor óptico sin contacto (láser semiconductor) señal: Respuesta de frecuencias: DVD, fs=48 kHz: 16 Hz a 22 000 Hz DVD, fs=96 kHz: 16 Hz a 44 000 Hz VCD/CD: 16 Hz a 20 000 Hz Gama din la tienda especializada en car audio más cercana. 59 - JVC KWAVX706 | Instructions - Page 118
un produit JVC. Veuillez lire attentivement toutes les instructions avant d'utiliser ne fonctionne pas ou a été mis hors service. Évitez toute exposition directe au rayon. Comment Pour sécurité... • N'augmentez pas trop le volume car cela bloquerait les sons de l'extérieur rendant la conduite - JVC KWAVX706 | Instructions - Page 119
disques 13 Fonctionnement sur Deux Zones 24 Opérations de la carte SD 27 APPAREILS EXTÉRIEURS Écoute du changeur de CD 29 Écoute de la radio satellite 31 Visionnement de la télévision 34 Écoute de iPod®/lecteur D 36 Écoute d'un autre appareil extérieur .......... 37 RÉGLAGES Égalisation du - JVC KWAVX706 | Instructions - Page 120
CD-ROM CD-I (CD-I Ready) CD enregistrable/réinscriptible CD-DA (CD-R/-RW) • Compatibles avec ISO 9660 Niveau 1, Niveau 2, Romeo et Joliet MPEG1/MPEG2 JPEG MP3/WMA/WAV DivX/MPEG4 Compatible *1 Les DVD-R enregistrés au format multi-bords peuvent aussi être reproduits (sauf les disques à double - JVC KWAVX706 | Instructions - Page 121
uniquement des disques DVD dont le numéro de code de région comprend "1". Si vous insérez un disque DVD Vidéo d'un service l'écran . Setup Surround Equalizer Sound Mode List Display Clock Disc Setup 1 Disc Setup 2 Tuner Input Display Clock Disc Setup 1 Disc Setup 2 Tuner - JVC KWAVX706 | Instructions - Page 122
Time Set 12Hours/24Hours 1:00 AM FRANÇAIS @ Retournez au menu . ¤ Choisissez ] . # Affichez l'écran . ‹ Réglez l'horloge. Time Set 12Hours/24Hours 1:00 AM Time Set 12Hours/24Hours 3:45 PM $ Retournez au menu . › Choisissez . % - JVC KWAVX706 | Instructions - Page 123
la source. Ouvrez et fermez le panneau du moniteur. TUNER = SAT (SIRIUS/XM) = DISC (DVD/VCD/CD) = SD • Quand le panneau du moniteur est ouvert, =CD-CH, iPod, D.PLAYER, ou EXT-IN = TV = AV-IN = vous pouvez insérer un disque et une carte SD. (retour au début) • Vous ne pouvez pas choisir ces - JVC KWAVX706 | Instructions - Page 124
-vous au Manuel d'installation/ raccordement (volume double zone est en service ( page 24), la télécommande fonctionne uniquement pour commander le lecteur de DVD/CD. DVD / RECEIVER MONITOR CONTROL 1 Touches de commande du moniteur • Utilisé pour un moniteur JVC- KV-MR9010 ou KV-MH6510. DVD/RECEIVER - JVC KWAVX706 | Instructions - Page 125
DVD: Permet de choisir les titres. Autres disques sauf CD: Permet de choisir les dossiers. • 4 / ¢: saut vers l'arrière/saut vers l'avant • 1 / ¡: recherche vers l'arrière/ recherche vers l'avant Pour les opérations du tuner pressées. Pour utiliser iPod d'Apple®/lecteur D. de JVC: • ∞: Arrête - JVC KWAVX706 | Instructions - Page 126
MHz JVC FM 93.1 MHz JKL Radio 95.3 MHz MNO FM Liste des préréglages- fréquence/noms affectés aux stations ~ Choisissez "TUNER". Ÿ Sélection de la bande. ! Recherchez une station-Recherche automatique. • Recherche manuelle: Maintenez pressé le côté gauche ou droit jusqu'à ce que "Manual - JVC KWAVX706 | Instructions - Page 127
avec un signal suffisamment fort Fonctionne uniquement pour les bandes FM. Une fois que vous avez mis en service cette fonction (choisi "Local"), elle reste toujours en service lors de la recherche des stations FM. 1 Setup Surround Equalizer Sound Mode List 2 Setup Surround Equalizer Sound Mode - JVC KWAVX706 | Instructions - Page 128
FRANÇAIS Préréglage manuel Ex.: Mémorisation de la station FM de fréquence 92,5 MHz sur le numéro de préréglage 4 de la bande FM1. 1 Sélection de stations préréglées Sur la télécommande: 1 2 2 FM1 NO NAME ou 92.5 MHz 3 87.5 MHZ 88.3 MHz 88.7 MHz 91.5 MHz 93.1 MHz 95.3 MHz • Vous - JVC KWAVX706 | Instructions - Page 129
que l'écran d'informations du disque ( pages 14 et 15) est affiché. Now Reading... DISC 3: 45 PM 7: Arrêt. 3: Démarrage de la lecture, si nécessaire. (Pour les DVD: prévisualisation de 10 secondes si la touche est pressée pendant la lecture.) 13 FONCTIONNEMENT - JVC KWAVX706 | Instructions - Page 130
lecture Format audio Mode Surround/ sonore Mode de lecture Indicateurs d'enceinte/de signal ( page 50) DVD VIDEO quand la fonction PBC est en service. No de groupe/No de plage/Durée de lecture DVD AUDIO PPCM MULTI REPEAT L les JPEG: No de dossier/No de plage CD MPEG FLAT REPEAT L R SW LS RS - JVC KWAVX706 | Instructions - Page 131
FRANÇAIS No de plage/Durée de lecture CD FLAT REPEAT L R SW LS RS 3: 45 PM 01 0:00:12 apparaît si aucun titre n'est affecté ou enregistré. No de dossier/No de plage/Durée de lecture Format audio (MP3/WMA/WAV) CD MP3 FLAT REPEAT L R SW LS RS 3: 45 PM 01 01 0:00:12 Current folder Name Current - JVC KWAVX706 | Instructions - Page 132
3 ou 4. Type de disque Intro Repeat Random - - Track: Reproduit les 15 premières secondes de chaque plage (pour les VCD: PBC hors service) Chapter: Répéter le chapitre actuel - Title: Répéter le titre actuel Track: Répéter la plage actuelle - Track: Répéter la plage Disc: actuelle (pour - JVC KWAVX706 | Instructions - Page 133
FRANÇAIS Sélection de plages sur la liste Si un disque comprend des dossiers, vous pouvez afficher la liste des dossiers/plages, puis démarrer la lecture. 1 La liste des dossiers apparaît et la liste des plages correspondant à la plage actuelle apparaît sur la colonne de droite. My Best Cinema My - JVC KWAVX706 | Instructions - Page 134
Opérations en utilisant de la télécommande-RM-RK240 EXTRA MONITOR CONTROL MODE ASPECT MENU DVD / RECEIVER CONTROL ATT ZOOM SOURCE BAND DUAL VOL 2nd VOL SHIFT + ère/vers l'avant*3 : Sélection d'un titre. : Choisissez le format de l'image. Utilisation des fonctions de : Sélection de la langue - JVC KWAVX706 | Instructions - Page 135
plage. Maintenez pressée la touche: Recherche vers l'arrière/vers l'avant*5. (Aucun son n'est entendu). : Sélection d'un dossier. : Choisissez le format de l'image. + : Choisissez une plage (à l'intérieur du même dossier). DIRECT +( OSD = ): Sélection directe d'un dossier*6. Pendant la lecture - JVC KWAVX706 | Instructions - Page 136
agrandie. ZOOM 1 ZOOM 2 ZOOM OFF Lecture d'un groupe bonus Si un DVD Audio comprenant un "groupe bonus" est détecté, l'indicateur BONUS s'allume sur le numéro de code dépend du disque. 3 Suivez les instructions interactives qui apparaissent sur le moniteur. Sélection d'une image fixe affichable - JVC KWAVX706 | Instructions - Page 137
sources codées multicanaux telles que Dolby Digital*1, DTS*2 et DVD Audio. (Quand la fonction est en service, "MULTI" apparaît sur l'écran d'information de disque). termes Dolby, Pro Logic et MLP Lossless, ainsi que le sigle double D sont des marques commerciales de Dolby Laboratories. *2"DTS" et " - JVC KWAVX706 | Instructions - Page 138
choisir un numéro supérieur à 9: Entrée d'une durée ou d'un nombre Ex.: DVD Pour entrer 1 (heure): 02 (minutes): 00 (secondes), appuyez sur 1, 0, 2, 0, 0, puis sur ENTER. VCD (PBC hors service) ] _ _:_ _ Pour entrer 64 (minutes): 00 (secondes), appuyez sur 6, 4, 0, 0, puis sur ENTER. • Il n'est - JVC KWAVX706 | Instructions - Page 139
la barre varient en fonction du type de disque. 1 Type de disque 2 • DVD: Format de signal audio • VCD: PBC 3 Mode de lecture DVD Vidéo: T. RPT: Répétition de titre C. RPT: Répétition de chapitre DVD Audio: T. RPT: Répétition de plage MPEG: T. RPT: Répétition de plage F. RPT: Répétition - JVC KWAVX706 | Instructions - Page 140
le fonctionnement sur deux zones est en service, la source principale change sur "DISC". DUAL SURR DVD VIDEO 01 01 0:00:12 DTS MULTI DVD/CD. * Système Surround virtuel pour casque d'écoute original de JVC. Ce Surround fonctionne aussi pour la source principale "DISC" bien qu'elle soit en service - JVC KWAVX706 | Instructions - Page 141
Opérations en utilisant l'écran de commande (MP3/WMA/WAV/MPEG/JPEG/ CD) Quand le fonctionnement sur deux zones est en service, ces opérations sont possibles sur le moniteur extérieur en utilisant la télécommande. L'écran de commande apparaît automatiquement quand vous insérez un disque. ( - JVC KWAVX706 | Instructions - Page 142
FRANÇAIS Opérations en utilisant l'écran de liste (MP3/WMA/WAV/MPEG/JPEG) Quand le fonctionnement sur deux zones est en service, ces opérations sont possibles sur le moniteur extérieur en utilisant la télécommande. Écran de liste Liste des dossiers Quand l'appareil n'est pas en - JVC KWAVX706 | Instructions - Page 143
reproduites répétitivement jusqu'à ce que vous changiez la source. • Retirer la carte SD arrête la lecture. • Vous ne pouvez pas choisir "SD" quand le fonctionnement sur deux zones est en service. Vous pouvez commander la lecture SD de la même façon que pour les disques MP3/WMA/ JPEG (sauf pour - JVC KWAVX706 | Instructions - Page 144
: Reproduire actuelle aléatoirement toutes Folder: Répète toutes les les plages du dossier plages du dossier actuel actuel, puis toutes les plages des dossiers suivants SD: Reproduire aléatoirement toutes les plages Folder: Répéter le dossier actuel - 28 FONCTIONNEMENT - JVC KWAVX706 | Instructions - Page 145
disques MP3. Préparation: Assurez-vous que "Changer" est choisi pour le réglage de l'entrée extérieure. ( page 45) ~ Choisissez "CD-CH". Ÿ Affichez la liste des disques. MP3 DISC JVC CAR AUDIO BEST 10 BEST JAZZ DISC 05 DISC 06 • Vous pouvez passer à une autre page de la liste des disques restants - JVC KWAVX706 | Instructions - Page 146
et 29. Affichez les listes = Liste des dossiers = Liste des plages Vous pouvez utiliser les touches suivantes sur la télécommande pour commander le changeur de CD. DISC- DISC+ : Sélection du disque. : Choisissez le dossier (support MP3 uniquement). : Sélection d'une plage. 30 - JVC KWAVX706 | Instructions - Page 147
(vendu séparément) à la prise du changeur de CD à l'arrière de l'appareil. • JVC SIRIUS radio DLP-Processeur de signaux satellite-terre pour la radio satellite SIRIUS. • Tuner universel XMDirectTM -Avec un adaptateur numérique intelligent JVC (XMDJVC100: non fourni), pour écouter la radio satellite - JVC KWAVX706 | Instructions - Page 148
POWER]ON page 38. Niveau de force du signal Bande SIRIUS/XM No de préréglage Nom de la catégorie Nom du canal No de canal SAT FLAT LEVLEL 3: 45 PM SR1 P1 01 Category Name Channel Name Channel Name The City 40 at 40 Hank's Place Audio Visions Preview DISP: Affichez la liste des préréglages, - JVC KWAVX706 | Instructions - Page 149
FRANÇAIS Mémorisation des canaux Vous pouvez prérégler six canaux pour chaque bande. Ex.: Mémorisation de canaux sur le numéro de préréglage 5 1 Accordez le canal que vous souhaitez. XM1 38 Rock XM Music Lab 2 Affichez la liste des préréglages. Channel Name The City 40 at 40 Hank's Place Audio - JVC KWAVX706 | Instructions - Page 150
Visionnement de la télévision Vous pouvez connecter le tuner de télévision JVC KV-C1000 à la prise AV BUS à l'arrière de l'appareil. No de canal Le nom affecté apparaît. Si aucun nom n'est affecté, "NO NAME" POWER]ON 4 TV BBC1 apparaît. DISP: Appuyez sur cette touche page 38. FLAT si - JVC KWAVX706 | Instructions - Page 151
FRANÇAIS 4 2 P5 JVCTV Sélection de stations préréglées Sélection sur la liste des préréglages 1 BBC1 BBC2 ABCTV CBS JVCTV HTV 2 Choisissez une station préréglée. BBC1 BBC2 ABCTV CBS JVCTV HTV • La liste des préréglages est aussi accessible par = . Setup Surround Equalizer - JVC KWAVX706 | Instructions - Page 152
: Recherche vers l'arrière/vers l'avant Pour iPod d'Apple et le lecteur D. de JVC D, il est nécessaire de connecter l'adaptateur d'interface (KS-PD100 ou KS-PD500) à la prise de changeur de CD à l'arrière. Préparation: Assurez-vous que "iPod" ou "D. player" est choisi pour le réglage de l'entr - JVC KWAVX706 | Instructions - Page 153
AV-INPUT Vous pouvez connecter un appareil extérieur aux fiches LINE IN/VIDEO IN. POWER]ON AV-IN AV-INPUT FLAT 3: 45 PM Titre FRANÇAIS EXT-INPUT Vous pouvez connecter un appareil extérieur aux prises du changeur de CD à l'arrière de l'appareil en utilisant l'adaptateur d'entrée de ligne-KS-U57 - JVC KWAVX706 | Instructions - Page 154
User 1 User 2 User 3 • Pour les valeurs préréglées de chaque mode sonore, page 53. • Quand le Surround ( page 21) est en service, l'égalisation sonore est annulée temporairement. Mémorisation de votre propre ajustement Vous pouvez mémoriser votre ajustement dans User 1, User 2 et User 3. 1 Répétez - JVC KWAVX706 | Instructions - Page 155
aux supports suivants... Sources Le nombre maximum de caractères AV-INPUT EXT-INPUT 16 caractères maximum. Stations FM/AM/TV 16 Choisissez "TV", puis accordez une station de télévision. • Pour un CD dans cet appareil: Insérez un CD. • Pour des CD dans le changeur de CD: Choisissez "CD-CH - JVC KWAVX706 | Instructions - Page 156
au menu supérieur Pour retourner à l'écran précédent MENU Setup Surround Equalizer Sound Mode List Display Clock Disc Setup1 Disc Setup2 Tuner Input FRANÇAIS Ex.: Changement du réglage "High Pass Filter" ~ Setup Surround Equalizer Sound Mode List • Les articles non disponibles sont affich - JVC KWAVX706 | Instructions - Page 157
feux de la voiture. Time Set: Règle l'heure de mise en/hors service du gradateur. Dimmer Level Vous pouvez prérégler la luminosité pour le gradateur. glages sont mémorisés séparément pour chaque source- "DISC", "AV-IN" et "TV". -15 à +15; Réglage initial 00 Bright: Ajustez ce réglage si l'image - JVC KWAVX706 | Instructions - Page 158
choisis, [page de référence] Il est possible de changer le format de l'image. Format d'image du signant d'entrée 4:3 16:9 Normal: Pour les Mountain, Central DST (Daylight Savings Time)*3 Off: Annulation. On: Mettez en service l'heure d'été si votre zone d'habitation y est soumise. *1 Ne peut - JVC KWAVX706 | Instructions - Page 159
Language Monitor Type moniteur extérieur connecté à la fiche VIDEO OUT; Réglage initial English. Choisissez réglage quand le format de votre moniteur ext supports codés multicanaux. • On: Choisissez ce réglage pour toujours utiliser cette fonction. *4 Peut être choisi uniquement pour "DISC" ou "SD - JVC KWAVX706 | Instructions - Page 160
le niveau de sortie de chaque enceinte dans une plage de -10dB à +10dB; Réglage initial 00. • Maintenez pressée ENT pour mettre en et hors service la tonalité de test-Test Tone: ON, OFF. Speaker Distance*7 Choisit l'enceinte Ajuste la distance de l'enceinte Vous pouvez ajuster le délai de sortie - JVC KWAVX706 | Instructions - Page 161
/iPod/D. player*10: Changeur de CD, iPod ou lecteur D. [29, 36] External Input: N'importe quel autre appareils que ceux donnés ci-dessus. [37] *8 Apparaît uniquement quand la radio satellite SIRIUS est connectée. *9 Le fil des feux de recul doit être connecté. Référez-vous au Manuel d'installation - JVC KWAVX706 | Instructions - Page 162
FRANÇAIS Surround*11 Others Articles de menu Réglages pouvant être choisis, [page de référence] Beep Off: Annulation. On: Met en service la tonalité sonore des touches. Telephone Muting Off: Annulation. Muting1, Muting2: Choisissez le mode qui permet de couper le son lors de l'utilisation d'un - JVC KWAVX706 | Instructions - Page 163
, Local), [11] Pour le FM. [11] Uniquement pour les CD ordinaires, les stations FM/AM, les stations de télévision, l'entrée AV-IN et EXT-IN. [39] Uniquement pour la lecture de disque, la lecture SD et iPod/ lecteur D. [16, 30, 36] Pour le TV. (Off , Channel, Channel+Station), [35] Mode*15 Auto - JVC KWAVX706 | Instructions - Page 164
de langue (pour la sélection de la langue des DVD) Code Langue Code Langue AA Afar FA Persan AB Abkhazien Setswana LV Latvian, Letton RW Kinyarwanda TO Tongan MG Malagasy SA Sanskrit TR Turc MI Maori SD Sindhi TS Tsonga MK Macédonien SG Sango TT Tatar ML Malayalam SH Serbo-Croate TW - JVC KWAVX706 | Instructions - Page 165
humide. Si cela se produit, le lecteur de DVD/CD risque de ne pas fonctionner correctement. Dans ce boîte, insérez-le délicatement sur le support central (avec la surface imprimée dirigée vers propres Un disque sale peut ne pas être reproduit correctement. Si un disque est sale, essuyez-le avec - JVC KWAVX706 | Instructions - Page 166
vous changez le format d'image sur "Just", les deux côtés de l'image sont étendus horizontalement pour adapter l'image à autoradio peut uniquement reproduire les fichiers CD audio (CD-DA) si différents types de quand le fonctionnement sur deux zones est en service, la lecture s'arrête aussi, sans que - JVC KWAVX706 | Instructions - Page 167
Les flux audio doivent être conforme au format MPEG1 Audio Layer -2. Reproduisez des fichiers Vous ne pouvez pas mettre en service le Surround pour les DVD Vidéo MPEG multicanaux ou les Surround On", la lecture stéréo démarre pour les sources DVD, DTS-CD et MPEG à 2 canaux sans signal codé Surround. - JVC KWAVX706 | Instructions - Page 168
comme prévues. Dans ce cas, consultez le site Web JVC suivant: Pour les utilisateurs de iPod: Pour les utilisateurs d'un lecteur D.: À propos des sons reproduits par les - JVC KWAVX706 | Instructions - Page 169
FRANÇAIS Modes sonores (réglages du niveau de fréquence préréglé) La liste ci-dessous montre les réglages de niveau de fréquence préréglés pour chaque mode sonore (voir page 38). Mode sonore 60 Hz Flat 00 Hard Rock +03 R&B +03 Pop 00 Jazz +03 Dance +04 Country +02 Reggae +03 - JVC KWAVX706 | Instructions - Page 170
service la fonction de double zone ( page 24). (Quand le fonctionnement sur deux zones est en service, la télécommande fonctionne uniquement pour commander le lecteur de DVD/CD stationnement n'est pas connecté correctement. ( Manuel d'installation/Raccordement.) • "Region Error Please Eject" appara - JVC KWAVX706 | Instructions - Page 171
précédente. • "Not Support" apparaît sur le moniteur et un plage est sautée. • "SD Error Please Eject" apparaît fichiers. La plage reproduite n'est pas dans un format de fichier reproductible. Passez à un autre fichier de CD correctement et appuyez sur le bouton de réinitialisation du changeur de CD. - JVC KWAVX706 | Instructions - Page 172
FRANÇAIS Satellite radio Symptôme Remèdes/Causes • "CALL 1-888-539-SIRIUS TO SUBSCRIBE" apparaît sur le moniteur. Démarrez la suscription pour la radio satellite SIRIUS (voir page 31). • "No Signal" ou "NO SIGNAL" apparaît sur le Déplacez-vous dans un endroit où les signaux sont plus moniteur. - JVC KWAVX706 | Instructions - Page 173
du tuner de télévision. • iPod ou le lecteur D. ne peut pas être mis sous tension ou ne fonctionne pas. • Vérifiez le câble de connexion et la connexion. • Chargez la batterie. • Pour le lecteur D.: Mettez à jour la version du micrologiciel. • Le son est déformé. Mettez hors service l'égaliseur - JVC KWAVX706 | Instructions - Page 174
kHz, 2,5 kHz, 6,3 kHz, 15 kHz ±10 dB 2,5 V/20 kΩ en charge (pleine échelle) 1 kΩ NTSC 1 Vp-p/75 Ω LINE IN, VIDEO IN, entrée antenne 2nd AUDIO OUT Changeur de CD, AV BUS Plage de fréquences: Tuner FM Tuner AM FM (avec l'intervalle des canaux réglé sur 100 kHz ou 200 kHz): 87,5 MHz à 107,9 MHz FM - JVC KWAVX706 | Instructions - Page 175
DVD, fs=48 kHz: 16 Hz à 22 000 Hz DVD, fs=96 kHz: 16 Hz à 44 000 Hz VCD/CD: transistor à couches minces) Standard de couleur: NTSC Format d'image 16:9 (large) Température de stockage admissibles: Dimensions (L × H × P): Taille d'installation (approx.): Taille du panneau (approx.): Masse ( - JVC KWAVX706 | Instructions - Page 176
Having TROUBLE with operation? Please reset your unit Refer to page of How to reset your unit Still having trouble?? USA ONLY Call 1-800-252-5722 http://www.jvc.com We can help you! EN, SP, FR © 2006 Victor Company of Japan, Limited 0806MNMMDWJEIN - JVC KWAVX706 | Instructions - Page 177
Instructions DVD RECEIVER WITH MONITOR KW-AVX706
-
 1
1 -
 2
2 -
 3
3 -
 4
4 -
 5
5 -
 6
6 -
 7
7 -
8
-
9
-
10
-
11
-
12
-
13
-
14
-
15
-
16
-
17
-
18
-
19
-
20
-
21
-
22
-
23
-
24
-
25
-
26
-
27
-
28
-
29
-
30
-
31
-
32
-
33
-
34
-
35
-
36
-
37
-
38
-
39
-
40
-
41
-
42
-
43
-
44
-
45
-
46
-
47
-
48
-
49
-
50
-
51
-
52
-
53
-
54
-
55
-
56
-
57
-
58
-
59
-
60
-
61
-
62
-
63
-
64
-
65
-
66
-
67
-
68
-
69
-
70
-
71
-
72
-
73
-
74
-
75
-
76
-
77
-
78
-
79
-
80
-
81
-
82
-
83
-
84
-
85
-
86
-
87
-
88
-
89
-
90
-
91
-
92
-
93
-
94
-
95
-
96
-
97
-
98
-
99
-
100
-
101
-
102
-
103
-
104
-
105
-
106
-
107
-
108
-
109
-
110
-
111
-
112
-
113
-
114
-
115
-
116
-
117
-
118
-
119
-
120
-
121
-
122
-
123
-
124
-
125
-
126
-
127
-
128
-
129
-
130
-
131
-
132
-
133
-
134
-
135
-
136
-
137
-
138
-
139
-
140
-
141
-
142
-
143
-
144
-
145
-
146
-
147
-
148
-
149
-
150
-
151
-
152
-
153
-
154
-
155
-
156
-
157
-
158
-
159
-
160
-
161
-
162
-
163
-
164
-
165
-
166
-
167
-
168
-
169
-
170
-
171
-
172
-
173
-
174
-
175
-
176
-
177
 |
 |

ENGLISH
ESPAÑOL
FRANÇAIS
DVD RECEIVER WITH MONITOR
KW-AVX706
RECEPTOR DVD CON MONITOR
KW-AVX706
RÉCEPTEUR DVD ET MONITEUR
KW-AVX706
For canceling the display demonstration, see page 5.
Para cancelar la demostración en pantalla, consulte la página 5.
Pour annuler la démonstration des affichages, référez-vous à la page 5.
For installation and connections, refer to the separate manual.
Para la instalación y las conexiones, refiérase al manual separado.
Pour l’installation et les raccordements, se référer au manuel séparé.
INSTRUCTIONS
MANUAL DE INSTRUCCIONES
MANUEL D’INSTRUCTIONS
For customer Use:
Enter below the Model
No. and Serial No. which
are located on the top or
bottom of the cabinet.
Retain this information
for future reference.
Model No.
Serial No.
LVT1467-001B
[J]
MODE
MENU
ASPECT
ZOOM
ATT
SOURCE
DISC+
DISC–
DVD / RECEIVER
CONTROL
EXTRA MONITOR
CONTROL
+10
–10
1
2
3
4
5
6
7
8
0
9
–100
BAND
OSD
MENU
TOP M
SETUP
RM-RK240
RETURN
ENTER
DUAL
SHIFT
VOL
2nd
VOL
+100
DIRECT
ASPECT
SURROUND