Jensen JCR-222 Instruction Manual - Page 1
Jensen JCR-222 - AM/FM Projection Alarm Clock Radio Manual
 |
UPC - 077283952210
View all Jensen JCR-222 manuals
Add to My Manuals
Save this manual to your list of manuals |
Page 1 highlights
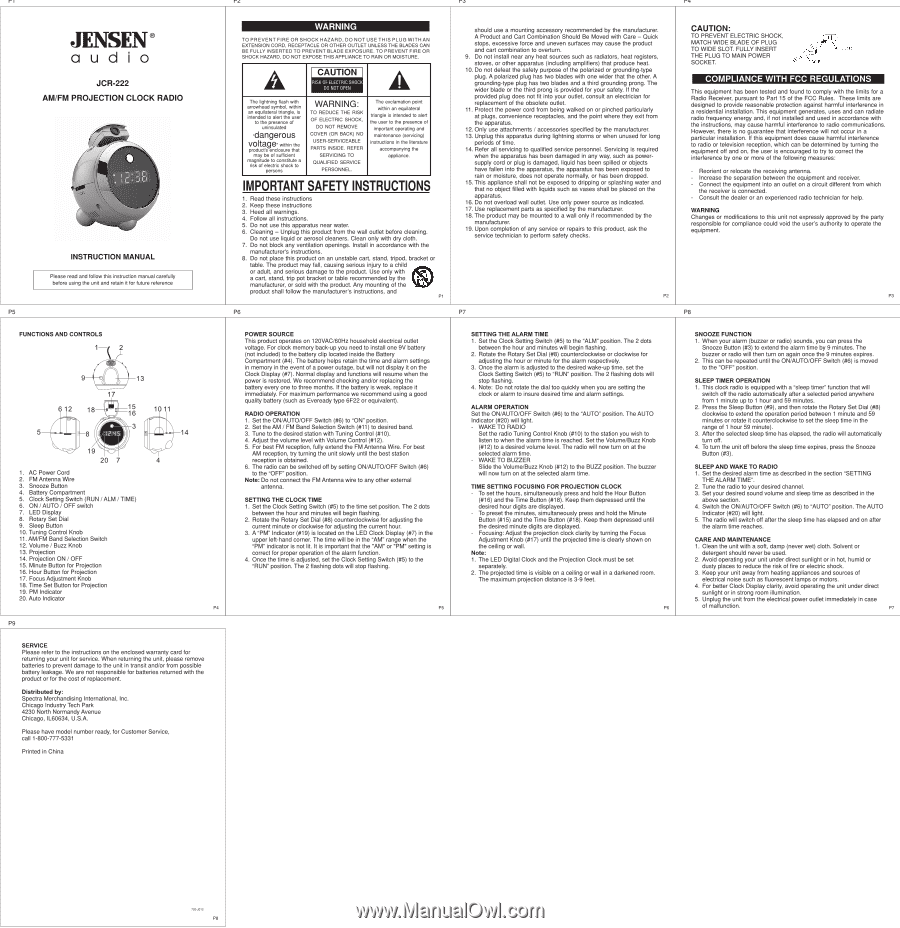
P1 P2 P3 P4 JENSEN° aud i o JCR-222 AM/FM PROJECTION CLOCK RADIO //7141 r1"" $00 • - I • i i4 C • III INSTRUCTION MANUAL Please read and follow this instruction manual carefully before using the unit and retain it for future reference P5 WARNING TO PREVENT FIRE OR SHOCK HAZARD, DO NOT USE THIS PLUG WITH AN EXTENSION CORD, RECEPTACLE OR OTHER OUTLET UNLESS THE BLADES CAN BE FULLY INSERTED TO PREVENT BLADE EXPOSURE. TO PREVENT FIRE OR SHOCK HAZARD, DO NOT EXPOSE THIS APPLIANCE TO RAIN OR MOISTURE. A CAUTION RISK OF ELECTRIC SHOCK DO NOT OPEN A The lightning flash with arrowhead symbol, within an equilateral triangle, is intended to alert the user to the presence of uninsulated -dangerous voltage. within the product's enclosure that may be of sufficient magnitude to constitute a risk of electric shock to persons WARNING: TO REDUCE THE RISK OF ELECTRIC SHOCK, DO NOT REMOVE COVER (OR BACK) NO USER-SERVICEABLE PARTS INSIDE. REFER SERVICING TO QUALIFIED SERVICE PERSONNEL. The exclamation point within an equilateral triangle is intended to alert the user to the presence of important operating and maintenance (servicing) instructions in the literature accompanying the appliance. IMPORTANT SAFETY INSTRUCTIONS 1. Read these instructions 2. Keep these instructions 3. Heed all warnings. 4. Follow all instructions. 5. Do not use this apparatus near water. 6. Cleaning - Unplug this product from the wall outlet before cleaning. Do not use liquid or aerosol cleaners. Clean only with dry cloth. 7. Do not block any ventilation openings. Install in accordance with the manufacturer's instructions. 8. Do not place this product on an unstable cart, stand, tripod, bracket or table. The product may fall, causing serious injury to a child or adult, and serious damage to the product. Use only with a cart, stand, trip pot bracket or table recommended by the manufacturer, or sold with the product. Any mounting of the product shall follow the manufacturer's instructions, and P1 P6 should use a mounting accessory recommended by the manufacturer. A Product and Cart Combination Should Be Moved with Care - Quick stops, excessive force and uneven surfaces may cause the product and cart combination to overturn. 9. Do not install near any heat sources such as radiators, heat registers, stoves, or other apparatus (including amplifiers) that produce heat. 10. Do not defeat the safety purpose of the polarized or grounding-type plug. A polarized plug has two blades with one wider that the other. A grounding-type plug has two blades and a third grounding prong. The wider blade or the third prong is provided for your safety. If the provided plug does not fit into your outlet, consult an electrician for replacement of the obsolete outlet. 11. Protect the power cord from being walked on or pinched particularly at plugs, convenience receptacles, and the point where they exit from the apparatus. 12. Only use attachments / accessories specified by the manufacturer. 13. Unplug this apparatus during lightning storms or when unused for long periods of time. 14. Refer all servicing to qualified service personnel. Servicing is required when the apparatus has been damaged in any way, such as powersupply cord or plug is damaged, liquid has been spilled or objects have fallen into the apparatus, the apparatus has been exposed to rain or moisture, does not operate normally, or has been dropped. 15. This appliance shall not be exposed to dripping or splashing water and that no object filled with liquids such as vases shall be placed on the apparatus. 16. Do not overload wall outlet. Use only power source as indicated. 17. Use replacement parts as specified by the manufacturer. 18. The product may be mounted to a wall only if recommended by the manufacturer. 19. Upon completion of any service or repairs to this product, ask the service technician to perform safety checks. P2 P7 CAUTION: TO PREVENT ELECTRIC SHOCK, MATCH WIDE BLADE OF PLUG TO WIDE SLOT. FULLY INSERT THE PLUG TO MAIN POWER SOCKET. r I AC Outlet AC Plug COMPLIANCE WITH FCC REGULATIONS This equipment has been tested and found to comply with the limits for a Radio Receiver, pursuant to Part 15 of the FCC Rules. These limits are designed to provide reasonable protection against harmful interference in a residential installation. This equipment generates, uses and can radiate radio frequency energy and, if not installed and used in accordance with the instructions, may cause harmful interference to radio communications. However, there is no guarantee that interference will not occur in a particular installation. If this equipment does cause harmful interference to radio or television reception, which can be determined by turning the equipment off and on, the user is encouraged to try to correct the interference by one or more of the following measures: - Reorient or relocate the receiving antenna. - Increase the separation between the equipment and receiver. - Connect the equipment into an outlet on a circuit different from which the receiver is connected. - Consult the dealer or an experienced radio technician for help. WARNING Changes or modifications to this unit not expressly approved by the party responsible for compliance could void the user's authority to operate the equipment. P3 P8 FUNCTIONS AND CONTROLS 1 2 OHO 9 13 17 6 12 18 I 15 16 10 11 3 5 8 ii 14 19 20 7 4 1. AC Power Cord 2. FM Antenna Wire 3. Snooze Button 4. Battery Compartment 5. Clock Setting Switch (RUN / ALM / TIME) 6. ON /AUTO / OFF switch 7. LED Display 8. Rotary Set Dial 9. Sleep Button 10. Tuning Control Knob 11. AM/FM Band Selection Switch 12. Volume / Buzz Knob 13. Projection 14. Projection ON / OFF 15. Minute Button for Projection 16. Hour Button for Projection 17. Focus Adjustment Knob 18. Time Set Button for Projection 19. PM Indicator 20. Auto Indicator P4 P9 POWER SOURCE This product operates on 120VAC/60Hz household electrical outlet voltage. For clock memory back-up you need to install one 9V battery (not included) to the battery clip located inside the Battery Compartment (#4). The battery helps retain the time and alarm settings in memory in the event of a power outage, but will not display it on the Clock Display (#7). Normal display and functions will resume when the power is restored. We recommend checking and/or replacing the battery every one to three months. If the battery is weak, replace it immediately. For maximum performance we recommend using a good quality battery (such as Eveready type 6F22 or equivalent). RADIO OPERATION 1. Set the ON/AUTO/OFF Switch (#6) to "ON" position. 2. Set the AM / FM Band Selection Switch (#11) to desired band. 3. Tune to the desired station with Tuning Control (#10). 4. Adjust the volume level with Volume Control (#12). 5. For best FM reception, fully extend the FM Antenna Wire. For best AM reception, try turning the unit slowly until the best station reception is obtained. 6. The radio can be switched off by setting ON/AUTO/OFF Switch (#6) to the "OFF" position. Note: Do not connect the FM Antenna wire to any other external antenna. SETTING THE CLOCK TIME 1. Set the Clock Setting Switch (#5) to the time set position. The 2 dots between the hour and minutes will begin flashing. 2. Rotate the Rotary Set Dial (#8) counterclockwise for adjusting the current minute or clockwise for adjusting the current hour. 3. A "PM" Indicator (#19) is located on the LED Clock Display (#7) in the upper left-hand corner. The time will be in the "AM" range when the "PM" indicator is not lit. It is important that the "AM" or "PM" setting is correct for proper operation of the alarm function. 4. Once the time is adjusted, set the Clock Setting Switch (#5) to the "RUN" position. The 2 flashing dots will stop flashing. P5 SETTING THE ALARM TIME 1. Set the Clock Setting Switch (#5) to the "ALM" position. The 2 dots between the hour and minutes will begin flashing. 2. Rotate the Rotary Set Dial (#8) counterclockwise or clockwise for adjusting the hour or minute for the alarm respectively. 3. Once the alarm is adjusted to the desired wake-up time, set the Clock Setting Switch (#5) to "RUN" position. The 2 flashing dots will stop flashing. 4. Note: Do not rotate the dial too quickly when you are setting the clock or alarm to insure desired time and alarm settings. ALARM OPERATION Set the ON/AUTO/OFF Switch (#6) to the "AUTO" position. The AUTO Indicator (#20) will light. - WAKE TO RADIO Set the radio Tuning Control Knob (#10) to the station you wish to listen to when the alarm time is reached. Set the Volume/Buzz Knob (#12) to a desired volume level. The radio will now turn on at the selected alarm time. - WAKE TO BUZZER Slide the Volume/Buzz Knob (#12) to the BUZZ position. The buzzer will now turn on at the selected alarm time. TIME SETTING FOCUSING FOR PROJECTION CLOCK - To set the hours, simultaneously press and hold the Hour Button (#16) and the Time Button (#18). Keep them depressed until the desired hour digits are displayed. - To preset the minutes, simultaneously press and hold the Minute Button (#15) and the Time Button (#18). Keep them depressed until the desired minute digits are displayed. - Focusing: Adjust the projection clock clarity by turning the Focus Adjustment Knob (#17) until the projected time is clearly shown on the ceiling or wall. Note: 1. The LED Digital Clock and the Projection Clock must be set separately. 2. The projected time is visible on a ceiling or wall in a darkened room. The maximum projection distance is 3-9 feet. P6 SNOOZE FUNCTION 1. When your alarm (buzzer or radio) sounds, you can press the Snooze Button (#3) to extend the alarm time by 9 minutes. The buzzer or radio will then turn on again once the 9 minutes expires. 2. This can be repeated until the ON/AUTO/OFF Switch (#6) is moved to the "OFF" position. SLEEP TIMER OPERATION 1. This clock radio is equipped with a "sleep timer" function that will switch off the radio automatically after a selected period anywhere from 1 minute up to 1 hour and 59 minutes. 2. Press the Sleep Button (#9), and then rotate the Rotary Set Dial (#8) clockwise to extend the operation period between 1 minute and 59 minutes or rotate it counterclockwise to set the sleep time in the range of 1 hour 59 minute). 3. After the selected sleep time has elapsed, the radio will automatically turn off. 4. To turn the unit off before the sleep time expires, press the Snooze Button (#3). SLEEP AND WAKE TO RADIO 1. Set the desired alarm time as described in the section "SETTING THE ALARM TIME". 2. Tune the radio to your desired channel. 3. Set your desired sound volume and sleep time as described in the above section. 4. Switch the ON/AUTO/OFF Switch (#6) to "AUTO" position. The AUTO Indicator (#20) will light. 5. The radio will switch off after the sleep time has elapsed and on after the alarm time reaches. CARE AND MAINTENANCE 1. Clean the unit with a soft, damp (never wet) cloth. Solvent or detergent should never be used. 2. Avoid operating your unit under direct sunlight or in hot, humid or dusty places to reduce the risk of fire or electric shock. 3. Keep your unit away from heating appliances and sources of electrical noise such as fluorescent lamps or motors. 4. For better Clock Display clarity, avoid operating the unit under direct sunlight or in strong room illumination. 5. Unplug the unit from the electrical power outlet immediately in case of malfunction. P7 SERVICE Please refer to the instructions on the enclosed warranty card for returning your unit for service. When returning the unit, please remove batteries to prevent damage to the unit in transit and/or from possible battery leakage. We are not responsible for batteries returned with the product or for the cost of replacement. Distributed by: Spectra Merchandising International, Inc. Chicago Industry Tech Park 4230 North Normandy Avenue Chicago, IL60634, U.S.A. Please have model number ready, for Customer Service, call 1-800-777-5331 Printed in China 720-J012 P8
-
 1
1
 |
 |