Kenmore 4027 Use and Care Guide
Kenmore 4027 - 4.0 cu. Ft. Front-Load Washer Manual
 |
UPC - 719192272040
View all Kenmore 4027 manuals
Add to My Manuals
Save this manual to your list of manuals |
Kenmore 4027 manual content summary:
- Kenmore 4027 | Use and Care Guide - Page 1
® Front.Loading Automatic Use & Care Guide Washer Lavadora autom&tica de carga frontal Manual de uso y cu Laveuse automatique & chargement Guide d utlllsat_on et d entrewen frontal ModelslModelos_od_les 796.4027* * = color number, nL_mero de color, numero de couleur Designed to use only - Kenmore 4027 | Use and Care Guide - Page 2
the Drain Hose '10 Connect to the Power Supply t 0 Leveling the Washer 11 lnstaBation of non-skid pads (optiona0 11 HOW TO USE iiiiiiiii Ci!onitiro!liiP!aineliiF!eiaitiurie:si! 12 Operating the Washer 13 ijjii!ii!!!!!ii i!i!!ili! Cycle Guide t4 _rting Wash Loads 15 - Kenmore 4027 | Use and Care Guide - Page 3
with controls. • Do not repair or replace any part of the washer or attempt any servicing other than as described in this manual. We strongly recommend that any service be performed by a qualified individual. • See Installation Instructions for grounding requlrements. • ALWAYS follow the fabric care - Kenmore 4027 | Use and Care Guide - Page 4
be careful not to pinch, crush, or damage the power cord. Faiiure to follow this warning can cause serious injury,fire, eiectfica] shock, or death. • The washer must be installed and electrically grounded by a qualified service porson in accordance with Iocalcodes to prevent shock hazard and assure - Kenmore 4027 | Use and Care Guide - Page 5
to the washing compartment to avoid the danger of children or small animals getting trapp_ inside before your washer is remov_ from service or discarded. shock, or death. 3oprong grounding t_e wall receptacle -.. GROUNDING INSTRUCTIONS This appliance must be grounded, in the event of malfunction - Kenmore 4027 | Use and Care Guide - Page 6
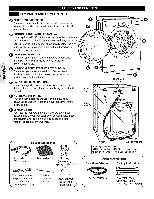
or retrieve lost items without a service call. LEVELING FEET Four leveling feet (two in the front and two in the back) adjust to improve washer stability on uneven floors. Feet are adjusted and locked in place using the adjusting wrench included with the washer. Power Cord Drain Hot and Cold Water - Kenmore 4027 | Use and Care Guide - Page 7
rigid enough to support the weight of the washer, when fully loaded, without flexing or bouncing. If your floor has too much flex in it, you may need to reinforce it to make it more rigid. A floor that is adequate for a top-loading washer may not be rigid enough for a front loading washer, due to - Kenmore 4027 | Use and Care Guide - Page 8
to remove the foam tub support in the middle of the carton base. See drawing below. If you must lay the washer down to remove the base packaging materials, always protect the side of the washer and lay it carefully on its side. DO NOT lay the washer on its front or back. To prevent - Kenmore 4027 | Use and Care Guide - Page 9
never be installedor stored [n a location subject to freezing temperatures. Damage to the water lines and internal mechanisms of the washer can result. If the washer was expo_d to freezing temperatures priorto installation, allow it to stand at room temperature for several hours before use and che_ - Kenmore 4027 | Use and Care Guide - Page 10
elbow bracket, mold, or microorganisms could spread to the inside of the washer. Floor Drain ,,,J insert the end of the drain hose into the floor drain. Secure the hose to prevent it from moving. CONNECT TO POWER SUPPLY Washer should be plugged into a 120-VAC, 60-Hz. grounded 3-prong outlet. Plug - Kenmore 4027 | Use and Care Guide - Page 11
4 leveling feet are in firm contact with the floor. NOTE: To make sure that the washer is properly level, run the washer with a test load: place a medium-sized load of laundry in the machine. Then press POWER, select RINSE+SPIN, and then press the START/PAUSE button. See the following sections for - Kenmore 4027 | Use and Care Guide - Page 12
manual, including the Important Safety Instructions, before operating this washer. CONTROL PANEL FEATURES ® () q) O POWER (ONJOFF) BUTTON Press to turn the washer ON. Press again to turn the washer OFF. NOTE: Pressing the POWER button during a cycie will cancel that cycle and any load guide - Kenmore 4027 | Use and Care Guide - Page 13
drawer and add Odetergent to the main wash compartment in the dispenser drawer, Add bleach and fabric softener as desired. See pages 16 and 17 for important information on detergents and dispenser use, O TURN ON THE WASHER Press the POWER button to turn on the washer. The lights around the Cycle - Kenmore 4027 | Use and Care Guide - Page 14
CYCLE GUIDE The cycle guide below shows the default settings, Low Medium Lightly soiled clothing Wash and small loads 2O Small loads of cotton, Cold linen, towels, shiM, 63 Clean sheets, jeans, mixed loads Cold,old Warm!Cold WarmPHarm No S#n Low Medium High ExtraHigh No S_n Low - Kenmore 4027 | Use and Care Guide - Page 15
clothes. • Pretreat heavily stained areas for best results. • Combine large and small items in a load. Load large items first. • Large _ems should not be more than half of the totai wash load. • The washer can be fully loaded, but the drum shouid not be tightly packed with items. The door of the - Kenmore 4027 | Use and Care Guide - Page 16
manually cleaned out. See Maintenance on page 23. Main Wash Detergent Compartment This compartment holds laund@ detergent for the main wash cycle; this detergent is added to the load at the beginning of the cycle. Always use HE (High-Efficiency) detergent with your washing machine the washer. Either - Kenmore 4027 | Use and Care Guide - Page 17
such as detergent, bleach, or liquid fabric softener, on top of your washer or dryer. Wipe up any spills [mmediateiy.These products can damage the finish and washing machine is designed for use with only High-Efficiency (HE) detergents. HE detergents are formulated specifically for front-load washers - Kenmore 4027 | Use and Care Guide - Page 18
unlocked by pressingthe START/PAUSE to pause the washer. NOTE: • If the temperature in the washer is too high, the door cannot be unlocked until the washer has cooled. , If the water level is too high, the door will not unlock. To drain the water, cycle the power off/on, then press the spin speed - Kenmore 4027 | Use and Care Guide - Page 19
desired value is lit, The washer automatically adjusts the water level for the type and size of wash load for best results and maximum efficiency The Drain & Spin cycle: 1. Press the POWER button to turn on the washer. 2o Press the SPIN SPEED button to select the desired spin speed, For drain only, - Kenmore 4027 | Use and Care Guide - Page 20
washer has shut off, the power button will allow the machine wash tub over time and can lead to a mildewy or musty smell. The CLEAN CleonWo_r WASHER cycle is specially designed to remove this buildup using bleach or other cleaner designed specifically for cleaning front load washers. The CLEAN WASHER - Kenmore 4027 | Use and Care Guide - Page 21
entire manual, including the Important Safe_ Instructions, _fore o_rating this washer, • Unplug the washer _fore care of your washer can extend its life, The outside of the machine can be cleaned the _pty wash drum. Cbse _r. Saiel t_hte wthaetesrp.in cycle and let was_r spin for 1 minuteto drain out - Kenmore 4027 | Use and Care Guide - Page 22
REGULAR CLEANING (cont.) Cleaning the Dispenser The dispenser should be cleaned periodicafly to remove buildup of detergent and other laund_ products that can cause the dispenser not to dispense the ]aundpj product properly. ! ! 1. Pull the dispenser drawer out until it stops. f ,,J 3. Remove the - Kenmore 4027 | Use and Care Guide - Page 23
that may get into the valves with the water supply, Operating the washer with the filters removed could cause a valve to fail open resulting warranty. 2. Care_J]]yremove the fi_tersfrom the water valves and soak them in white vinegar or a lime scale remover, following the manufa_urer's instructions - Kenmore 4027 | Use and Care Guide - Page 24
causing damage to the pump. If the washer fails to drain properly, unplug the washer and allow the water to _o], if necessary, before proceeding, 1, Open the drain pump filter access pane], 3, Remove the plug from the drain hoE, and allow the water to drain completely. NOTE: If there is a large - Kenmore 4027 | Use and Care Guide - Page 25
Humming or gurgling: Drain pump pumping water from the washer at the end of a cycle, Clothes tumbling in the drum during the wash and rinse cycies. BEFORE CALLING FOR SERVICE Your washingmachine is equipped withan automatic error-mon_oring system to detect and diagnose problems at an early stage - Kenmore 4027 | Use and Care Guide - Page 26
BEFORE CALLING FOR SERVICE (cont.) Cheek if.,, Were bleach or softener added directly to the wash load in the drum? Washer not unloaded promptly. Clothes not properly sorted, Then.,, Laundry chemicals must be loaded into the dispenser_ Always remove items from the washer as soon as possible after - Kenmore 4027 | Use and Care Guide - Page 27
washer to coo] until the DOOR LOCK indicator turns off on the display. Allow the washer to complete the programmed cycle, or press the CANCELJDRA]Nbutton to drain the water, Wash ) etergent in a_rdance with the manufacturer's instructions. Run the CLEAN WASHER cycle regularly. Be sure to wipe around - Kenmore 4027 | Use and Care Guide - Page 28
the load after the door unl_ks. The washer has an imbalance detection and correction system If individual heavy articles are loaded (bath persists, call for service. The display shows: Check if.,, A powerfailure has o_urred. Then,,, If the power to the washer has been interrupted during - Kenmore 4027 | Use and Care Guide - Page 29
Sears will NOT pay for: 1. Ex_ndable items that can wear out from normal use, including but not limited to filters, belts, light bulbs, and bags. 2. A service technician to instruct the user This warranty applies only while this appliance is used in the United States or Canada. This warranty gives
-
 1
1 -
 2
2 -
 3
3 -
 4
4 -
 5
5 -
 6
6 -
 7
7 -
8
-
9
-
10
-
11
-
12
-
13
-
14
-
15
-
16
-
17
-
18
-
19
-
20
-
21
-
22
-
23
-
24
-
25
-
26
-
27
-
28
-
29
 |
 |

®
Front.Loading
Automatic
Washer
Use & Care Guide
Lavadora
autom&tica
de
carga
frontal
Manual
de
uso y cu
Laveuse
automatique
&
chargement
frontal
Guide
d
utlllsat_on
et d entrewen
ModelslModelos_od_les
796.4027*
*
= color
number,
nL_mero de color, numero
de couleur
==
iiiiZ:!!_
¸
Designed
to use only
HE
High
Efficiency
detergent
DiseSado
para
utilizar
solamente
detergente
de alta
eficacia
Con_u
pour
i'utilisation
d'un
d6tergent
haute
efficacit6
seulement
iiiii_i
MFL625268_
Sears
Brands
Management
Cor_ration,
Hoffman
Estates,
IL
60179
_ars
Canada
Inc,,
Toronto,
Ontario,
Canada
M5B
2B8
WWW,
_ars
.CO m
www,_ars,ca