Kenmore 5478 Use and Care Guide - Page 14
order, ORDER, replace, REPLACE
 |
UPC - 883049131900
View all Kenmore 5478 manuals
Add to My Manuals
Save this manual to your list of manuals |
Page 14 highlights
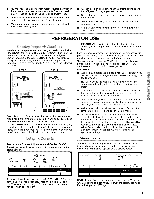
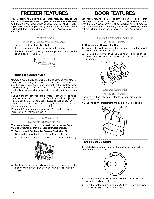
• There will be water in the filter. Some spilling may occur. The water filter status light will help you know when to change your water filter. When the water filter status display changes from "GOOD" to "ORDER," this tells you that it is almost time to change the water filter cartridge. Replace the water filter cartridge when the water filter status display changes to "REPLACE." If water flow to your water dispenser or ice maker decreases noticeably, change the filter sooner. The filter should be replaced at least every 6 months depending on your water quality and usage. To change the filter, see "Water Filtration System." INDICATOR: STATUS: NEW or GOOD (green) New filter installed ORDER (yellow) Order filter REPLACE (red) OR when water flow decreases Replace water filter After changing the water filter, reset the status light by pressing and holding the FILTER button for 3 seconds. The status light will change from Replace (red) to New/Good (green) when the system is reset. Style 1 Style 2 l,_new good order replace PRESS & HOLD TO RESET _ GOOD ORDER REPLACE Filter Status _J!_e[ I:::'_II[:_,to[ .,,,,y;s.,,
-
 1
1 -
2
-
3
-
4
-
5
-
6
-
7
-
8
-
 9
9 -
 10
10 -
 11
11 -
 12
12 -
 13
13 -
 14
14 -
 15
15 -
 16
16 -
 17
17 -
 18
18 -
 19
19 -
20
-
21
-
22
-
23
-
24
-
25
-
26
-
27
-
28
-
29
-
30
-
31
-
32
-
33
-
34
-
35
-
36
-
37
-
38
-
39
-
40
-
41
-
42
-
43
-
44
-
45
-
46
-
47
-
48
-
49
-
50
-
51
-
52
-
53
-
54
-
55
-
56
-
57
-
58
-
59
-
60
-
61
-
62
-
63
-
64
-
65
-
66
-
67
-
68
-
69
-
70
-
71
-
72
-
73
-
74
-
75
-
76
-
77
-
78
-
79
-
80
-
81
-
82
-
83
-
84
 |
 |
