Kenmore 7929 Use and Care Guide - Page 12
the Hinge Pin from the Bottom Hinge. Reattach
 |
View all Kenmore 7929 manuals
Add to My Manuals
Save this manual to your list of manuals |
Page 12 highlights
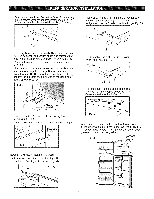
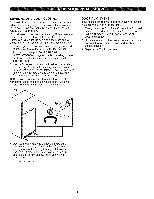
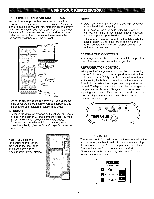
REVERSEAND REATTACHREFRIGERATORDOOR • Using a 1A-inch socket wrench, loosen and remove Hinge Pin from the Middle Hinge Pin Bracket. Remove washer underneath the middle hinge and set aside NOTE: At this point the door will be loose, lift up door slightly and remove it. (Fig. 20 and 20a). ° REMOVE base grill. See BASE GRILL INSTRUCTIONS on page 8. • Remove the washer from the Bottom Hinge Pin (Fig. 22). o Using a 1A-inch socket wrench, loosen and remove the Hinge Pin from the Bottom Hinge. Reattach the Hinge Pin to the opposite side of the Hinge (see Fig. 22 and 22a). NOTE: This is easier to do while the Hinge is still attached. Fig. 22 Fig. 20a 22a Loosen and remove the 2 bolts and the phillips head screw to remove the Middle Hinge Bracket from refrigerator housing (Fig. 21). Set parts aside. Using 10mm or 13/32-inch socket wrench with 2-inch extension, loosen the 3 bolts and remove the Bottom Hinge from right side of housing (Fig. 23). 12
-
 1
1 -
2
-
3
-
4
-
5
-
6
-
 7
7 -
 8
8 -
 9
9 -
 10
10 -
 11
11 -
 12
12 -
 13
13 -
 14
14 -
 15
15 -
 16
16 -
 17
17 -
18
-
19
-
20
-
21
-
22
-
23
-
24
-
25
-
26
-
27
-
28
-
29
-
30
-
31
-
32
 |
 |
